Xara X. The Bitmap Gallery (Continued)
|
|||||||||||
Xara X. The Bitmap Gallery (Continued) |
|||||||||||
|
|
|||||||||||
|
|||||||||||
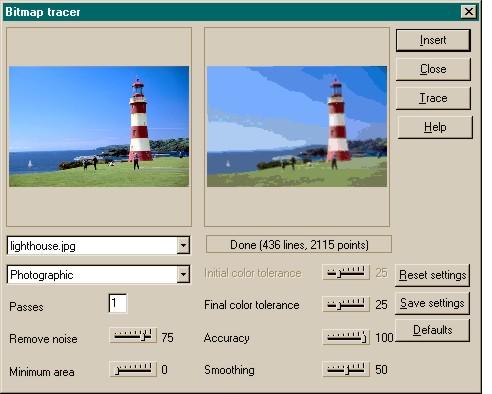
To trace a bitmap, select the bitmap in the Bitmap Editor then press the Trace button to open the
Bitmap Tracer dialog (shown above). Experiment with the settings and press Trace to see a preview of how the final traced object will look. When you are satisfied with the settings, press Insert
to place the grouped, traced objects onto the screen. Here is a quick summary of the settings. The first of the two drop down lists contains a list of the bitmap images in the gallery for you to select from. (You can
also select from the thumbnail images in the gallery). The second drop down list determines the type of bitmap being traced and includes: Monochrome, for black and white or two-color images, Grayscale
, for black and white photographic images, Limited Color, for bitmaps with flat, poster-like areas of color, and Photographic, for color photographic images. Select the setting that best suits
your selected bitmap. Xara varies the default settings based upon these choices. Passes: The default is 1. Increasing the number of passes forces the tracer to add
more detail with each subsequent pass. More passes can produce a better image, but the trade off is more computer memory and disc space are required. Remove Noise:
The higher this setting, the more small artifacts will be removed. Minimum Area: This refers to the smallest sized area that will be traced. The
lower this setting, the smaller the shapes that will be traced and the more detail will be added to the final trace. Color Tolerance: Determines how accurately the trace will try to replicate the
actual colors in the bitmap image. Accuracy: The higher this setting, the more control points will be added to the traced shapes. The final image will be more accurate but more system memory and
hard disc space will be used. Smoothing: This setting determines the degree of smoothness when tracing curved shapes. Higher settings result in smoother shapes, but at an overall loss of detail. Remember, the Help button is context-sensitive and can explain all the settings in greater detail. |
|
|
|
 Trace can also be used to create vector versions of bitmap logos. As in the case of the lighthouse image shown above, the
larger the bitmap image, and/or the higher the bitmap's resolution, the more accurate the final tracing. In the example shown above, the original logo (left) was
converted to bitmap, same size at 96 dpi (Windows screen resolution). The resulting vector logo does not bear much resemblance to the original and, is for all
intents and purposes, unusable. The second tracing resulted from a bitmap that was four times larger than the original. The vector elements have been reduced to the
same size as the original logo and offer a slightly more acceptable image. If the traced bitmap had been 800% of the original size, the tracing would have been
much more acceptable. But the reality is, tracing is not always the best way to get professional results. In cases where a professional-quality vector logo needs to be
created from a bitmap logo, taking the time to recreate the logo using Xara's drawing and text tools is the best solution.
Trace can also be used to create vector versions of bitmap logos. As in the case of the lighthouse image shown above, the
larger the bitmap image, and/or the higher the bitmap's resolution, the more accurate the final tracing. In the example shown above, the original logo (left) was
converted to bitmap, same size at 96 dpi (Windows screen resolution). The resulting vector logo does not bear much resemblance to the original and, is for all
intents and purposes, unusable. The second tracing resulted from a bitmap that was four times larger than the original. The vector elements have been reduced to the
same size as the original logo and offer a slightly more acceptable image. If the traced bitmap had been 800% of the original size, the tracing would have been
much more acceptable. But the reality is, tracing is not always the best way to get professional results. In cases where a professional-quality vector logo needs to be
created from a bitmap logo, taking the time to recreate the logo using Xara's drawing and text tools is the best solution.
 PaintShop Pro and other related applications. However plug-in
filters that modify an entire bitmap image, such as Sean Sedwards' Emboss filter, shown above, and available in the
PaintShop Pro and other related applications. However plug-in
filters that modify an entire bitmap image, such as Sean Sedwards' Emboss filter, shown above, and available in the