 |
 |
 |
 |
 |
 |
 |
Tutorial -- Creating an Image Swap with Macromedia Fireworks 3
The image swap we will be creating today uses four Frames and two layers. Frame 1 is the frame we see at first. Frame 2 contains the mouse over image, Frame 3
contains the swap image and text for mouse over A. Frame 4 contains the swap image and text for mouse over B. Easy enough. But then there are the Layers! Layer 2
is automatically created when we create the initial mouse over effects and contains both rollover buttons. Layer 1 is then empty. Why Layer 2 is created while
Layer 1 remains unpopulated is beyond my capacity to understand. I'm sure there is a reason, just none I can see. The two swap images are placed on Layer 1. With this
preface, let's begin the tutorial. Just follow the steps and don't ask why, OK?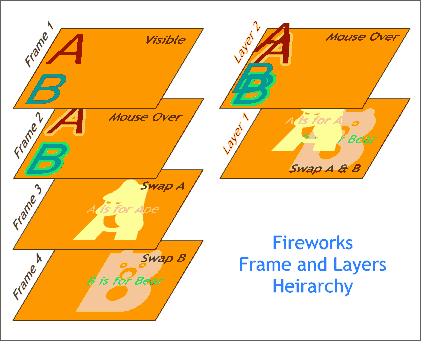 You're probably quicker
than I am, but I had a bit of trouble getting the hang of creating image swaps. The reason was, I think, my confusion between Layers and Frames, both of which are used by Fireworks. So after many attempts here
is what I discovered.
You're probably quicker
than I am, but I had a bit of trouble getting the hang of creating image swaps. The reason was, I think, my confusion between Layers and Frames, both of which are used by Fireworks. So after many attempts here
is what I discovered.
Use the same settings shown on the left. Fireworks offers two ways to specify color. The default shown here, is Hexadecimal. If you know the Hexadecimal values for all the 216
non-dithering colors, cool. If not, click the color wheel icon and you can enter the RGB values. Make the background color FF9900 or RGB 255 153, 0. Press OK.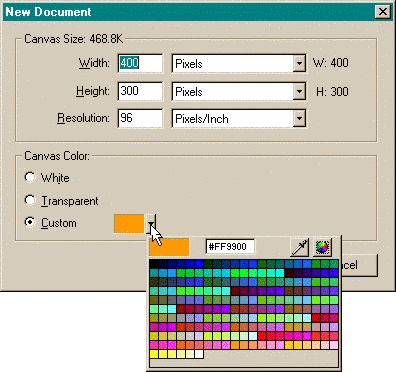 Open Fireworks and from the
File menu select New.
Open Fireworks and from the
File menu select New.
Select the Text Tool and click in the Up tabbed section window of the New Button dialog to open the Text Editor
(shown here). Key in a capital A. Set the size to 72 point and the font to a sans serif font. I've used Microsoft's Trebuchet. Click the color button and change the color to RGB 102, 0, 0. From the Insert menu, select
New Button. The New Button dialog opens (shown below). The New Button dialog can create a simple rollover effect (Up and Over) or a complex rollover (Up, Over, Down, and
Over While Down). For this tutorial, we'll create a simple rollover effect.
From the Insert menu, select
New Button. The New Button dialog opens (shown below). The New Button dialog can create a simple rollover effect (Up and Over) or a complex rollover (Up, Over, Down, and
Over While Down). For this tutorial, we'll create a simple rollover effect.
NOTE: Text edits, as with Xara, have to be made with the text highlighted.
The text is placed in the New Button dialog (shown here). Note the tabbed sections for the other button states. Active Area automatically selects the hotspot area. Press the Over tab.
You might notice there is nothing there. Press the Copy Up Graphic button (in the bottom right portion of the Over tabbed section). This copies and pastes the image from the Up state into the Over
tabbed section where we can add a mouse over effect.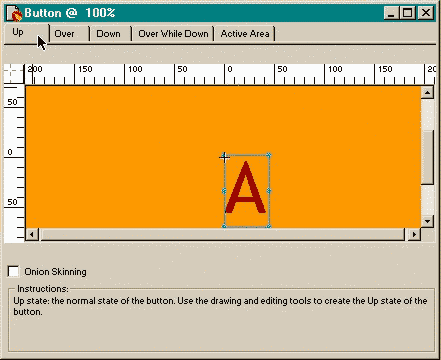 Press OK to exit the
Text Editor.
Press OK to exit the
Text Editor.
NOTE: You can also create custom images in Xara and export them in the Adobe Illustrator AI format and Import them into the Button dialog.
While you are here, preview some of the other effects. When you are done previewing, select Drop Shadow. We now have the two button states, Up and Over. Press the X button to close the dialog.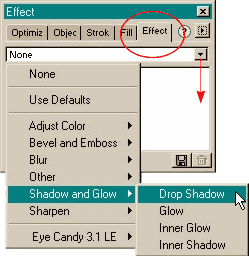 Make sure that you are in the
Over window. Select the A, then select the Effect menu. (Window > Effect) From the drop down list, select Shadow and Glow > Drop Shadow.
Make sure that you are in the
Over window. Select the A, then select the Effect menu. (Window > Effect) From the drop down list, select Shadow and Glow > Drop Shadow.
The tutorial continues on the next page >