 |
 |
 |
 |
 |
 |
 |
Fitting Text to a Curve
Fitting text to a curve (or path) in Xara is quite easy. Most readers probably already know how to do this but a little review is always good. And for new users, we will lift the veil of mystery.
To type directly on a curve, select the curve with the Selector Tool, select the Text Tool and click on the left side of the path. The text
cursor changes from the crosshair to the text cursor. When you click the path, the Insertion Cursor changes to a red line. Start typing. That's it.
Xara treats the place where the cursor is first inserted as the left margin, even if there is more of the curve as shown in the last example. You can use the text alignment options found on the Infobar when the Text Tool
is selected, to align the text on the path. But again, if the first click was not placed on the very left end of the curve, the text will only be aligned between the insertion point and the end of the path. On the
other hand, you might want your text to start further in. If you make a mistake, select the text then select Remove Text from Curve from the Arrange pull down menu.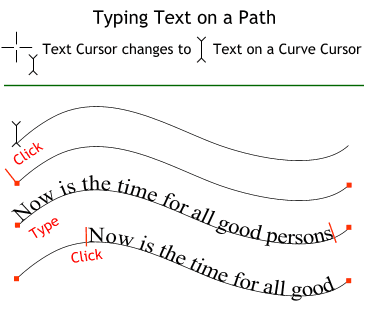 There are two ways to place text
on a curve. The first method is the direct method.
There are two ways to place text
on a curve. The first method is the direct method.
To do this, select the curve with the Selector Tool, select the text, and from the Arrange
pull down menu, select Fit Text to Curve. If you alter the path (Ctrl click to select the path) the text will automatically reflow. To remove the text from the curve, select Remove Text from Curve from the
Arrange menu.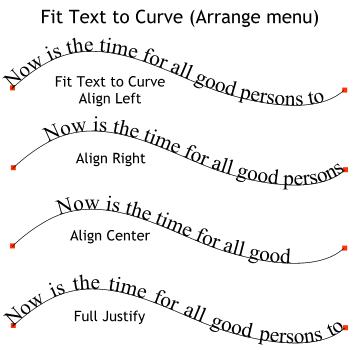 The second way to fit text to a path is to use the Fit Text to Curve command in the Arrange menu.
![]() Use the Text aligment buttons on
the Infobar to align the text on the curve.
Use the Text aligment buttons on
the Infobar to align the text on the curve.
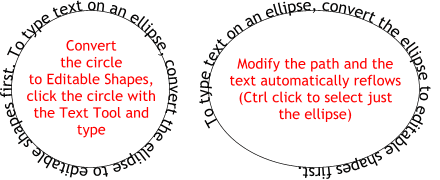 Adding text to a circle or
rectangle, or Quick Shapes object work the same way as entering text on a curve, with this exception, the shape must first be converted to editable (no not edible -- editable) shapes. (Arrange >
Convert to Editable Shapes). Arrange > Fit Text to Curve works too.
Adding text to a circle or
rectangle, or Quick Shapes object work the same way as entering text on a curve, with this exception, the shape must first be converted to editable (no not edible -- editable) shapes. (Arrange >
Convert to Editable Shapes). Arrange > Fit Text to Curve works too.