 |
 |
 |
 |
 |
 |
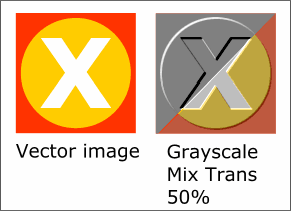
Center the grayscale bitmap on top and with just the bitmap selected, select the
Transparency Tool (the wine glass) and from the drop-down list on the Infobar select Flat, Mix and 50%. I've done a cutaway to show the before and after effect.
Notice that while the effect is pronounced, the colors have become muted. While this is nice, we can do better Make a duplicate of the black, gray and white vector image. Select the duplicate vector image and change the colors as shown on the far left.
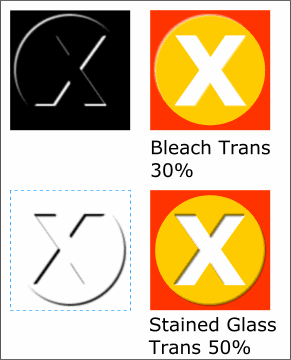
Select the second bitmap and from the Plug-ins menu select Emboss > Shadows. You will now have an image like the one on the bottom left.
Center the black (highlights) bitmap on top of the colored vector image. With just the bitmap selected, select the Transparency Tool (the wine glass) and apply a Flat, Bleach Transparency, amount
30%. Now center the white bitmap (shadows) on top and with just the white bitmap selected, apply a Flat, Stained Glass Transparency, a This is how the vector image looks now with the two bitmaps placed on top. Compare this to the grayscale bitmap transparency and you'll see a world of difference.
Why is that? Xara's Bleach transparency (also known as Additive) makes black totally invisible so just the non-black grayscale values are applied to the image. Adjusting the setting to 30%
prevents the highlights from appearing too white. Xara's Stained Glass Transparency (also known as Subtractive) make white invisible and only
applies the non-white grayscale values. Adjusting the slider setting to 50% keeps the shadows from being too black and artificial looking. The upshot is by using the highlight and shadow bitmaps and Bleach and
Stained Glass transparency, only the shadow and highli You can apply these emboss bitmaps over any image, as illustrated on the right. Be sure to check out all the shareware filters in the Shareware
section. And if you have invented any plug-in filters that you would like to share or sell, contact me and give me a description of the filter and how it works.  Make another bitmap from the black, white and gray vector image. Now make a duplicate of the bitmap so you have two bitmap images. Select the first bitmap and from the Plug-ins menu, select Emboss > Highlights
. Press OK. You will have an image like the one on the top left.
 mount 50%.
  ght portions of the image are affected leaving the rest of the colors
unchanged.