


 Next we’ll look at the Publishing process. All series 7 products let you
publish your website from within the program. But not all web-hosts
have the same settings. So before you set up your Publish settings, it is
best to check with your web host.
Here is a link to GoDaddy.com’s FTP requirements. GoDaddy is one of
the larger web hosting companies and their instructions are quite clear.
If you do not understand how to configure the publish settings or if you
are having problems, contact your web host and make sure that all of
your settings are correct for their requirements.
Next we’ll look at the Publishing process. All series 7 products let you
publish your website from within the program. But not all web-hosts
have the same settings. So before you set up your Publish settings, it is
best to check with your web host.
Here is a link to GoDaddy.com’s FTP requirements. GoDaddy is one of
the larger web hosting companies and their instructions are quite clear.
If you do not understand how to configure the publish settings or if you
are having problems, contact your web host and make sure that all of
your settings are correct for their requirements.
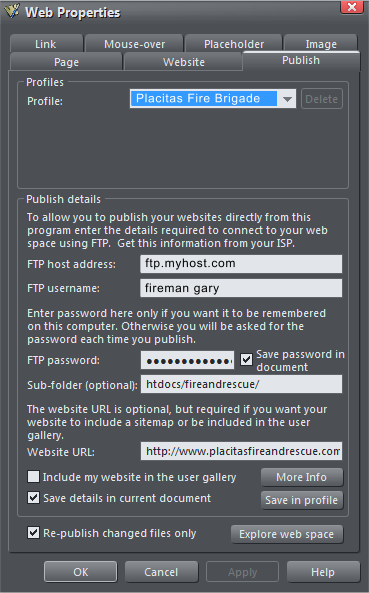 Inside the Web Properties options are the Publish settings. The screen
shot above is for a website I manage for our local volunteer fire
brigade. You can use this for reference. The required information
includes and for the most part will be provided by your web hosting
company: FTP Host Address This is the URL to the server where you
will publish your files. Your FTP User Name is provided by your web
host and used when you log on to your account. The FTP Password is
also assigned by your web host and you need it to access your files. This
is quite often a different user name and password than you use to
access your account e-mail account for example.
If you check Save Password in Document, you won’t have to enter this
every time you publish. If you share a computer at work, it is best not
to check this option. Some web hosts, including mine, Network
Solutions, require your files to be placed in a Sub Folder. Network
Solutions uses a folder called htdocs/ And as I manage several dozen
websites, I have a separate sub folder for each account. Check with
your web host to see if you need to publish to a sub menu.
If you include your Website URL (just the home page), Xara will create
a Site Map which makes it easier for search engines like Google to
index your site’s content. You can opt to have Xara include your
website in their User Gallery. Press More Info to learn more about this
program. Save Details in Current Document saves all this FTP
information with the document so you don’t have to enter it each time
you publish. If you click Save in Profile you can name these settings
and access them from the drop down list at the top of the menu. (Save
Profile is not available in Photo and Graphics Designer 7).
If you check Re-publish Changed Files Only, then after the initial
publishing of your site, Xara will only publish files that have changed.
And finally Explore Web Space (not available in Photo and Graphic
Designer) lets you delete files from the web host’s server.
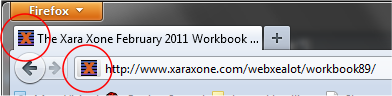
Version 7 products can now automatically create those cute little
custom icons that appear in the tabs and web address section of your
document. These icons are called favicon and are a breeze to create.
Create a small square design. Click the yellow Names tag icon and
name the design favicon. When you publish your site Xara resizes the
image and adds it to your site and it will appear as shown above as well
as next to your website if someone adds a bookmark for your page.
Inside the Web Properties options are the Publish settings. The screen
shot above is for a website I manage for our local volunteer fire
brigade. You can use this for reference. The required information
includes and for the most part will be provided by your web hosting
company: FTP Host Address This is the URL to the server where you
will publish your files. Your FTP User Name is provided by your web
host and used when you log on to your account. The FTP Password is
also assigned by your web host and you need it to access your files. This
is quite often a different user name and password than you use to
access your account e-mail account for example.
If you check Save Password in Document, you won’t have to enter this
every time you publish. If you share a computer at work, it is best not
to check this option. Some web hosts, including mine, Network
Solutions, require your files to be placed in a Sub Folder. Network
Solutions uses a folder called htdocs/ And as I manage several dozen
websites, I have a separate sub folder for each account. Check with
your web host to see if you need to publish to a sub menu.
If you include your Website URL (just the home page), Xara will create
a Site Map which makes it easier for search engines like Google to
index your site’s content. You can opt to have Xara include your
website in their User Gallery. Press More Info to learn more about this
program. Save Details in Current Document saves all this FTP
information with the document so you don’t have to enter it each time
you publish. If you click Save in Profile you can name these settings
and access them from the drop down list at the top of the menu. (Save
Profile is not available in Photo and Graphics Designer 7).
If you check Re-publish Changed Files Only, then after the initial
publishing of your site, Xara will only publish files that have changed.
And finally Explore Web Space (not available in Photo and Graphic
Designer) lets you delete files from the web host’s server.
Version 7 products can now automatically create those cute little
custom icons that appear in the tabs and web address section of your
document. These icons are called favicon and are a breeze to create.
Create a small square design. Click the yellow Names tag icon and
name the design favicon. When you publish your site Xara resizes the
image and adds it to your site and it will appear as shown above as well
as next to your website if someone adds a bookmark for your page.
 Mouse Over Image - For Zoom View
Eyecatcher Widgets (not available in Photo and Graphic Designer 7)
add a professional touch to your site, such as the Cloud Tint Zoom
widget shown above. The zoom widgets let your visitors see close up
details while taking up a small amount of space. There are quite a
variety in the Designs Gallery > Widgets folder. To add one to your site,
drag the widget onto the page, double click to open the editing
window, then follow the instructions. Most of the time you are dropping
an image or images onto an existing image. Press the Save disc icon
(remember those 3.5” floppies?) at the top of the edit window and
you’re good to show.
Mouse Over Image - For Zoom View
Eyecatcher Widgets (not available in Photo and Graphic Designer 7)
add a professional touch to your site, such as the Cloud Tint Zoom
widget shown above. The zoom widgets let your visitors see close up
details while taking up a small amount of space. There are quite a
variety in the Designs Gallery > Widgets folder. To add one to your site,
drag the widget onto the page, double click to open the editing
window, then follow the instructions. Most of the time you are dropping
an image or images onto an existing image. Press the Save disc icon
(remember those 3.5” floppies?) at the top of the edit window and
you’re good to show.

 Create a square
icon and name it
favicon
Create a square
icon and name it
favicon
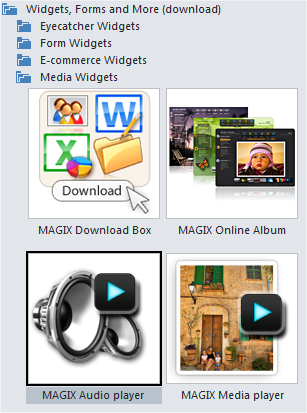
 How about sound, you ask. How can I create a cool media player like
the one shown above? And what’s it going to cost me? (You ask a lot of
questions). Listen up and I’ll walk you through it.
How about sound, you ask. How can I create a cool media player like
the one shown above? And what’s it going to cost me? (You ask a lot of
questions). Listen up and I’ll walk you through it.
 Drag the
MAGIX Audio
Player onto
the page
Drag the
MAGIX Audio
Player onto
the page
 Open the Designs Gallery > Widgets > Media Widgets folder. Select the
MAGIX Audio Player image and drag it onto the page.
A dialog appears asking for you to sign in to your MAGIX account. If you
don’t have one, you can create a FREE account. It is painless and no
salesman will call. At least none have called on me.
The process is fairly straight forward. You audition media players (click
on the image to see the media player full size0. There are dozens in all
shapes, sizes and colors. There is something for everybody.
After you select the media player, go to the next screen (use the
buttons at the top of the window), select Audio and upload the MP3
selections you wish to play. I have picked a few original tunes created
by Vic Hauer, a talented Xara user. Once you have uploaded and added
the music (I am not sure but it might reside on the MAGIX servers after
you upload it), then you can accept or reject the offer from MAGIX of
unlimited fun for under $5.00, and finalize the player. When you press
Insert, it takes a few moments, and then the player appears.
NOTE: When your page loads it may take a few moments for the
player to appear. And look at the player in Outlines View
(Window > Quality > Outlines) The player’s size might be larger
than it appears on the page and if there is anything overlapping
the player’s actual footprint, the page will not load and the player
will not appear.
There are lots of useful and cool things in the Designs Gallery including
Forms, Maps, social media, e-commerce and other assorted widgets.
Not all are very easy to figure out and some I have had absolutely no
luck with. But there are also lots of free and inexpensive solutions that
you can find on Google, or on sites like Twitter and Facebook that you
can add to your site using a placeholder. Plus there is a excellent supply
of free clip art, photo clip art, pre-designed buttons, and more in the
Designs Gallery.
I barely scratched the surface. Many of you new users will undoubtedly
have questions. Press the e button on the navigation bar or use the
send e-mail link below to send me your questions, suggestions,
corrections or things you would like covered in future editions.
And remember, if you don’t want to bother me (I am a very busy and
important person), by all means visit the Web Design Chat Forum on
TalkGraphics.
Gary W. Priester
Editor and Host of the Xara Xone
Send e-mail
Real live
MAGIX Audio
Player.
Try it out.
All music
©Vic Hauer
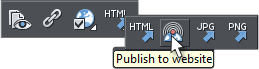
Once you have entered and confirmed your settings, you’re ready to
publish your website. Press the HTML icon on the Web Properties
toolbar then press the Publish to Website icon. This takes a few
moments to initialize, then you will see a progress bar in the top right
area of the screen. When the progress bar reaches the end of the
upload, the progress bar disappears and you can check your website on
line to make sure everything is OK.
If you prefer to use an external FTP application, such as Filezila,
CuteFTP or other, create a folder on your desktop, press the HTML
Export Website icon (to the left of the Publish to Website icon), and
publish to the folder. Then FTP to your web host from the folder.
Open the Designs Gallery > Widgets > Media Widgets folder. Select the
MAGIX Audio Player image and drag it onto the page.
A dialog appears asking for you to sign in to your MAGIX account. If you
don’t have one, you can create a FREE account. It is painless and no
salesman will call. At least none have called on me.
The process is fairly straight forward. You audition media players (click
on the image to see the media player full size0. There are dozens in all
shapes, sizes and colors. There is something for everybody.
After you select the media player, go to the next screen (use the
buttons at the top of the window), select Audio and upload the MP3
selections you wish to play. I have picked a few original tunes created
by Vic Hauer, a talented Xara user. Once you have uploaded and added
the music (I am not sure but it might reside on the MAGIX servers after
you upload it), then you can accept or reject the offer from MAGIX of
unlimited fun for under $5.00, and finalize the player. When you press
Insert, it takes a few moments, and then the player appears.
NOTE: When your page loads it may take a few moments for the
player to appear. And look at the player in Outlines View
(Window > Quality > Outlines) The player’s size might be larger
than it appears on the page and if there is anything overlapping
the player’s actual footprint, the page will not load and the player
will not appear.
There are lots of useful and cool things in the Designs Gallery including
Forms, Maps, social media, e-commerce and other assorted widgets.
Not all are very easy to figure out and some I have had absolutely no
luck with. But there are also lots of free and inexpensive solutions that
you can find on Google, or on sites like Twitter and Facebook that you
can add to your site using a placeholder. Plus there is a excellent supply
of free clip art, photo clip art, pre-designed buttons, and more in the
Designs Gallery.
I barely scratched the surface. Many of you new users will undoubtedly
have questions. Press the e button on the navigation bar or use the
send e-mail link below to send me your questions, suggestions,
corrections or things you would like covered in future editions.
And remember, if you don’t want to bother me (I am a very busy and
important person), by all means visit the Web Design Chat Forum on
TalkGraphics.
Gary W. Priester
Editor and Host of the Xara Xone
Send e-mail
Real live
MAGIX Audio
Player.
Try it out.
All music
©Vic Hauer
Once you have entered and confirmed your settings, you’re ready to
publish your website. Press the HTML icon on the Web Properties
toolbar then press the Publish to Website icon. This takes a few
moments to initialize, then you will see a progress bar in the top right
area of the screen. When the progress bar reaches the end of the
upload, the progress bar disappears and you can check your website on
line to make sure everything is OK.
If you prefer to use an external FTP application, such as Filezila,
CuteFTP or other, create a folder on your desktop, press the HTML
Export Website icon (to the left of the Publish to Website icon), and
publish to the folder. Then FTP to your web host from the folder.