


 Arg! I almost forgot to cover links. So I have added an extra page (this
one) to cover links.
The first website I saw, back in the mid 80s was almost all text with lots
of blue underscored text. This blue underscored text I was told was
hyper-linked text and linked to other websites containing more hyper-
linked text to yet other websites. This ever expanding web of hyper-
links was known as the World Wide Web. But I am sure you already
knew all this.
When I first started creating my on-line Xara tutorials, I wrote my own
HTML scripts. These were very basic. Pictures could be left right or
centered in a block of text. And hyper-links were added using a bit of
script such as <a href="http://www.xaraxone.com">The Xara
Xone</a> This added a link like this to the text The Xara Xone.
Fortunately today we can place images anywhere we wish and link to
other websites, anchors, photos, e-mail addresses, PDF files, YouTube
Videos, you name it. And Xara makes it easy and does all the coding.
Arg! I almost forgot to cover links. So I have added an extra page (this
one) to cover links.
The first website I saw, back in the mid 80s was almost all text with lots
of blue underscored text. This blue underscored text I was told was
hyper-linked text and linked to other websites containing more hyper-
linked text to yet other websites. This ever expanding web of hyper-
links was known as the World Wide Web. But I am sure you already
knew all this.
When I first started creating my on-line Xara tutorials, I wrote my own
HTML scripts. These were very basic. Pictures could be left right or
centered in a block of text. And hyper-links were added using a bit of
script such as <a href="http://www.xaraxone.com">The Xara
Xone</a> This added a link like this to the text The Xara Xone.
Fortunately today we can place images anywhere we wish and link to
other websites, anchors, photos, e-mail addresses, PDF files, YouTube
Videos, you name it. And Xara makes it easy and does all the coding.
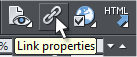
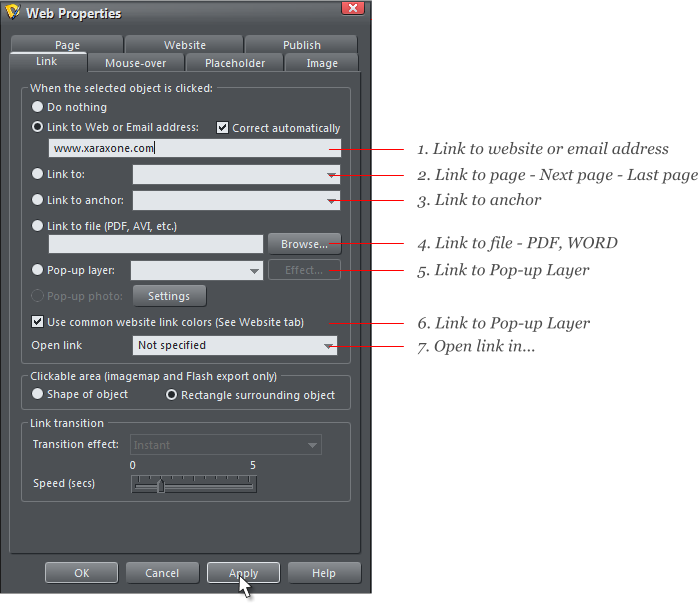 Shown above is the Link section of the Web
Properties menu. You can access it instantly via
the Link Properties icon shown to the left.
You can link almost anything to anything else. But the most common
form of links are text links and buttons. I will cover the options shown
in the screen capture above.
1. Link to Website or e-mail Address Select some text or an object
such as a button, or a photo, and enter the address. Press Apply to add
the link. Check Correct Automatically and Xara will convert
www.xaraxone.com to the correct HTML format,
http://www.xaraxone.com. Or key in gary@gwpriester.com and Xara
automatically converts this to mailto:gary@gwpriester.com. The mailto:
tag launches the visitors e-mail program when they click the link.
TIP: Instead of linking your actual e-mail address, link text such as
Send e-mail to your e-mail address. Xara encodes the actual e-
mail address to effectively hide the address from automated
“bots” that search out e-mail addresses to add to spam lists. I
think we can all agree there is too much of that already!
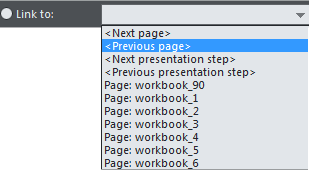
2. Link to:... You can link text, graphics
or buttons to a specific page on your
website. You can also link to the next or
previous page (or if you are creating a
presentation) the Next or Previous Step.
You might for example create two arrow
buttons to let your visitors go to the next
or previous page and link the arrow
buttons accordingly. The benefit of this is
the buttons know what the next or previous page is, even if you repeat
them on all pages or delete or add a page.
TIP: You can also add an automatic link to the top of the page by
adding the pound sign # in the web address text entry box
(covered in item 1). This forces the browser to reload the page
and go to the top at the same time.
3. Link to Anchor An anchor is a specific place in the text or on the
page, or an image that you can go directly to. For example, say you
have a very long page of text with subheads and you want your visitor
to go directly to a specific subhead. If your subhead is separate and not
part of the existing block of text, then select the text, click the yellow
Names tag on the Infobar and give your subhead a name you will
recognize, such as “Roses are red”. At the top of your page, have a
bullet list of all the subheads. Select a subhead, select the appropriate
text from the Link to Anchor drop down list and press Apply.
TIP: If you want to add an anchor to a large continuous block of
text such as this article, place a rectangle over the area you wish
to anchor to, name the rectangle and make it 98% transparent.
NOTE: If the anchored text is in the current screen, the first
anchor on the page, let’s say, then nothing will happen.
4. Link to File You can add a download link to a PDF file, a Word
document, an AVI file and other file types. Browse to the location of
the file (it can be on your desktop, or on your hard drive), select the
file and press Open to select the file, and then Apply. Xara creates and
places a copy the file to the index_htm_files folder when you publish
your site. The visitor to your website clicks the link and then typically
has the option to Open or Save the file.
5. Link to a Pop-up Layer This link links to the content on a pop-up
layer. You could link a small image or text to a larger image that you
have placed on a pop-up layer. I have a simple gallery format that I
make available for artists in my community. The page shows 8
thumbnail images that are linked to 8 different pop up layers. When
the visitor clicks an image, the layer instantly appears with a photo or
image. You can see this in action here.
NOTE: You can link to a pop-up layer using the Web Properties
Mouse-Over > Show Pop-up Layer link. This shows the layer
instantly when the cursor is over the link and the layer closes as
soon as the mouse is moved off of the link.
6. Open Link In If you link to a web address you can specify how that
link with open the linked page. Most commonly, you will use the New
Window (_blank) option. If you link to www.newpage.com, most
browsers will either open a new tab, or move to the the linked page
and close your own page. If you select Open in > New Window
(_blank), a new browser window opens and when your visitor closes the
new window, your site is still there and you have not lost your visitor.
A link is worth a thousand words. I copied the descriptions of the Open
In options and linked to www.xaraxone.com using the described
options. This should visually demonstrate how each of these links
works. (I have never understood the differences anyway, so maybe this
way we can both learn how they work). Press the Back arrow to return
to this page after you have previewed each link.
New window (_blank) Open the link in a new browser window.
Same frame (_self) Open the link in this frame (the frame that contains
this object).
Parent frame (_parent) Open the link into the parent window or
frameset that contains this frame.
Same window (_top) Open the link into the main browser window,
replacing any existing frames.
I can’t say that I see any difference. But then maybe I am just dense.
Shown above is the Link section of the Web
Properties menu. You can access it instantly via
the Link Properties icon shown to the left.
You can link almost anything to anything else. But the most common
form of links are text links and buttons. I will cover the options shown
in the screen capture above.
1. Link to Website or e-mail Address Select some text or an object
such as a button, or a photo, and enter the address. Press Apply to add
the link. Check Correct Automatically and Xara will convert
www.xaraxone.com to the correct HTML format,
http://www.xaraxone.com. Or key in gary@gwpriester.com and Xara
automatically converts this to mailto:gary@gwpriester.com. The mailto:
tag launches the visitors e-mail program when they click the link.
TIP: Instead of linking your actual e-mail address, link text such as
Send e-mail to your e-mail address. Xara encodes the actual e-
mail address to effectively hide the address from automated
“bots” that search out e-mail addresses to add to spam lists. I
think we can all agree there is too much of that already!
2. Link to:... You can link text, graphics
or buttons to a specific page on your
website. You can also link to the next or
previous page (or if you are creating a
presentation) the Next or Previous Step.
You might for example create two arrow
buttons to let your visitors go to the next
or previous page and link the arrow
buttons accordingly. The benefit of this is
the buttons know what the next or previous page is, even if you repeat
them on all pages or delete or add a page.
TIP: You can also add an automatic link to the top of the page by
adding the pound sign # in the web address text entry box
(covered in item 1). This forces the browser to reload the page
and go to the top at the same time.
3. Link to Anchor An anchor is a specific place in the text or on the
page, or an image that you can go directly to. For example, say you
have a very long page of text with subheads and you want your visitor
to go directly to a specific subhead. If your subhead is separate and not
part of the existing block of text, then select the text, click the yellow
Names tag on the Infobar and give your subhead a name you will
recognize, such as “Roses are red”. At the top of your page, have a
bullet list of all the subheads. Select a subhead, select the appropriate
text from the Link to Anchor drop down list and press Apply.
TIP: If you want to add an anchor to a large continuous block of
text such as this article, place a rectangle over the area you wish
to anchor to, name the rectangle and make it 98% transparent.
NOTE: If the anchored text is in the current screen, the first
anchor on the page, let’s say, then nothing will happen.
4. Link to File You can add a download link to a PDF file, a Word
document, an AVI file and other file types. Browse to the location of
the file (it can be on your desktop, or on your hard drive), select the
file and press Open to select the file, and then Apply. Xara creates and
places a copy the file to the index_htm_files folder when you publish
your site. The visitor to your website clicks the link and then typically
has the option to Open or Save the file.
5. Link to a Pop-up Layer This link links to the content on a pop-up
layer. You could link a small image or text to a larger image that you
have placed on a pop-up layer. I have a simple gallery format that I
make available for artists in my community. The page shows 8
thumbnail images that are linked to 8 different pop up layers. When
the visitor clicks an image, the layer instantly appears with a photo or
image. You can see this in action here.
NOTE: You can link to a pop-up layer using the Web Properties
Mouse-Over > Show Pop-up Layer link. This shows the layer
instantly when the cursor is over the link and the layer closes as
soon as the mouse is moved off of the link.
6. Open Link In If you link to a web address you can specify how that
link with open the linked page. Most commonly, you will use the New
Window (_blank) option. If you link to www.newpage.com, most
browsers will either open a new tab, or move to the the linked page
and close your own page. If you select Open in > New Window
(_blank), a new browser window opens and when your visitor closes the
new window, your site is still there and you have not lost your visitor.
A link is worth a thousand words. I copied the descriptions of the Open
In options and linked to www.xaraxone.com using the described
options. This should visually demonstrate how each of these links
works. (I have never understood the differences anyway, so maybe this
way we can both learn how they work). Press the Back arrow to return
to this page after you have previewed each link.
New window (_blank) Open the link in a new browser window.
Same frame (_self) Open the link in this frame (the frame that contains
this object).
Parent frame (_parent) Open the link into the parent window or
frameset that contains this frame.
Same window (_top) Open the link into the main browser window,
replacing any existing frames.
I can’t say that I see any difference. But then maybe I am just dense.
 There are so many things to cover and I don’t
want you to overload so let me just cover
one more feature that you may find of
interest and that is Repel Text Under and
Repelling and Anchoring. These are similar
so it helps to understand how they work.
Any object that is placed over a text
area (paragraph text) can be set to
repel the text that is UNDER the
object. Simply right click on the
object and select Repel Text
Under. By default, the text will be
offset 5 pixels to the side and top and
bottom.
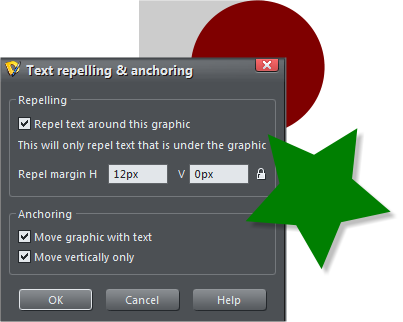
If you select Repelling and Anchoring from the
pop-up menu you have more options as shown on
the left. You can specify a custom offset distance and you can click the
lock icon to specify a different horizontal and vertical offset distance. I
like 0-2px for vertical offset as it is tighter.
You can also move the graphic(s) with the text. If you modify the text
area, by adding more text, removing text, adjusting the text size, or
resizing the text area, the anchored graphic retains its position. You
can anchor an object to text that is outside of the text area. In this
case, the anchored graphic will also move along with the text. The
Help menu does not explain the Move Vertically Only option but if we
take the literal interpretation, we can assume the anchored object can
only move up or down. Agree? Disagree? Discuss.
The Link Options
There are so many things to cover and I don’t
want you to overload so let me just cover
one more feature that you may find of
interest and that is Repel Text Under and
Repelling and Anchoring. These are similar
so it helps to understand how they work.
Any object that is placed over a text
area (paragraph text) can be set to
repel the text that is UNDER the
object. Simply right click on the
object and select Repel Text
Under. By default, the text will be
offset 5 pixels to the side and top and
bottom.
If you select Repelling and Anchoring from the
pop-up menu you have more options as shown on
the left. You can specify a custom offset distance and you can click the
lock icon to specify a different horizontal and vertical offset distance. I
like 0-2px for vertical offset as it is tighter.
You can also move the graphic(s) with the text. If you modify the text
area, by adding more text, removing text, adjusting the text size, or
resizing the text area, the anchored graphic retains its position. You
can anchor an object to text that is outside of the text area. In this
case, the anchored graphic will also move along with the text. The
Help menu does not explain the Move Vertically Only option but if we
take the literal interpretation, we can assume the anchored object can
only move up or down. Agree? Disagree? Discuss.
The Link Options