|
|
|
Not too long ago in the Xara Xtreme Forum, a user asked for a technique to create a horse's shoe. I posted a very brief example. Here is the same example fleshed out in more detail.
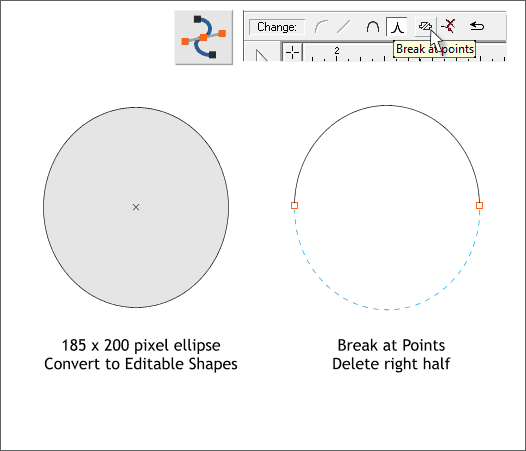
Using the Ellipse Tool (Shift F4), create an ellipse 185 pixels tall by 200 pixels wide. From the Arrange menu, select Convert to Editable Shapes. Switch to the Shape Editor Tool (F4). Select the left and right middle control points and press the Break at Points icon on the Infobar (shown above). Switch to the Selector Tool (the arrow pointer). Select the bottom half and delete it.
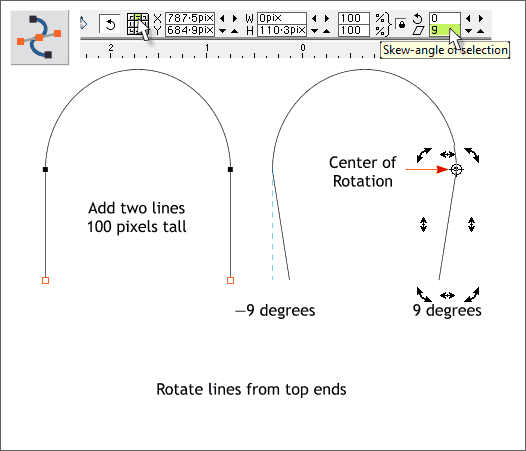
Using the Shape Editor Tool, create a vertical line about 100 pixels tall. (Click once on the page, hold down the Ctrl key to constrain the angle of the line, click and drag upwards. The Infobar will show the height of the line). Duplicate the line (Ctrl d) and position one line directly under each point of the top arc as shown above left. Click twice on the left line to enable Rotate/Skew mode. Drag the Center of Rotation bulls eye to the top of the line, or click the top center button in the Set Origin Position icon. In the Skew Angle of Selection text entry box on the Infobar, enter —9 and press Enter. Repeat this step for the right line but enter just 9 in the text entry box.
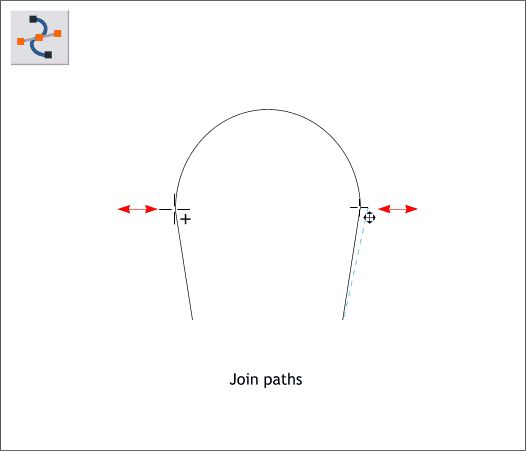
Using the Selector Tool, drag a selection rectangle about all three lines (or hold down the Shift key and click on each line to multiple select). Switch to the Shape Editor Tool (F4). Move the cursor over the place where the right line and the top arc meet. The cursor will change to a cross hair and four arrows when you are over this spot. Drag the line away a short distance and then back. The cursor changes to a + to indicate the two segments are now joined. Repeat this for the left line and the arc. This joins the three paths into one path. (Selecting Join Shapes from the Arrange menu does not create one path).
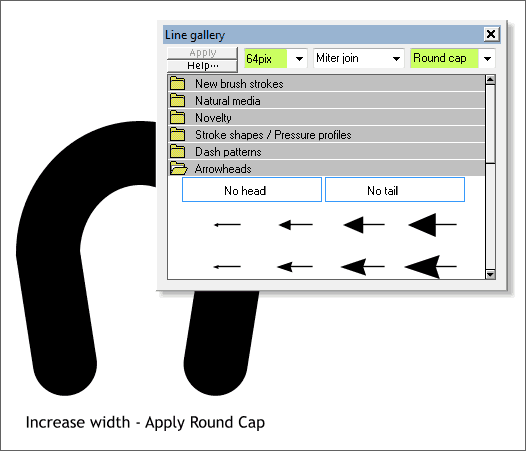
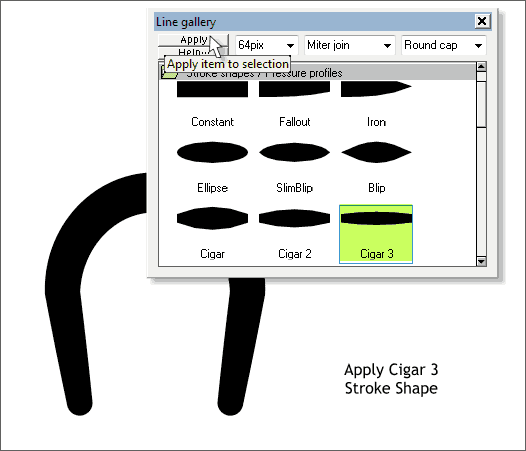
With the path selected, open the Line Gallery (F12). Change the line Width to 64pix. From the End Cap drop down list on the right, select Round Cap.
Open the Stroke Shapes and Pressure Profiles folder. Select Cigar 3 and press the Apply button.
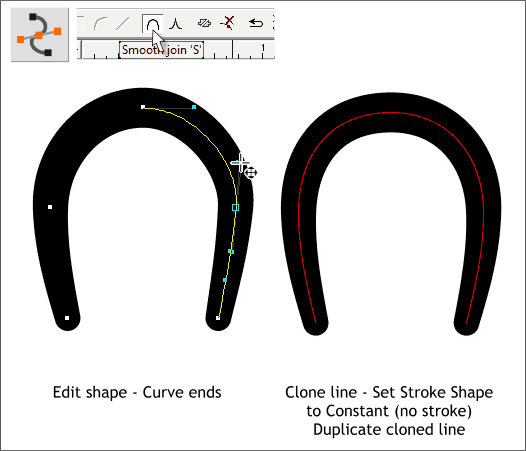
Switch to the Shape Editor Tool (F4). Drag the bottom straight line portions outward just a tiny amount to change the line to a curve. Select the top control point and on the Infobar press the Smooth Join icon. Edit the shape until it is more of a horseshoe shape as shown on the right. Clone the shape (Ctrl k). Change the Stroke Shape to Constant (the first option which is the default straight line, and change the line Width to 1pix. Apply a different outline color to differentiate the two paths. Duplicate the thin path and set it to one side for the moment.
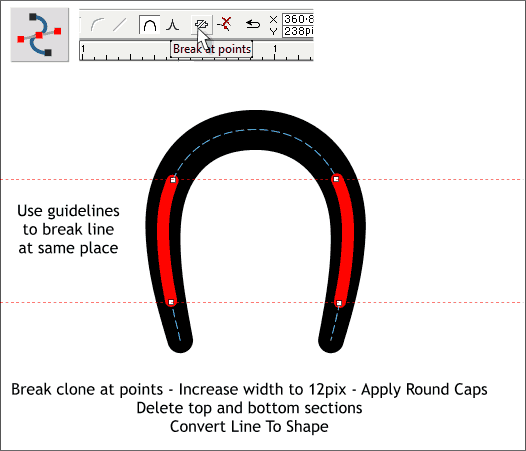
Drag two guidelines from the top screen ruler (Ctrl L to display rulers) as shown above. Select the 1pix path then switch to the Shape Editor Tool. Double click on the path in each place where it crosses the guidelines to add four new control points. Select the 4 new control points and press Break at Points. Delete the top and bottom portions. Change the Width to 12pix. Apply Round Cap in the Line Gallery. Select the two new paths and the large horseshoe shaped path and Arrange > Convert Line to Shape.
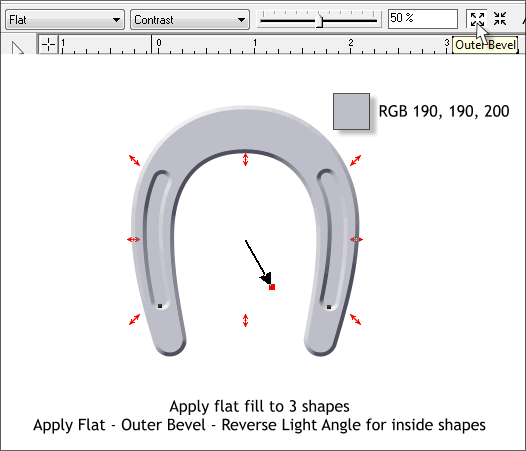
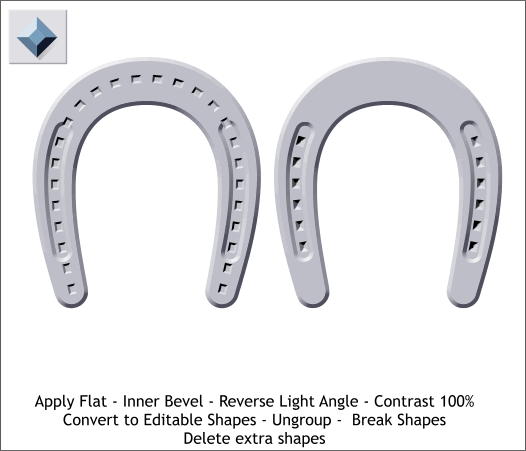
Apply a flat dull silver colored fill. Select all three shapes with the Bevel Tool (Ctrl F3) and apply a Flat Outer Bevel. Select the two smaller shapes and reverse the Light Angle arrow to make the two shapes appear to be recessed.
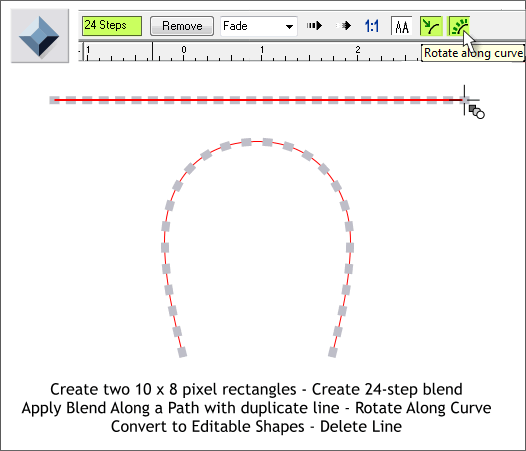
Locate that duplicate horseshoe path you created some time ago. It can't have gone far. Create a small rectangle to the size shown above and apply the same silver fill color. Duplicate the rectangle and set the two rectangles a fair distance apart. Select the Blend Tool (Ctrl F3). Click on one rectangle and drag to the other rectangle to create a blend. Change the number of Blend Steps to 24 and press Enter to apply the change. With the blend and the Blend Tool selected, click on the thin duplicate horseshoe path. On the Infobar press the Blend Along a Curve icon, then press the Rotate Along Curve icon. From the Arrange menu, select Convert to Editable Shapes. Hold down the Ctrl key and click on the think horseshoe path with the Selector Tool to select just the path, and delete it.
Apply a Flat, Inner Bevel to the rectangles. Arrange > Convert to Editable Shapes and then Arrange > Ungroup. If necessary, and if the option is available, select Arrange > Ungroup again and then Arrange > Break Shapes. Delete all the rectangles except those in the recessed area as shown on the right.
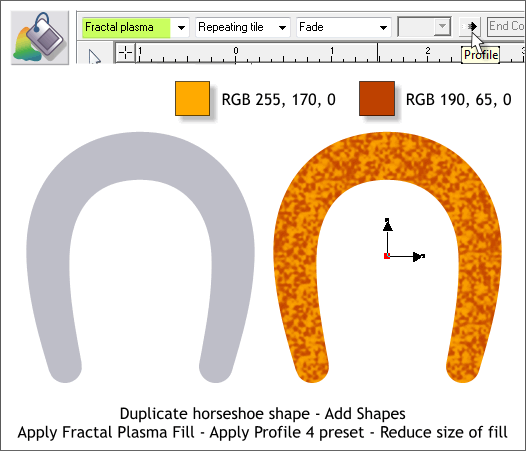
Clone the beveled horseshoe shape (Ctrl k). From the Arrange menu, select Combine Shapes > Add Shapes or press Ctrl 1, the keyboard shortcut. Apply a Fractal Plasma fill by selecting the shape with the Fill Tool, then selecting Fractal Plasma from the drop down list of Fill Types on the Infobar. Drag either of the outside fill path square handles inward to reduce the graininess of the fill. Click the Profile arrow icon (shown above) and from the drop down list of Presets, select Profile 4 . Use the two colors shown above.
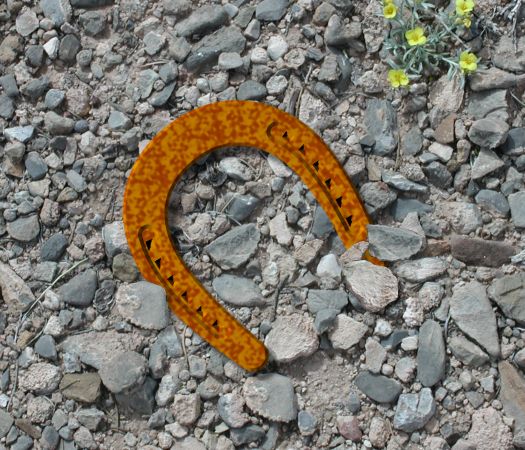
Select the Fractal Plasma-filled shape then select the Transparency Tool (F6). From the drop down list of Transparency Types, select Stained Glass. I added a Wall Shadow with the Shadow Tool (Ctrl F2) and added a New Mexico desert sand and stone photo. I duplicated the stone photo and masked out a few of the stones which were arranged on top of the horseshoe to help it blend into the sand. I think that looks moderately convincing. Was this workbook helpful? Your comments, questions, suggestions, are always welcome. Please use the Send e-mail link below to send along your feedback. Gary W. Priester |
|||||||
|
|||||||
|
|
|||||||


