|
|
|
I'm not sure why it is, but glass, chrome, gold and GEL seem to be the most popular effects and the most often requested tutorials. I know that GEL buttons have been covered before and are also the subject of one of Xara's movies, I believe. But here is my version of the Apple Macintosh OS X GEL button.
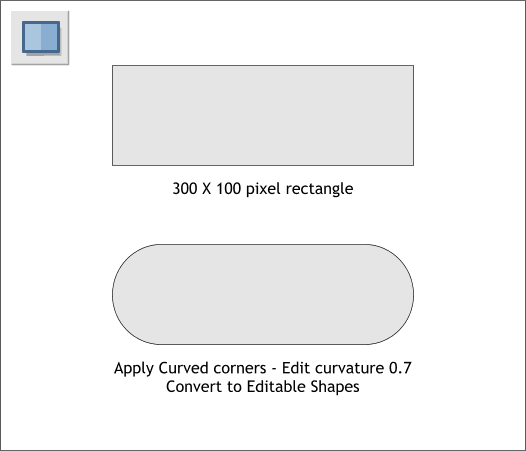
Create a 300 x 100 pixel rectangle. (I know this is a very large button but it is easier to work larger. We will reduce the button down to a more practical size later on). Apply a Curved Corner with the Rectangle Tool. From the drop down list on the Infobar, choose Curvature and increase the amount to 0.7. TIP: If you draw your rectangle and then modify the shape resizing it, when you apply Curved Corners, the rectangle may look more line an ellipse. To make sure your corners are perfectly round, draw and edit the first rectangle to the proper size. The draw a new rectangle on top to the exact size. Now when you apply Curved Corners the result should look like the example above. With the rectangle and the Rectangle Tool selected, from the drop down list on the Infobar, select Curvature. Change the amount to 0.7 and press Enter to apply the change.
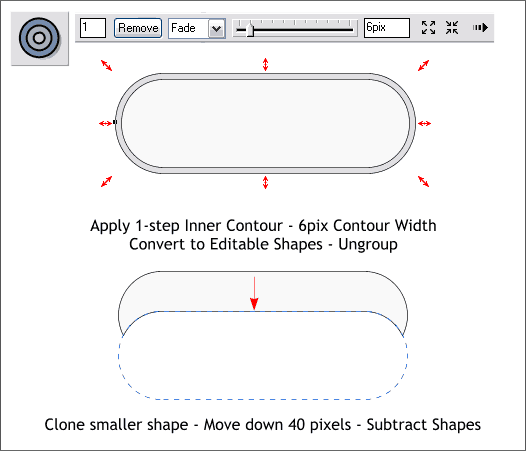
Select the rounded rectangle with the Contour Tool (Ctrl F7). Drag any of the red control arrows toward the center a small distance to apply an Inner Contour. Change the number of Contour Steps on the Infobar to 1 and press Enter to apply the change. In the Contour Width text entry box, enter 6pix and press Enter. Arrange > Convert to Editable Shapes. Ungroup. Clone the smaller inside shape and move the clone down 40 pixels. TIP: If you set the Nudge Size (the distance an object is moved when you press an arrow key on your keyboard) to 1pix (Utilities > Options... General > Nudge Size: ) each click of an arrow key will move the selection 1 pixel. If you hold down the Shift key, the selection is moved 10 pixels. So Shift click the arrow key 4 times. Select the smaller inside shape and the clone and Combine Shapes > Subtract Shapes (or press Ctrl 2). This shape will be used for a white highlight.
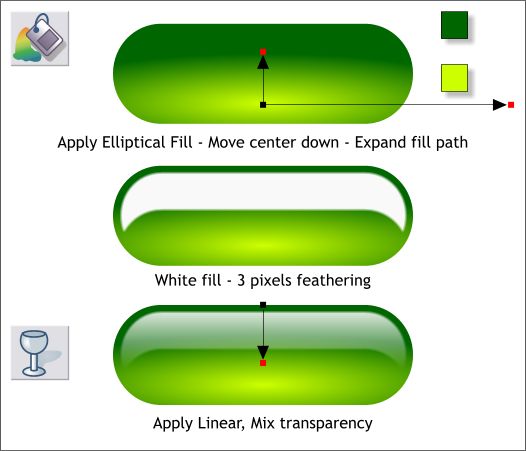
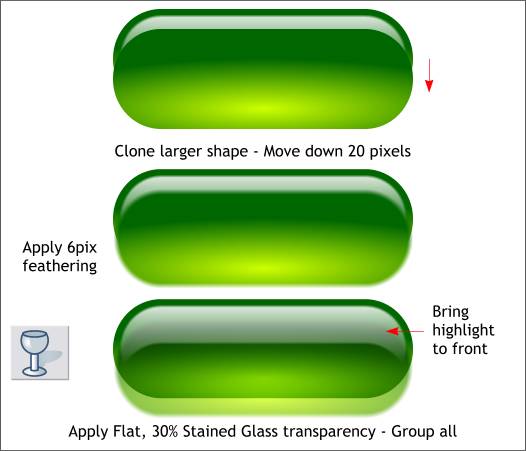
Select the larger shape and using the Fill Tool (F5) apply an Elliptical fill (select Elliptical from the Fill Type drop down list) using the 2 colors shown above. Drag the center of the fill down and extend the left fill path arrow to the right as shown in the top example. (I have removed the highlight shape for this step to make it easier to see the fill). TIP: You can select the center of the fill and then use your arrow keys to move the fill up or down. Select the subtracted shape and position it as shown in the middle illustration above. With the highlight shape selected, left click on the white color on the screen palette (you can also drag the color from the screen palette and drop it onto the shape). Apply 3 pixels of feathering using the Adjust Size of Feather Region slider on the upper right side of the Infobar. Click the shape with the Transparency Tool (F6). Hold down the Ctrl key to constrain the direction and drag from the top of the shape to a little distance below the shape to apply a Linear transparency.
Clone the large shape (Ctrl k). Move the clone down 20 pixels. Apply 6 pixels of feathering. Using the Transparency Tool, apply a Flat, Stained Glass transparency. Move the Transparency slider to 30%. This gives the illusion of a transparent shadow being cast by the GEL button. Select the white highlight and Arrange > Bring to Front (or Ctrl f) as shown in the bottom illustration. Group (Ctrl g) all objects. And that's GEL!
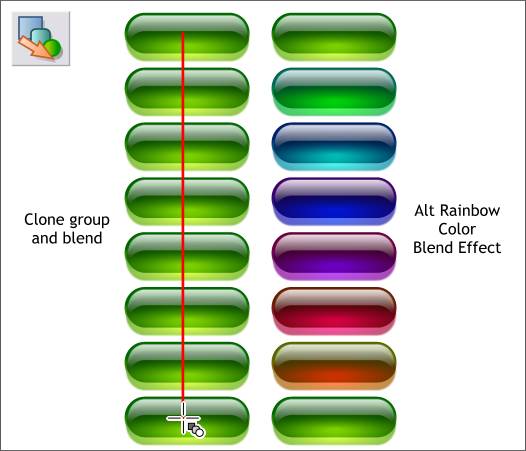
Here's a quick way to generate some alternate colored buttons. Reduce the size of the button to about 125 pixels wide. Make a Clone (Ctrl k) and position the clone directly below the original and down about 500 pixels. Using the Blend Tool (F7), click on one button and drag to the other button to apply a Blend. Increase the number of Blend Steps on the Infobar and press Enter to apply the change. From the Color Blend Effect drop down list (default setting is Fade) select Alt Rainbow. Xara creates a blend of all fill colors and transparencies. Try that in any other drawing application!
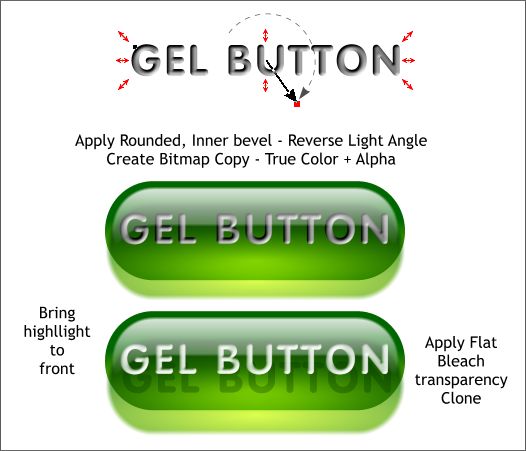
Finally we can add some text. I have used the font VAG Rounded Bold. There is a similar face in the Xara Fonts folder on the CD called Valken. Apply a Flat, 60% black fill. Apply a Rounded, Inner Bevel. Reverse the Light Angle by dragging the large arrow in the center 180 degrees as shown above top. Right click on the text and select Create Bitmap Copy... from the pop up menu leave all the settings as they are. Press Create. Center the text on the button. Apply a Flat, Bleach transparency. Clone the text. Bring the white highlight to the front.
|
||
|
|
