 |
 |
||||||||
| 0 1 2 3 4 5 6 7 8 9 10 11 Download Zipped Tutorial | |||||||||
|
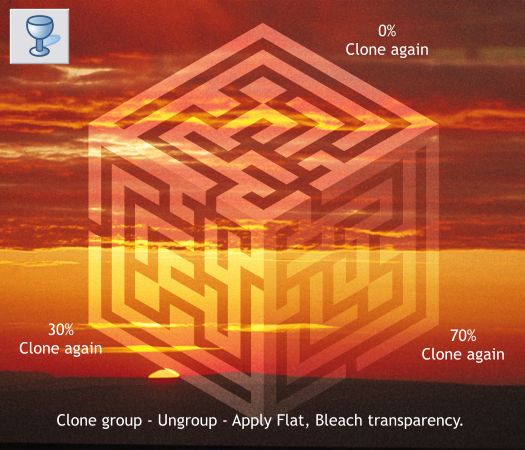
Clone the cube group (Ctrl k). Then ungroup the cube group. Select the three ungrouped clones and then select the Transparency Tool (F6). From the drop down list of Transparency Types select Bleach. Change the left side Transparency slider setting to 30% on the Infobar. Change the right side Transparency slider setting to 70% . Clone each of the three sides (Ctrl k). Your drawing should now look like the drawing above.
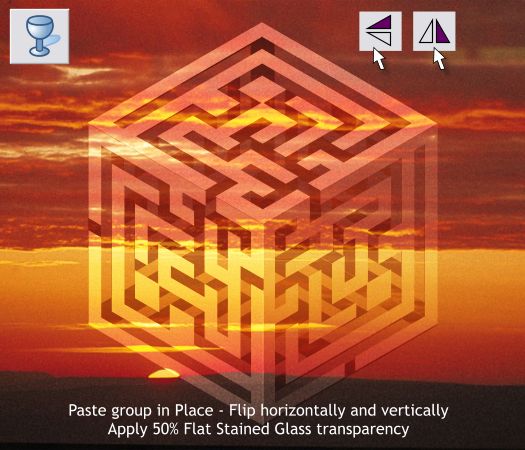
Paste the group from the clipboard using Edit > Paste in Place or press Shift > Ctrl v. Press the Flip Horizontally icon and then press the Flip Vertically icon. This creates the back side of the cube. But you already knew that, didn't you? Select the Transparency Tool (F6), select Stained Glass from the drop down list of Transparency Types. and change the Transparency slider setting to 50%. With this Stained Glass group (the back of the cube) selected, hold down the Shift key and select the background rectangle. Press Ctrl b to send both to the back. With any luck your image will look like the one above. And you are done. Almost.
Select all the objects. From the Arrange menu, select Create Bitmap Copy.... Use the True Color Color Depth option and either leave the Bitmap Size at 96dpi (for viewing on the screen) or 300dpi for printing. Hold down the Shift key and press Create. This places the bitmap in the exact same place. Select the Transparency Tool (F6). From the Transparency Shape drop down list on the left side of the Infobar, select Elliptical and from the Transparency Type drop down list, select Stained Glass. Click the center control point where the two fill path arrows meet, and change the slider setting to 100%. Click either of the outside control points at the end of the arrows and change the slider setting to 0%. Click the Profile arrow icon on the Infobar and select Profile 2 from the drop down list. This expands the transparent portion of the rectangle. And finally, hold down the Alt key and click twice on the top cube (it is actually one layer down) to select it and press Ctrl f to bring it to the top. Repeat this step for the left and then again for the right side. Questions? Comments? Suggestions? Juicy Gossip? Use the Send e-mail link to send me your feedback. It is never not appreciated. (Life is not a contest to see how long we can avoid double negatives). Gary W. Priester |
|||||||||
|
|
|||||||||
|
|
|||||||||


