|
The Xara Xone Workbook - The best, easy and fun Xara X tutorials |
|
|
|
THE XARA CONFERENCES | XARA.COM | XARA ONLINE | GRAPHICS.COM TOP SITES | ALL WORKBOOKS |
|
Save your work so far, and then select the sizing pixels, and clone them (Ctrl K), and put the clone to the back (Ctrl B). Hold down the Shift key and select the ring and add the ring and the pixels together (Arrange > Combine Shapes > Add Shapes or press Ctrl 1).
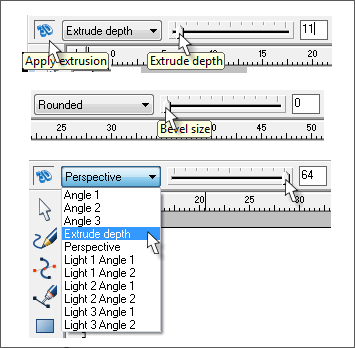
Now click on the 3D extrude tool, and apply the default settings by clicking on the 3D icon on the Infobar. Set the Extrude Depth to 11 and set the Bevel to 0. From the Extrusion drop down menu, choose Angle 1 and set it to about 78. Set the perspective to 64, the maximum. We are going to use this ring as a positioning and sizing guide. Give the ring a red fill, and apply a flat transparency of around 35%.
Without moving the ring, move the characters of STONE HENGE over the band, space them out along the band, and amend the size of each character so that the height at the centre of each character matches the height of the band at that location. Because of the exaggerated perspective, this will mean that the characters of STONE will be smaller than those of HENGE, with smaller variations around the ring. You will have to do this by eye, but it isn't that critical. You should end up with something like the example above.
|
||||||


