|
|
|
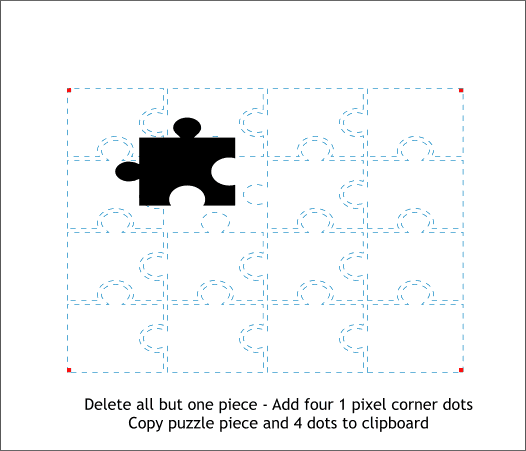
Finally, we will create a floating puzzle piece. Return to Xara Xtreme or Xtreme Pro. Create a 1 pixel square, make three duplicates, and place one pixel at each corner of the puzzle pieces as shown above in red. Move all the other puzzle pieces off to one side (the blue dashed outline shows where the small squares go). Place the one piece you set aside earlier as shown so that it is left and above the hole in the puzzle. Select the four 1 pixel squares and the floating puzzle piece and Copy these five objects to the clipboard (Ctrl c).
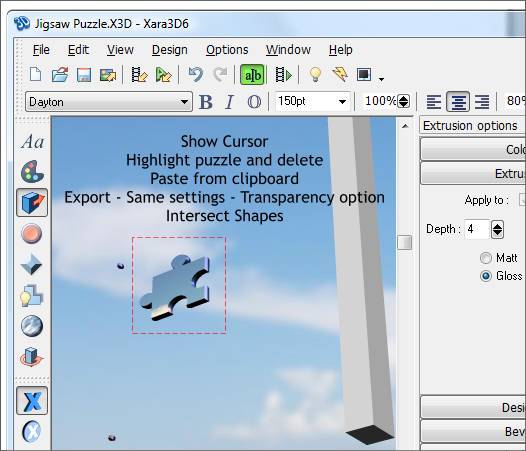
Return to Xara 3D-6. Save your Puzzle. I know we just saved the image but you also need to save the Xara 3D-6 file. Give it a clever name like Puzzle. Press the Show Cursor icon. Press Ctrl a to select all then press the Delete key on your keyboard. Paste, Ctrl v, the puzzle piece and the four squares into the page. Xara 3D-6 replaces the puzzle with the new selection. All the settings, bevel, lighting, extrusion, etc., remain the same. The four 1 pixel squares (credit Mike Sims, the Xara 3D wizard for this tip) place the object in the exact same spot in space as the puzzle pieces. The four pixels are noticeable but they will be removed later. Export this image using the same settings as before but this time check the Transparent option in the Export Options dialog. Import the puzzle image into Xtreme or Xtreme Pro and align it with the puzzle image. The puzzle piece should have a transparent background. If not export it again from Xara 3D-6 and this time select the Transparent option. Draw are rectangle around the floating puzzle piece, select the rectangle and the bitmap and Arrange > Combine Shapes > Intersect Shapes or press Ctrl 3 . This eliminates the four corner 1 pixel squares.
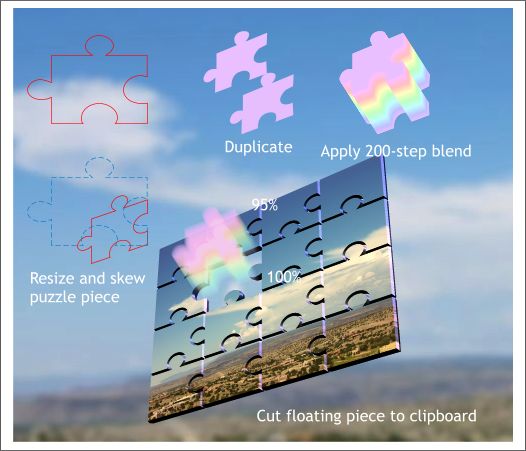
This last step is a bit complicated and it is optional. If you feel the tutorial really pushed you to the limits of your ability, then save your Xara 3D-6 file (this time call it Puzzle Piece), save your Xara Xtreme drawing, and you are excused. To add a bit of magic to the image, resize and skew the vector floating puzzle and place it over the opening in the puzzle. Apply a pale purple (or any pale color) fill. Duplicate the puzzle piece and place it over the floating 3D puzzle piece. Select the 3D puzzle piece (Alt click twice to select below the vector puzzle piece) and cut it to the clipboard (Ctrl x). Using the Blend Tool, create a 200-step blend between the two pieces and select the Alt Rainbow Color Blend Effect to create a pale rainbow. Select the top puzzle piece in the blend (Ctrl click) and switch to the Transparency Tool. Set the Transparency slider setting to 95%. Switch back to the Selector Tool and press Tab to select the bottom puzzle piece in the blend. Switch back to the Transparency Tool and set the slider setting to 100%. Paste the 3D puzzle piece on top (Edit > Paste in Place or Shift Ctrl v).
Here's the finished image with some added text. Comments, or questions. You can use the Send e-mail link below to send along your comments. |
|
|
||||||||
|
|
||||||||


