|
|

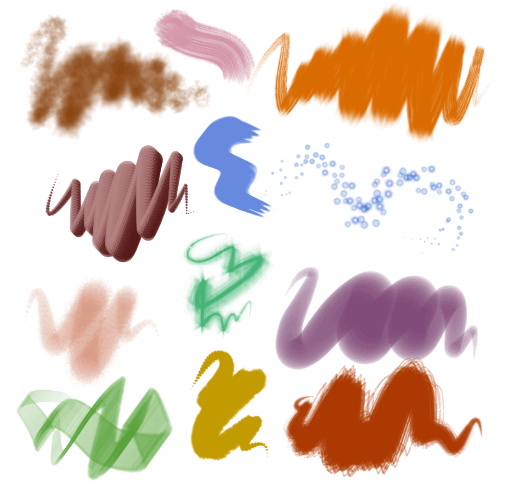
Brush CategoriesThere are three categories of brush types that can be made:
These three types of brushes can be combined into one, to add even more diversity.
For details about object order when a brush is made of many objects, see previous section about the spacing tab 4. When a brush is made, the size of the original object will equate to the brush line thickness. If you desire constituent brush objects to retain their relative positions in the brush, then those objects should be grouped prior to creating the brush. Bitmap brushes Brushes can be made from bitmaps for even greater flexibility; some vector object properties do not currently get translated into a brush, such as feathering, for example. There are still however some limitations in using bitmaps. The colour of the brush line cannot be changed when composed of a bitmap. The colour is thus determined by the colour of the bitmap when created. The category of bitmap brushes also includes shapes with bitmap fills. Remember to toggle the Tile Fills setting on the Fill properties tabbed section for more control over the bitmap brush. Bitmap transparency brushes Using a bitmap transparency on a vector object is a novel way to combine the best of both vector and bitmap effects in brush creation. One advantage is that the effective bitmap brushes can be re-coloured. The following section will guide you through the creation of such a brush. It relies heavily on the process outlined in a past tutorial of mine on creating custom transparencies, which was covered in Guest Tutorial 52.
Creating the object: a) The brush that will be created in this example will have feathering, and we want this feathering property to be retained when converted to a brush. Firstly, create the brush object on top of another object that will get the bitmap transparency. This ensures that the correct object size is used for the brush. The objects should initially be created in shades of black, or the maximum range of transparency will not be available later.
b) Copy (Ctrl c) the white square above to the clipboard (as it will get the bitmap transparency later), and then create a bitmap copy of the whole object shown above (making sure the outline of the square is set to none). Set the colour depth to 16 colours as any greater level will not provide measurable quality when the transparency is applied, and will only use an unnecessarily large amount of memory. Set the resolution (in the Bitmap Size tabbed section) to your desired value, for example 96 dpi for 100% zoom, or more, or 200+dpi if you plan to enlarge the brush and want to retain quality.
c) Next, paste a copy of the square that was copied in step b; give it the colour you want the brush to have (it can be re-coloured later), and then select the Transparency Tool (F6). From the drop down list of Transparency Shapes, select the Elliptical transparency type first. This sets the handles to the edges of the shape so that when the bitmap transparency is applied, the aspect ratio is correct. Next select the bitmap Transparency Type, and then from the drop down list of bitmaps on the Infobar, select the bitmap we just created. It should be automatically scaled to the size of the object, which was why the bitmap copy of the object that acquired the transparency was made in step b to ensure sizing is correct.
d) The custom transparency-brush object is now complete, and can be made into a brush in the usual manner. When the brush is first used, it will appear incorrect; go to the Fill properties tabbed section and uncheck the Tile Fills box to have it appear correctly. Final notes Clicking the Save button in the Brush Properties dialogue saves all current brush settings (but not the line colour!) for the selected brush. Future uses of that brush will use the new settings.
Combinations of vector object, bitmap, and bitmap transparency can be used to create some unique brush effects. The vector transparency objects will allow features that cannot be used in brushes by using normal vector objects, for example feathering, whereas the vector objects, and vector transparency objects, will allow multiple colour effects if the Named Brush Colours option is checked in the Fill properties tab, as was shown in the section of this tutorial on the Fill properties tab. Finally, the bitmap components will allow permanent colour components.
If any Xara files containing Brush libraries, such as my Xhriss Brush Collection.xar (Zipped download file 474K) are put in the following folder ./Xara Xtreme/Templates/Brushes/, then every time Xara is loaded, the brushes in that file will be in the default selection, and have their own folder in the line gallery. As usual with all things Xara, the primary limitation is the users imagination. With some experimenting, some particularly novel brush effects could be created. The skys the limit, so go nuts. If you have questions or comments, Id love to hear them. Click the Send e-mail link below. Xhris |


|
|
|
The Xara Xone Guest Tutorials ©2006 Gary W. Priester All rights reserved
|