|
|
|
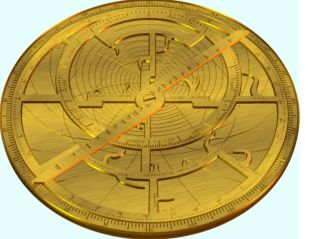
This is a picture of an astrolabe, a medieval navigational instrument. The image was created as several flat 2d shapes in Xara X, which were then combined and rendered in Xara 3D-6. Iíll begin this tutorial by detailing the basic steps. On page 5 Iíll explain the process in greater detail.
Notice that all the pieces are exactly the same overall size and shape, the last three made so by the addition of a thin rim. This is to ensure that Xara 3D-6 doesn't resize them to suit itself, thus spoiling the careful alignment they had in Xara X! This is a standard technique for working with Xara 3D-6. Other methods are to place a pixel-sized dot at top left and bottom right of the Xara X workspace. Whichever method you adopt will depend on the nature of your creation. Doing all the sizing and alignment in Xara X is far easier and more flexible than trying to do it in Xara 3D-6. I will follow the steps I used to create the outer engraved ring, the 2nd in the row, which is marked off to show a full 24 hour day, in five-minute intervals. This is one of the simpler parts to make, but the processes used to make it were the same for the other pieces. There is a simpler piece, the central screw, but if I based the tutorial on that we'd be finished already! Broadly I made the ring from two circles, subtracting the smaller from the larger, and created a radial pattern of lines and subtracted them also from the ring, and subtracted the hour numbers, too. I actually used several circles, adding some and subtracting others, to ensure I got clean edges, as Xara X can get a bit inaccurate when performing lots of subtractions, and ugly artifacts can sometimes appear. Starting off in Xara X, I set the page to 800 x 600 pixels, landscape, and set the grid to 50 pixels, with 5 divisions. Enabled the grid, and snap-to-grid. Absolute size doesn't really matter, but you want to create reproducible circles and lines several times. The first step is to create a circle. I chose a circle 500 pixels diameter, and set the line width to 0.25pt. Fill the circle red or any good contrast to both black and white. Now create a radial pattern of lines. There are two sets, the major set of lines marks off the hours and half-hours and are spaced at 7.5 degree intervals. The minor set are a little shorter than the major set and mark off the 5-minute intervals spaced at 1.25 degree intervals. For ease of handling, I created the major lines first, then added them together as one shape using Ctrl-1. You can then clone these, and reduce them a little, so they don't extend as far as the major set (97% was the figure I used), then rotate, clone, rotate, clone etc. until they are all done.
|
|
The Xara Xone Guest Tutorials ©2005 Gary W. Priester All rights reserved
|


