Phase 1
Create your Xara Menu files as you normally would using Xara Webstyle.
Save your Xara generated files to their own unique folder on your desktop and give it a name that will help you identify which site it belongs to, and what's in the folder. For the purposes of this tutorial let's name it
"Xara Assets site 101"
Phase 2
Create your Xara Menu files as you normally would using Xara Webstyle.

NOTE: This next step is critical.
It is extremely important to remember that Fusion will draw it's assets from where ever you designated them to come from, whether they came from the
root of your "C" drive or from within a nested folder structure on a particular zip disk, Fusion will ultimately record asset locations into it's data base and will
always look in these established locations for the needed assets each time you publish the site.
If for some reason these asset locations are changed you will then have to go through the process of reintroducing those assets back into the Fusion Data
Base. Otherwise, on publish, Fusion will error on locating the needed assets. Therefore, it is a good policy to keep ALL site assets within the Fusion Site assets folder.
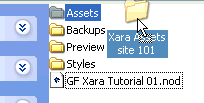
POSITION XARA ASSETS: Okay, Using Windows Explorer, move the desk top folder called "Xara Assets site 101" that contain your newly generated Xara
files into your Fusion Site "Assets" folder. See Figure 1

Figure 1
Continued on next page >
|