 |
 |
||||
| 0 1 2 3 4 5 6 Download Zipped Tutorial | |||||
|
Water Droplets - Part II Gel Shading and Shadow Method I mentioned in Part I that clipviewing is also a way you could use to create gel type objects - shading and shadows. Gel objects can have similar properties to water or other types of liquid droplets. The following is not meant to be a thorough tutorial, but just a brief description of this method. |
|||||
|
Note: For shapes (such as this text) that have uneven widths, I created separate contours (plus inset path) for the holes of the 'g' and the 'e'. Otherwise in trying to create a very narrow inner contoured shape for the whole thing, it begins to disappear in parts and then doesn't slice the larger shape properly. The dark shading was then 3 (non-grouped) objects (outer edge shading and inner shading objects of the 'g' and 'e' holes. This contouring method works easiest with objects that have a standard width or thickness. Remembering that narrower the small inner 'cutting' shape is then the bigger the area of shading on the gel is.
|
|||||
|
Paste in place the original text or gel shape, give it a flat transparency if you wish. Add a same coloured shadow to this shape as well and offset to the same amount as the clipview shadow. I sent this behind the clipview. Using a transparency for this object can make the gel colour a bit faint, so paste in place the gel object again, change colour to white and give it a saturation transparency. This leaves the whole gel reasonably transparent still, restores the overall colour and adds a bit of a glow. In the examples below I nudged this shape down and right to also cover the coloured shadow. If you leave the main gel object solid then you will need to add some kind of overlay with the background fill to simulate gel transparency.
Changing colour is as simple as changing the colour of the clipview shading & shadow and the main gel fill & shadow objects, plus any other added shapes, although depending on the colour you may well need to adjust some of the transparency levels. TIP: You could also try using an overlaid shape with a 0% hue transparency and a different colour, this will change the whole gel object to the colour of the overlay and is just a quick way of doing this. As with the leaf droplets to create a gel object that has a different look (with a flat coloured shadow and a highlight on the edge away from the light source - example D: above), just nudge the inner clipviewed edge shading object and add highlights to the edge of the gel away from the light source. Although for this kind of gel look the shadow tends to be mostly flat colour it can have often have lighter inner 'glints'. Included in the Step 4 image above for A, B and C is the previously explained blended distortion effect - this time with the Worms4.jpg background. There are still, parts of these tutorials that I am trying to improve, such as the 'hard' top highlights of the water droplets/gel. Not to mention experimenting with reflections in the droplet and other effects. One of the hardest parts of water droplets or other transparent objects is that the shading, highlights and reflections etc can vary a lot even with droplets that are adjacent - so they can be tricky to figure out. Well that's the last bit ... cup of tea time now! If there are any comments or questions, or you would like me to explain anything in more detail, then please feel free to use the feedback form on the next page - it's nice to hear your comments/views. [Editor's Comments] The Xara Xone wishes to express its gratitude to Su for all the incredible work she has done in this two-part tutorial. If you have read this far, and have learned some useful informationand how could you have not, please take a moment and send Su your comments.
|
|||||
|
|
|||||
|
©2003 Su Lawrence All rights reserved
|
|||||
|
|
|||||
 Step 1. Create your basic gel object and copy to clipboard. Then use this
to create your two outer and inner contoured objects plus inset path, and subtract shapes to create the final donut shape. (See Steps 10a - 10b of
Step 1. Create your basic gel object and copy to clipboard. Then use this
to create your two outer and inner contoured objects plus inset path, and subtract shapes to create the final donut shape. (See Steps 10a - 10b of  Step 2. Paste in place the original text object / gel shape then use it
to clipview the donut shape (see
Step 2. Paste in place the original text object / gel shape then use it
to clipview the donut shape (see  Step 3. Using the shadow tool (Ctrl+F2) add a shadow to the
whole clipview object, make the shadow the same dark colour as the clipviewed donut shape.
Step 3. Using the shadow tool (Ctrl+F2) add a shadow to the
whole clipview object, make the shadow the same dark colour as the clipviewed donut shape.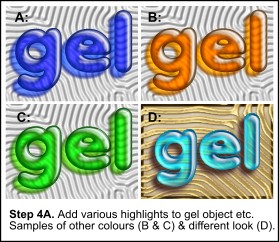 Step 4. Then you have a template to which you can add
highlights, as on the droplet and/or other shading effects. Here are some examples.
Step 4. Then you have a template to which you can add
highlights, as on the droplet and/or other shading effects. Here are some examples.