 |
 |
||||
| 0 1 2 3 4 5 6 Download Zipped Tutorial | |||||
|
Water Droplets - Part II Bitmap Distortion - Water Droplets (or Gel etc) This is something I had been experimenting with recently. I was originally trying to get a rippled water reflection of an object. I came up with using a multi-step blend to produce the rippled effect, then also found this method could be used to distort bitmaps in the same way a water droplet, shaped glass or transparent gel object distorts the surface / background behind it. Here is the general method using the water droplet over the Bluetile.jpg filled rectangle (Example A: in Coloured Backgrounds section) |
|||||
|
|
|||||
|
|
|||||
|
|
|||||
|
|
|||||
|
Optional: Hold down the Ctrl key and click in the centre of the blend, to select the smallest object in the blend. I gave this object a 9 pixel feather. With this object still selected, click on the selector tool (F2) and hit the tab button (this should select the middle object), I gave this object a 4 pixel feather. This can often just help to blend the steps in a bit more.
|
|||||
|
Lastly, bring the droplet group to the top and just normally move it to align with the blend This effect has been exaggerated a bit in this example, to show it better. For a lower distortion/magnification just change the dpi settings of the two inner blended shapes to something higher. You can use this contouring and multi-blend distortion with all sorts of shapes, some shapes or bitmap fills work better than others. Generally speaking, water droplets tend to produce more distortion when viewed obliquely, i.e. at an angle rather than directly overhead. With the same droplet in the Main Picture (on first page), I used a perspective mould for the Bluetile bitmap background, then created a bitmap copy and used this perspective background with the blend distortion method. Using a higher resolution bitmap seems to work best around 150 dpi should be okay.
|
|||||
|
To follow on from this on the next page, I have also detailed the method for the rippled water reflection, mentioned above.
|
|||||
|
|
|||||
|
©2003 Su Lawrence All rights reserved
|
|||||
|
|
|||||
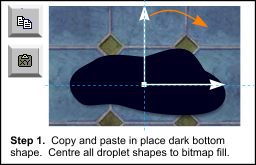 Step 1. Copy the bottom black or dark blue etc shape of the droplet.
Group all your droplet objects. Paste in place the copied shape and remove the transparency. Check the fill of the bitmap background using the fill tool, drag a horizontal and vertical guideline through the centre
fill node. Centre your droplet shapes over the guidelines temporarily - positioning the shapes like this seems to produce a clearer distortion.
Step 1. Copy the bottom black or dark blue etc shape of the droplet.
Group all your droplet objects. Paste in place the copied shape and remove the transparency. Check the fill of the bitmap background using the fill tool, drag a horizontal and vertical guideline through the centre
fill node. Centre your droplet shapes over the guidelines temporarily - positioning the shapes like this seems to produce a clearer distortion.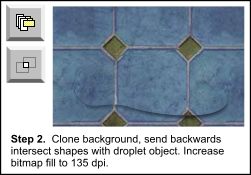 Step 2. Create a clone of the background bitmap and send it behind
the dark solid droplet shape. Select this background clone and the shape, then intersect shapes. (Arrange > Combine Shapes > Intersect Shapes or Ctrl+3). This just gives a droplet shape with the same tiled fill as the
background.
Step 2. Create a clone of the background bitmap and send it behind
the dark solid droplet shape. Select this background clone and the shape, then intersect shapes. (Arrange > Combine Shapes > Intersect Shapes or Ctrl+3). This just gives a droplet shape with the same tiled fill as the
background.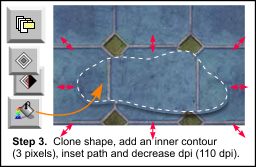 Step 3. Clone this shape and contour inwards a small amount - around 3
pixels, click on inset path. Now decrease the bitmap fill dpi (I used 110 dpi). To simulate a magnification effect.
Step 3. Clone this shape and contour inwards a small amount - around 3
pixels, click on inset path. Now decrease the bitmap fill dpi (I used 110 dpi). To simulate a magnification effect.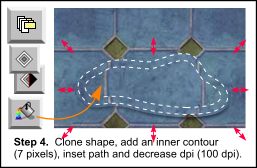 Step 4. Clone this new shape and do another inner contour - around 7
pixels, plus inset path again. Finally decrease the bitmap fill dpi further (I used 100 dpi). You can use more objects than three if you wish, the more objects using smaller inner contours the smoother the steps can
be, although you can end up with some weird effects on some shapes.
Step 4. Clone this new shape and do another inner contour - around 7
pixels, plus inset path again. Finally decrease the bitmap fill dpi further (I used 100 dpi). You can use more objects than three if you wish, the more objects using smaller inner contours the smoother the steps can
be, although you can end up with some weird effects on some shapes.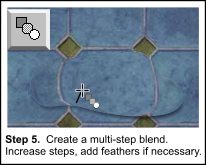 Step 5. You should now have 3 shapes with
different dpi's sitting over each other. Zoom in if necessary and do a multi-step blend from the larger shape to the middle then from this blend to the inner shape, increase blend steps from the default 5 to something like 10.
Step 5. You should now have 3 shapes with
different dpi's sitting over each other. Zoom in if necessary and do a multi-step blend from the larger shape to the middle then from this blend to the inner shape, increase blend steps from the default 5 to something like 10.
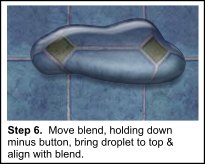 Step 6. Now you can move the blend so it is
over something more interesting if you like, just drag it with the mouse whilst holding down the minus button on the number pad, then the fill will still align with the background. The rule seems to be the more
you drag the blend away from the bitmap fill centre - the more distorted it gets, you can also use this to create a different type of perspective distortion than viewed head on.
Step 6. Now you can move the blend so it is
over something more interesting if you like, just drag it with the mouse whilst holding down the minus button on the number pad, then the fill will still align with the background. The rule seems to be the more
you drag the blend away from the bitmap fill centre - the more distorted it gets, you can also use this to create a different type of perspective distortion than viewed head on.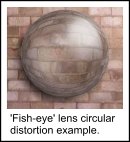 Fish-eye Lens Effect I have also used this method to
create circular glass/bubble 'fish-eye' lens effects. It works reasonably well for this, but I needed to use two separate blends to try and get the curvature right (i.e. blend from Step 2 to Step 3 shapes, copy and paste in
place Step 3 object only - then a second blend from Step 3 to Step 4 shapes), so it's a bit of a fiddle. But even with this the curving is still not quite right.
Fish-eye Lens Effect I have also used this method to
create circular glass/bubble 'fish-eye' lens effects. It works reasonably well for this, but I needed to use two separate blends to try and get the curvature right (i.e. blend from Step 2 to Step 3 shapes, copy and paste in
place Step 3 object only - then a second blend from Step 3 to Step 4 shapes), so it's a bit of a fiddle. But even with this the curving is still not quite right.