 |
 |
||||||
| 0 1 2 3 4 5 6 Download Zipped Tutorial | |||||||
|
Water Droplets - Part II Although this isn't as relevant to droplets, we are still on a watery theme and this is another way of using the multi-blend distortion for rippled water reflections; with an extra option of distorting or moulding other bitmap filled objects such as for curved brick walls or reflections in shaped glass. This is a more linear technique |
|||||||
|
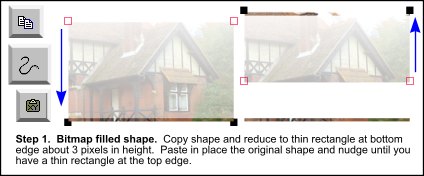
Copy this bitmap filled shape to the clipboard (Ctrl+C). Select the shape and click on the Shape Editor Tool (F4), then marquee select the top two nodes. Nudge them downwards until you have a bottom rectangle shape that is about 3 pixels in height. Paste in place (Ctrl+Shift+V) the full sized bitmap filled shape and this time select the bottom two nodes and nudge them upwards until you again have about a 3 pixel high rectangle, but at the top edge this time. The narrower these rectangle shapes are the smoother the rippled effect, but 3 pixels works quite well.
|
|||||||
|
Using the blend tool again create a multi-step blend. Drag the blend tool from the very top 3 pixel rectangle shape to the one just below, drag again from the blend just created to the next rectangle shape below it and so on until you have re-blended all the steps together. This second blend should give you a shape that looks like the original bitmap-filled object. Note: With large bitmap-filled objects this can be a big blend and can be slow on the redraw
Select both the line and blend then click on the blend tool, in the blend infobar (toolbar that appears when a tool is clicked on) select the Blend Along a Curve icon. This attaches the blend to the wavy line and produces a rippled distortion to the bitmap, because you started the line at the bottom it also reverses the picture. You can remove the line by right mouse clicking on the criss-crossed square icon at the bottom left of the screen (set no colour). The blend is still editable and you can select it and click on the shape editor tool to individually adjust the nodes in the line to change the ripple effect. |
|||||||
|
I made a bitmap copy of the blend and aligned it to the original bitmap filled object. I Then applied a fractal plasma transparency to the 'reflection' bitmap, converted it to shapes and cloned. I reversed the transparency values of the clone, then using the fill tool clicked on it's centre fill node and nudged it a bit until the two objects have a slightly misaligned fill. I then added various other transparencies and experimented with profiles etc, also using an overlay with the Water2.tif (fill gallery - Non Repeating Colour Fills folder - CD Rom), and lastly masked out the wobbly left/right edges. You can use this multi-blend bitmap distortion method to produce other effects, such as bricks in a round tower, or rolls of linoleum etc. Just attach the final multi-step blend to a curved line - like half of an ellipse. You can also create wavy text or flag type objects. To create a distortion that runs horizontally (like the wavy bricks example here), it's the same method but blending left to right etc starting with two tall, thin rectangles at each side. You can also add extra distortion / magnification to this effect by adjusting the dpi's of the bitmap filled rectangles before performing the first and/or final multi-blend (in the same way as the water droplet distortion). Additionally, there is nothing to stop you from making a vertical distortion blend, creating a bitmap copy and then doing a horizontal distortion blend from that ... to create a sort of two way morphing effect. However, it can get a bit fuzzy, with the final blend - but it's fun to play with the different effects. Finally, some gel stuff using clipview ...
|
|||||||
|
|
|||||||
|
©2003 Su Lawrence All rights reserved
|
|||||||
|
|
|||||||
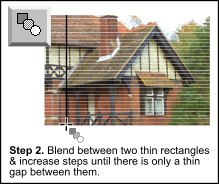 Step 2. Using the blend tool (F7) drag from one rectangle shape to the other to
produce a blend. Increase the amount of blend steps until you can see that there is a very thin space between each step, (not necessary but makes the next step much easier to do!) You should now have a
'repeat' of the original bitmap-filled shape in the form of a blend with a kind of shuttered effect.
Step 2. Using the blend tool (F7) drag from one rectangle shape to the other to
produce a blend. Increase the amount of blend steps until you can see that there is a very thin space between each step, (not necessary but makes the next step much easier to do!) You should now have a
'repeat' of the original bitmap-filled shape in the form of a blend with a kind of shuttered effect.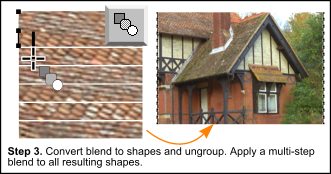 Step 3. Select the blend, convert it to editable shapes (Ctrl+Shift+S) and
ungroup (Ctrl+U). You will probably need to zoom in at this point.
Step 3. Select the blend, convert it to editable shapes (Ctrl+Shift+S) and
ungroup (Ctrl+U). You will probably need to zoom in at this point.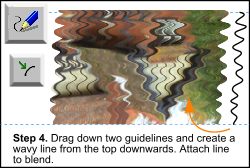 Step 4. Make sure you have rulers enabled (Window > Bars > Rulers or
Ctrl+L). With snap to objects on (Window > Snap to objects or NumPad *), drag a horizontal ruler down to snap to the very top edge of the blend and another for the bottom. Enable Snap to Guides (Window >
Snap to Guides or NumPad 2). Select either the Freehand & Brush Tool (F3) or shape editor tool (F4), starting from the bottom guideline, create a wavy line between the two guidelines.
Step 4. Make sure you have rulers enabled (Window > Bars > Rulers or
Ctrl+L). With snap to objects on (Window > Snap to objects or NumPad *), drag a horizontal ruler down to snap to the very top edge of the blend and another for the bottom. Enable Snap to Guides (Window >
Snap to Guides or NumPad 2). Select either the Freehand & Brush Tool (F3) or shape editor tool (F4), starting from the bottom guideline, create a wavy line between the two guidelines.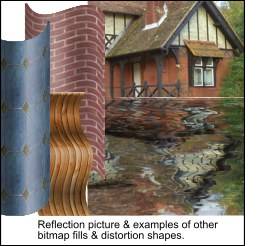 Although I haven't quite figured out the best way to create a 'broken'
ripple effect to date, here is a very quick description of what I did with the resulting example reflection picture here of the Lodge.tif.
Although I haven't quite figured out the best way to create a 'broken'
ripple effect to date, here is a very quick description of what I did with the resulting example reflection picture here of the Lodge.tif.