 |
 |
||||
| 0 1 2 3 4 5 6 7 Download Zipped Tutorial | |||||
|
Paste in place (Ctrl+Shift+V) the copied black shape and give it an inner contour of 9 pixels (I used the round join) then inset path.
|
|||||
|
|
|||||
|
With the selector tool click on the inner keyhole icon (the clipped blue donut shape - or just hit tab key to toggle between the two clipview objects) change colour back to black and give it an 11 pixel feather. Also give this inner donut shape a linear transparency of 85% at the top and 90% at the bottom. Copy whole clipview to clipboard (Ctrl+C). Selecting again the inner black donut shape, nudge it upwards by about 3 or 4 pixels and also to the left by about 3 pixels. Although this is a low ratio it can be handy to be able to change the transparency on the bottom without affecting the top, say for coloured backgrounds. The final bit of shading also includes a small shadow of the droplet.
Because I like being awkward, I then Alt + selected the long thin inner white highlight with the 6 pixel feather (Step 9) and the subtracted inner white highlight with the 14.5 pixel feather (Step 7) and brought them to the top.
|
|||||
|
Select the white and coloured shape, then subtract shapes (Arrange > Combine Shapes > Subtract Shapes or Ctrl+2). You should be left with a solid white highlight. Whilst decompiling I noticed that I tweeked this shape, reduced the height, nudged to the left etc. This simply produces a slightly less even space between the top edge of the droplet and the highlight. Give the highlight a linear transparency from 0% to 100%. I had both start and end transparency handles a bit outside the shape, but adjust it until you like the look of it. Give it a 1 pixel feather.
|
|||||
|
|
|||||
|
©2003 Su Lawrence All rights reserved
|
|||||
|
|
|||||
 Step 10a. Clone bottom black shape. Remove the transparency for the
moment. Copy this shape to the clipboard (Ctrl+C). Give it a large outer contour about 25 pixels should do and inset path - change the colour to any colour temporarily
Step 10a. Clone bottom black shape. Remove the transparency for the
moment. Copy this shape to the clipboard (Ctrl+C). Give it a large outer contour about 25 pixels should do and inset path - change the colour to any colour temporarily  Step 10b. Select the large blue shape
and the small black one and subtract shapes (Arrange > Combine Shapes > Subtract Shapes or Ctrl+2). You should be left with a wobbly donut shape.
Step 10b. Select the large blue shape
and the small black one and subtract shapes (Arrange > Combine Shapes > Subtract Shapes or Ctrl+2). You should be left with a wobbly donut shape. Step 11a. Paste in place the copied black shape again (which is
the same size as the droplet). Send this shape behind your donut object (Arrange > Move Backwards or Ctrl+Shift+B). Select this shape and the donut one and apply clipview (Arrange > Apply Clipview).
Step 11a. Paste in place the copied black shape again (which is
the same size as the droplet). Send this shape behind your donut object (Arrange > Move Backwards or Ctrl+Shift+B). Select this shape and the donut one and apply clipview (Arrange > Apply Clipview). Step 11b. Using the selector tool
(F2) select the clipview object and you will notice two keyhole icons in black outline. Click on the outer keyhole icon (selects the smaller black background object only) and apply a 100% flat transparency to this shape.
Step 11b. Using the selector tool
(F2) select the clipview object and you will notice two keyhole icons in black outline. Click on the outer keyhole icon (selects the smaller black background object only) and apply a 100% flat transparency to this shape.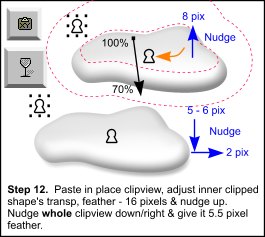 Step 12. Paste in place the copied clipview object. Select the inner
keyhole icon and nudge the donut shape upwards by 8 pixels. Increase the feather to 16 pixels and adjust the transparency settings to 70% at the bottom and 100% at the top. Select the whole clipview
object and nudge it downwards about 5 - 6 pixels and to the right about 2 pixels to create the shadow, give the whole clipview about a 5.5 pixel feather.
Step 12. Paste in place the copied clipview object. Select the inner
keyhole icon and nudge the donut shape upwards by 8 pixels. Increase the feather to 16 pixels and adjust the transparency settings to 70% at the bottom and 100% at the top. Select the whole clipview
object and nudge it downwards about 5 - 6 pixels and to the right about 2 pixels to create the shadow, give the whole clipview about a 5.5 pixel feather. Step 13a. Lastly, add top highlights. Clone bottom black
shape and make it flat white in colour, remove the transparency for the moment. Contour it inwards very slightly about 2.5 pixels then click on inset path.
Step 13a. Lastly, add top highlights. Clone bottom black
shape and make it flat white in colour, remove the transparency for the moment. Contour it inwards very slightly about 2.5 pixels then click on inset path. Step 13b. Clone this shape and give it any colour