|
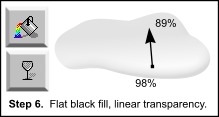 Step 6. Remember the shape we created
by adding the bevel to the original droplet shape. It should be coloured white. Select this shape (hold down Alt key and click over the bevel until the white object is selected - check the information line at
the bottom of the screen and the 'current line & fill colours' icon just above it). Give it a flat black fill. Add a linear transparency darker at the top around 89%
through to 98% at the bottom. Although I didn't use the exact same angle as the previous bevel light source or the bevel transparency, which would probably be more accurate. Step 6. Remember the shape we created
by adding the bevel to the original droplet shape. It should be coloured white. Select this shape (hold down Alt key and click over the bevel until the white object is selected - check the information line at
the bottom of the screen and the 'current line & fill colours' icon just above it). Give it a flat black fill. Add a linear transparency darker at the top around 89%
through to 98% at the bottom. Although I didn't use the exact same angle as the previous bevel light source or the bevel transparency, which would probably be more accurate.
Important Note: Because this shape is the same size as the whole droplet we will be cloning it to create the upper objects. As it will be the only black object that isn't in a clipview I will simply state clone the
bottom black shape, when referring to this object, later on.
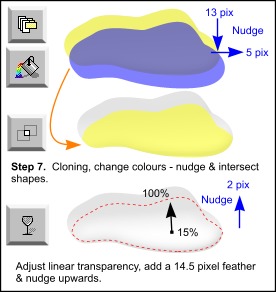 Step 7. I wanted to exaggerate a lighter area in the bottom central
part of the droplet interior. So clone the bottom black shape and give it a flat white fill (yellow in diagram - flat transp). Clone this white shape again change it to any colour (blue in diagram - flat transp) and nudge it down 13 pixels and to the right by 5 pixels. (Use the cursor keys to nudge objects - remember your single nudge distance is set to 1 pixel).
Select both these shapes (hold down the Shift key and click on both shapes with the selector tool) and then intersect shapes (Arrange > Combine Shapes > Intersect Shapes or Ctrl+3). Step 7. I wanted to exaggerate a lighter area in the bottom central
part of the droplet interior. So clone the bottom black shape and give it a flat white fill (yellow in diagram - flat transp). Clone this white shape again change it to any colour (blue in diagram - flat transp) and nudge it down 13 pixels and to the right by 5 pixels. (Use the cursor keys to nudge objects - remember your single nudge distance is set to 1 pixel).
Select both these shapes (hold down the Shift key and click on both shapes with the selector tool) and then intersect shapes (Arrange > Combine Shapes > Intersect Shapes or Ctrl+3).
The black shape you cloned this from already had a linear transparency, just adjust it to the angle/size shown here - make the bottom transparency 15% and the top 100%. Give it a 14.5 pixel feather, or enough so it blends in
reasonably well. Nudge this shape up by about 2 pixels - as it will be brought to the top of the final droplet.
Step 8. To soften the gradation between the dark top of the droplet and the Step 7 internal highlight I added another white feathered shape. Clone the
bottom black shape and change fill to white, add a flat 50% transparency and a 37 pixel feather. This softens the whole effect a little. This is a very subtle
change at this stage of the tutorial and you can barely see a difference, which is why there is no diagram for this step. However, the effect although still subtle, is more noticeable in the final droplet, with the later added
shading.
 Step 9a. Lastly with this internal highlight area, I brightened the
lower part a bit with a thinner shape to produce more of a glow at the bottom. Clone the bottom black shape and change fill to white (red in diagram - flat transp) and remove the linear
transparency - we will change it later. Give it a 6 pixel inner contour (I used a round join), then click on inset path to remove the contour. Step 9a. Lastly with this internal highlight area, I brightened the
lower part a bit with a thinner shape to produce more of a glow at the bottom. Clone the bottom black shape and change fill to white (red in diagram - flat transp) and remove the linear
transparency - we will change it later. Give it a 6 pixel inner contour (I used a round join), then click on inset path to remove the contour.
 Step 9b. Clone this shape give it any colour, then nudge it up
by 13 pixels and to the left by 5 pixels. Select both your white shape and coloured shape and subtract shapes (Arrange > Combine Shapes > Subtract Shapes or Ctrl+2). I then nudged the resulting thin shape
upwards by 5 pixels. Step 9b. Clone this shape give it any colour, then nudge it up
by 13 pixels and to the left by 5 pixels. Select both your white shape and coloured shape and subtract shapes (Arrange > Combine Shapes > Subtract Shapes or Ctrl+2). I then nudged the resulting thin shape
upwards by 5 pixels.
Give this shape an elliptical transparency of 0% in the centre and 51% at the edges. I pulled the centre transparency node down to a middlish position over the shape and then pulled out the outside nodes a little.
Add a 6 pixel feather. This shape and the elliptical transparency is fairly subtle on a white background surface, you could probably give it just a flat transparency for example. However, for coloured backgrounds etc the object
itself and the elliptical transparency becomes more noticeable
Well it still isn't looking very exiting yet. So we are going to add some shading definition. The next technique is the one I mentioned in the intro, regarding gel objects shading & shadows (Covered next month in Part II).
(continued on the next page)
|