|
Part One - Water Droplet
First you will need to adjust your Page settings. Go to File Menu > Page Options ... Click on the Units tab in this menu and set your your Page Units to pixels and your Colour Units to 0-255. Click on the General tab and at
the bottom in the Editing part set your Nudge Size to 1 pixel. Click ok.
I will often apply arbitrary colours/transparencies to shapes in the diagrams in this tutorial, just so that they can be seen more easily. I will let you know when this happens by stating in brackets a phrase in pink bracketed
text such as (yellow in diagram plus flat transp), this is for information only. Also I may suggest you apply an arbitrary colour to a shape (i.e. set to 'any colour') for the same
reason or because the colour doesn't matter. All fills/transparencies etc are shown with straight black arrowed lines, nudge distances are straight blue arrowed lines, and orange curved arrows just show 'transition' from one object to another or point out a particular part of an object. Unless specifically stated otherwise all transparencies are the default mix transparency.
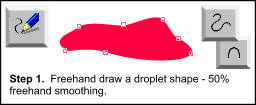
 Step 1. Freehand draw a droplet shape, any colour and no outline. I
kept freehand smoothing at the default of 50% as I didn't want too many nodes to complicate things. Step 1. Freehand draw a droplet shape, any colour and no outline. I
kept freehand smoothing at the default of 50% as I didn't want too many nodes to complicate things.
Because I later use a bevel with this shape I made the curves quite rounded - so select the shape with the selector tool (F2) click on the shape editor tool (F4) and marquee select all nodes
(start drag from outside the shape to include the whole object), then in the shape editor tool infobar select smooth join ('S') for all nodes. I made a few
minor adjustments of curve handles (small red squares either side of a smooth join node - attached by lines) until I had a shape that looked ok.
Make the size of this shape about 132 pixels width by 43 pixels height. If you want a bigger or smaller droplet it can be resized at the end.
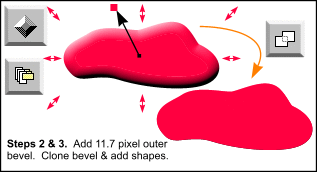
Step 2. Add a Rounded 2 outer bevel. Bevel size : 11.7 pixels. Contrast : 100%. Light angle 298 degrees.  Light elevation 29 degrees. NB: there didn't seem to be any change with the different join methods for this shape, but I would suggest using a round join
for the bevel and also for any contours. Light elevation 29 degrees. NB: there didn't seem to be any change with the different join methods for this shape, but I would suggest using a round join
for the bevel and also for any contours.
Step 3. Clone (Ctrl+K) the bevelled object and add shapes (Arrange > Combine Shapes > Add shapes or Ctrl+1). This gives you a single object that has the same boundaries as the bevel, send this object to
the back (Ctrl+B), recolour it white so you can see the next step more easily.
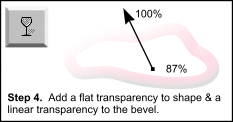
 Step 4. Give the bevel a linear
transparency - start 85% (at bottom) to 100% (at top). I also dragged the 100% transparency node outside the bevel boundary so it was just visible. You can give the droplet shape only (not the bevel) a flat 100% transparency,
although this isn't necessary if you do something extra in the next step. Step 4. Give the bevel a linear
transparency - start 85% (at bottom) to 100% (at top). I also dragged the 100% transparency node outside the bevel boundary so it was just visible. You can give the droplet shape only (not the bevel) a flat 100% transparency,
although this isn't necessary if you do something extra in the next step.
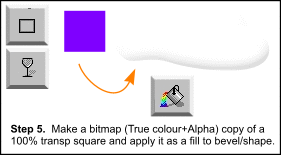
 Step 5. Using the rectangle tool (Shift+F3) and holding down the
Ctrl key drag to create a small square - any colour. I generally use a square of whole pixels and no outline. Give the square a 100% flat transparency. Select the square and create a bitmap copy of it (Arrange > Create
Bitmap Copy or Ctrl+Shift+C), with True Colour + Alpha, (i.e. a png). Step 5. Using the rectangle tool (Shift+F3) and holding down the
Ctrl key drag to create a small square - any colour. I generally use a square of whole pixels and no outline. Give the square a 100% flat transparency. Select the square and create a bitmap copy of it (Arrange > Create
Bitmap Copy or Ctrl+Shift+C), with True Colour + Alpha, (i.e. a png).
If you applied a 100% transparency to the shape in Step 2 then just select the bevel, open the Bitmap Gallery (Utilities > Galleries > Bitmap Gallery or F11)
and select the transparent bitmap. You will be able to find it as it should be the only bitmap with no picture. Click on the [Fill] button in the gallery (Apply
as Fill) and close the gallery. If you didn't apply a 100% transparency to the shape then you need to apply the bitmap to both shape and bevel together.
(continued on the next page)
|