
 Fine, now we "turn on" our display.
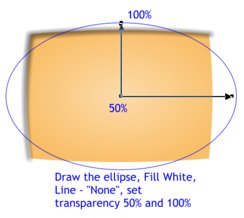
Draw the ellipse, fill it with "White", set line as "none", transparency as 50% and 100% as shown.
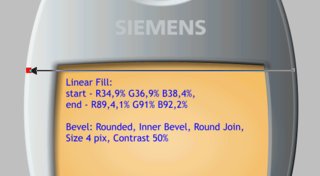 Apply a Linear fill with R-34.9%, G-36.9%, B-38.4% and R-89.4%, G-91%, B-92.2%.
Now apply a Rounded, Inner Bevel, Round Join, Size 4pix, Contrast 50%.
 Now we will add a bevel appearance to the bottom part of panel.
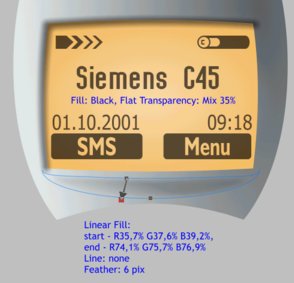
Draw the shape as shown and set the line to none. Apply a Linear fill using these colors: R-35.7%, G-37.6%, B-39.2% and R-74.1%, G-75.7%, B-76.9%
Apply 6pix of Feathering.
Draw all screen display elements and fill them black. Apply a Flat, Mix transparency, 35%.
TIP: A subtle default envelope can be used to give the screen display elements a convex appearance.
 STEP 8. Headphone and all Buttons
To make the openings (black) draw three curved line segments. Set the line weight to 3pt and apply the Round Caps line caps (Line Gallery).
Edit the lines to fit with original ellipse, then select all lines and convert them to editable shapes (Arrange > Convert to Editable Shapes).
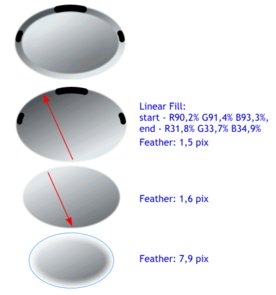
Draw the bigger ellipse and apply a Linear fill: R-90.2%, G-91.4%, B-93.3%, and R-31.8%, G-33.7%, B-34.9%, apply 1.5pix feathering.
Clone the ellipse (Ctrl K), flip the ellipse horizontally and vertically. Hold down the Shift key and scale down the cloned ellipse to fit with smaller ellipse. Apply 1.6pix feathering.
Clone the second ellipse and scale it down a little bit. Apply 7.9pix feathering.
Assemble all shapes as shown at the top of picture.
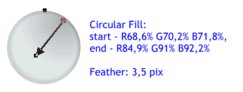 Round Button. I think you'll repeat this step as shown. The Bevel is a Rounded Inner Bevel,
Size 2.8pix, Contrast 100%.
Round Button. I think you'll repeat this step as shown. The Bevel is a Rounded Inner Bevel,
Size 2.8pix, Contrast 100%.