

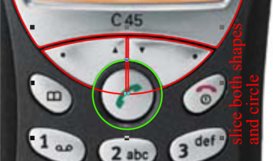
 Draw the circle as shown. Clone Ctrl k the circle. Select both the cloned
circle and the left button, and Slice them (Ctrl 4). Repeat this step to get the right button.
Draw the circle as shown. Clone Ctrl k the circle. Select both the cloned
circle and the left button, and Slice them (Ctrl 4). Repeat this step to get the right button.
Move these two buttons off to the side of the page.
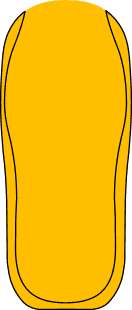
Draw the rest of the buttons. The button shapes are all different. Use the Shape Editor Tool and the technique covered at the top of Page 1 to create the rest of the buttons.
TIP: Draw the buttons: Notepad, 1, *, and 2. All the rest of the buttons are clones of these 4 buttons.
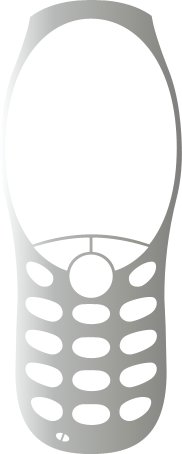
The result you'll get is the wire frame phone as shown on the previous page.
 STEP 4. Shape 2
OK, now we'll make Shape 2 with openings for screen and buttons.
Copy all the phone's buttons, shapes and ellipse panel, to the clipboard (Ctrl c).
Select all of the buttons and ellipse panel, and (Arrange > Combine Shapes... Add Shapes). This will create a shape like the white shape inside the phone shape shown on the right.
Paste the contents of the clipboard on top using Shift Ctrl v to paste the contents in the exact place from where they were copied. Paste another copy using Ctrl v and move these to one side for a moment.
Select both Shape 2 and the new combined buttons and ellipse shape and Slice them (Ctrl 4). That's all.
 Now we will paint our new Shape 2 with original colors. As I have two
pictures phones with different panels, I decided to combine them into one model. So we will paint Shape 2 the same as at original Pic.2.
Now we will paint our new Shape 2 with original colors. As I have two
pictures phones with different panels, I decided to combine them into one model. So we will paint Shape 2 the same as at original Pic.2.
Choose the Fill Tool or press F5. Set the Fill Tool cursor to the left border of Shape 2. Hold down the Ctrl key and drag fill to the right. This is a quick way to create a Linear fill.
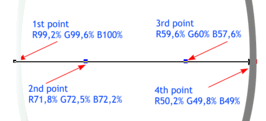
Select left control handle (the square box at the beginning of the Linear fill) and open the Color Editor (Ctrl e). Drag the color picker to capture the screen color. From the Color Model drop down list in the Color Editor, choose RGB Color Model and set RGB values as R-99.2% G-99.6% B-100% (I used the color picker to get this values and they maybe different a little from your picks). Select the end of fill and set color as R-50.2% G-49.8% B-49%.
OK, now we will add two additional fill points to our Linear fill for a more realistic effect.
Select the Shape 2 with the Fill Tool. Double click on the fill path arrow to add a new color station. Double click again to add a second color station. Space the color stations as shown in the illustration above. Fill the second color station (the small square on the fill path arrow) R-71.8% G-72.5% B-72. 2%. Fill the other color station, R-59.6% G-60% B-57.6%.
 Looks pretty cool!
We can add a bevel to make the plate more 3 dimensional.
Choose the Bevel Tool or press Ctrl F3. Apply an Inner, Rounded Bevel, with the Round Join option (the upside down U icon on the Infobar). Set the bevel Size to 4pix, and set the Contrast to 100%.
If you have not already done so, name and save your drawing and take a short break.
 STEP 5. Shape 1
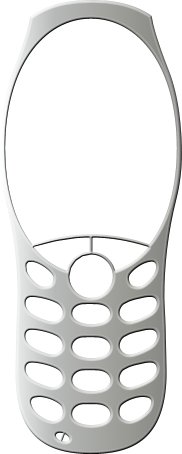
OK, now we need to make Shape 1. You need to get shape shown in black outline on the right.
Slice Shape 2 and Shape 1, and then delete the unnecessary parts so that you just wind up with the U-shape shown here.