|
Perspective shapes, an added dimension
A brick tower
 This example makes use of the curved perspective effect
mentioned on page 2 to create a circular brick tower, starting with the bricks. This example makes use of the curved perspective effect
mentioned on page 2 to create a circular brick tower, starting with the bricks.
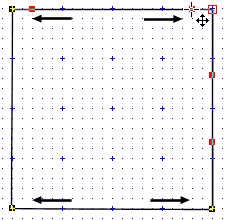
 Begin by creating the shape of a square mould envelope,
pasting it into the grid as usual. Notice the position of the horizontal point handles? Well, select one and drag it to reduce its length. Do the same for the other three points taking
care to adjust them equally, as illustrated. Begin by creating the shape of a square mould envelope,
pasting it into the grid as usual. Notice the position of the horizontal point handles? Well, select one and drag it to reduce its length. Do the same for the other three points taking
care to adjust them equally, as illustrated.
Now, to create a tower we need an appropriate surface to mould. Create a rectangle the same height as your
intended tower (say 200px like everything else and the right width, say 150 px and fill it with bricks. If you haven't got any, you can create bricks by filling with xara's black & white fill called
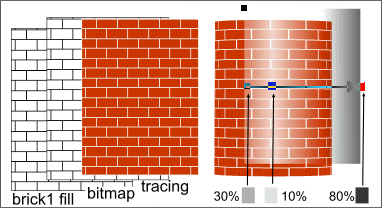
(surprisingly) brick 1. Make a bitmap copy and then trace the bitmap with the bitmap tracer from the tools menu. You will need something like the following settings:

 Having got your bricks you can ungroup and remove the backing (
Alt-select) before colouring the bricks and applying the envelope. For a greater effect we'll apply the envelope twice, converting to editable shapes (Arrange > Convert to Editable Shapes
) in between. On the second occasion, after pasting the envelope, raise the top horizontal handles just a little and lower the bottom ones. This heightens the perspective. In order to heighten the effect further
we can add lighting. Having got your bricks you can ungroup and remove the backing (
Alt-select) before colouring the bricks and applying the envelope. For a greater effect we'll apply the envelope twice, converting to editable shapes (Arrange > Convert to Editable Shapes
) in between. On the second occasion, after pasting the envelope, raise the top horizontal handles just a little and lower the bottom ones. This heightens the perspective. In order to heighten the effect further
we can add lighting.
Copy the final envelope shape, paste it and apply a gradient fill as illustrated, and set the transparency to brightness. In the example
on the front page I also added a slight bevel to the bricks to make them stand out.
You don't have to stick to cylinders as you can see below from other envelopes applied to the same bricks. Any straight lines can
be adjusted to add perspective, elsewhere there is a compromise between shape and perspective to be worked out. I created the roof in the top illustration from the same bricks, adjusted in shape
and number and recoloured before applying the cone envelope below. In this case the two bottom horizontal handles were turned slightly up instead of down.
|

