|
Creating envelopes
Making Waves
 We'll start with a simple shape which
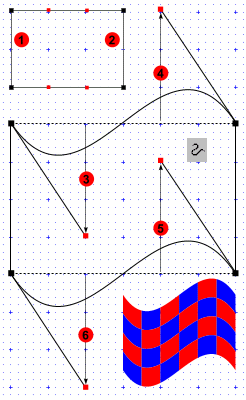
is one of the most useful. Create a default envelope from a rectangle of, say, 300 x 200 pixels, copy and paste it neatly over the grid (window menu, also snap to grid). With the shape
editor selected, gather up the points making the left side (1) and make line (/ on infobar) to remove the unwanted handles. Repeat for right side (2). Select the top left point and
drag its remaining handle vertically down by, say, 150 pixels until it snaps into place in the grid. Tab to the next point and drag the handle up this time, by an equal amount (4). Repeat for the bottom points (5,6)
and that's all there is to it. You can save the shape or move on and apply it as below. We'll start with a simple shape which
is one of the most useful. Create a default envelope from a rectangle of, say, 300 x 200 pixels, copy and paste it neatly over the grid (window menu, also snap to grid). With the shape
editor selected, gather up the points making the left side (1) and make line (/ on infobar) to remove the unwanted handles. Repeat for right side (2). Select the top left point and
drag its remaining handle vertically down by, say, 150 pixels until it snaps into place in the grid. Tab to the next point and drag the handle up this time, by an equal amount (4). Repeat for the bottom points (5,6)
and that's all there is to it. You can save the shape or move on and apply it as below.
Notes: If you flip or rotate the envelope shape to point the mould in another direction you will need to restore the path start point and rotation.
If you had moved the handles toward each other as you dragged, you would have started to stretch the ends at the expense of the
middle (handle hex). You may or may not want this effect.
Applying the wave shape
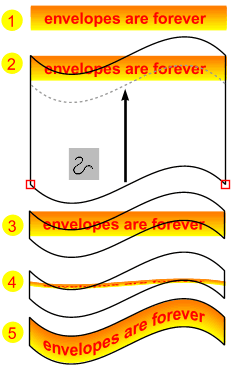
 Lets apply the wave to a banner (1).
Place a copy of the envelope shape over the banner and shrink it proportionally to fit the largest dimension of the banner (2). Often we can just stretch it to an acceptable fit,
but as the proportions of the envelope shape differ noticeably from the object we are moulding we shall maintain the steepness of the wave by shrinking the straight sides only. Select the
envelope shape, go into shape edit mode, scoop up the bottom points and nudge them up until the corners of the envelope meet the corners of the banner (3). Copy the envelope now and
apply it (4). It doesn't look promising, but stretching the mould results in (5), which is pretty well what we wanted. Lets apply the wave to a banner (1).
Place a copy of the envelope shape over the banner and shrink it proportionally to fit the largest dimension of the banner (2). Often we can just stretch it to an acceptable fit,
but as the proportions of the envelope shape differ noticeably from the object we are moulding we shall maintain the steepness of the wave by shrinking the straight sides only. Select the
envelope shape, go into shape edit mode, scoop up the bottom points and nudge them up until the corners of the envelope meet the corners of the banner (3). Copy the envelope now and
apply it (4). It doesn't look promising, but stretching the mould results in (5), which is pretty well what we wanted.
I used a blend to get the gradient as a gradient fill doesn't mould.
|

