|
More Exotic Shapes
Deco Mould
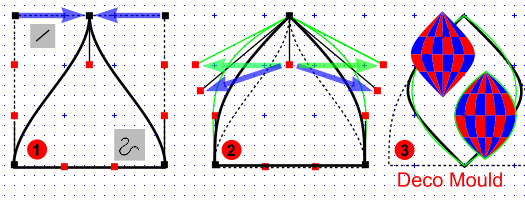
Here's another simple one, that I've called a deco mould. Create the basic envelope shape as before but square, select the edit tool
and the top two points. Click on 'make line' icon. The handles on the top line of the shape disappear. Select each point in turn and nudge into the middle, as illustrated by 1. (Notice this gives a
vortex shape) Take the remaining handles and move outwards at 45 degrees and half way down the shape (2). (Can you see a mitre appearing?) Repeat with the bottom two points (3). Notice that
because you have moved the handles vertically towards each other, the middle of the object is compressed vertically. If that is unacceptable, instead move the handles horizontally as indicated
in green. In the example illustrated on the front page I have taken one copy as a shape and given it a gradient fill. Then I have taken a set of diagonal lines in the shape of a rectangle, applied the
mould shape and adjusted the width and height to fit over the top.
Drop Mould
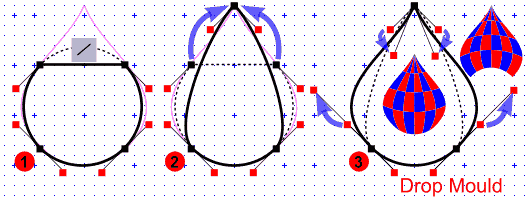
This one is not so easy as you can't use the shape Gary created in his tutorial, though it has four points, as we must keep the points
balanced. But you can use Gary's drop as a guide as shown here in purple. Create a circular mould this time and copy it to your page as before. Place the guide behind it in a different colour. Select the
top two points and make a line between them as before. Move them both up to coincide with the apex of the guide. Now move the lower two points and their handles until your envelope shape
lines up fully with the guide. The inset shows what happens if you then raise the bottom-most pair of handles. [Gary is chagrinned! Ed]
Vase and dome
The vase and dome shapes are created in the same way. The dome is based on the proportions of the Florence dome, one of the
wonders of the world. The 4/5th spacing of the circles was considered perfect. When the Florentines designed their cathedral, the knowledge did not then exist as to how to construct the dome,
which is larger than St Peter's, St Paul's or the Capitol. God will find a way, they said, and He did - in the form of Brunelleschi. He completed it in 1436 without using any central scaffold. The
illustration has the horizontal handles removed (Florence is 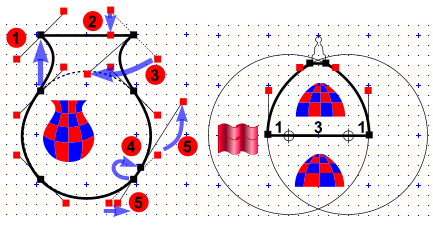 octagonal) however you can use them instead to give
a circular effect as illustrated in the lower example. Brunelleschi's friend Alberti wrote the first proper treatise on perspective, as we shall see in the second tutorial. octagonal) however you can use them instead to give
a circular effect as illustrated in the lower example. Brunelleschi's friend Alberti wrote the first proper treatise on perspective, as we shall see in the second tutorial.
Start with the circular mould as before. Then
1. Select the top two points and nudge directly up to form the lip
of your vase. 2. Drag the top pair of handles down to form the horizontal surface. 3. Drag the remaining pair of handles inward to the centre to create a neck, touching the circle. Then adjust the
bottom two points to bring the bowl of the vase back out again; you will need to : 4. move the point round a little, and 5. Adjust the angle of the handles accordingly, stretching the top pair of
handles to get the shape you want, which may well differ from mine.
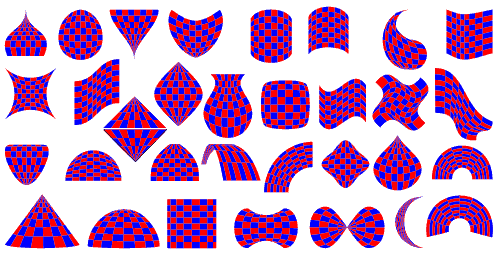
Despite point limitation, an amazing number of shapes are possible as illustrated below. Click here for the XAR file from which you can copy the envelopes below.
The last example we shall follow uses the handle hex effect of the mould envelope to simulate perspective.
|