Xara X. Create Bitmap Copy
|
|||||||
|
Xara X. Create Bitmap Copy |
|||||||
|
|
|||||||||||||||||||||||||||||||
|
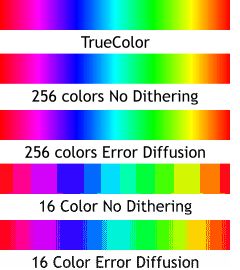
TrueColor produces the smoothest blend with no banding. 256 Colors, with or without Error Diffusion, produces a smooth transition at this small size as well. 16 Colors with No Dithering is banded and 16 Colors with Error Diffusion is only by degrees better. But, if you are creating bitmaps to use in Xara, why be cheap? Go for the gold and use either TrueColor or TrueColor + Alpha. Worry about the other settings when you get ready to export your image. |
|
Do not include a rectangular background behind your object when you Create Bitmap Copy or Xara will include it in the bitmap and the background will not be transparent. If your image does not need a transparent background then select the TrueColor option. |
|
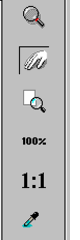
The Control Bar contains a Zoom Tool for magnifying a section of the preview image, a Push Tool for sliding the image around in the preview window, Zoom to Fit, which reduces the image to fit inside the preview windows, 100% which scales the image to full size, and 1:1, similar to 100% but displays non-GIF images at the same size they appear on screen at 100% Zoom Factor. The Color Picker (the eyedropper) only works on images of 256 colors or less and can be used to designate transparent colors. NOTE: We will cover the creation of transparent GIF files in next month's issue. All file options in the Save Bitmap Copy dialog are PNG images. There are many similarities between PNG, GIF, and JPEG which we will sort out next month as well. |
|
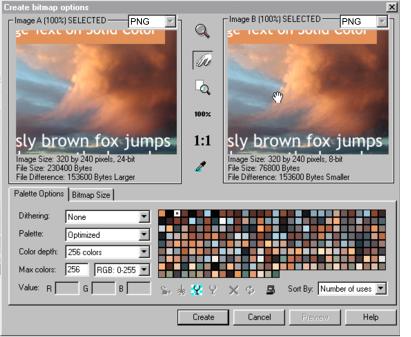 You can Create a Bitmap Copy
right in Xara. There are two ways to do this: 1) right click on the selection and select Create Bitmap Copy, or 2) select this function in the Arrange pull down menu at the top of the
screen.
You can Create a Bitmap Copy
right in Xara. There are two ways to do this: 1) right click on the selection and select Create Bitmap Copy, or 2) select this function in the Arrange pull down menu at the top of the
screen.
 By default, Create Bitmap Copy selects a
Color Depth of True Color + Alpha. This is 24 bit color with an additional 8 bits of alpha channel transparency. The other options are TrueColor (16.7 million colors), 256 colors, 16
colors and 2 colors.
By default, Create Bitmap Copy selects a
Color Depth of True Color + Alpha. This is 24 bit color with an additional 8 bits of alpha channel transparency. The other options are TrueColor (16.7 million colors), 256 colors, 16
colors and 2 colors.
 If you select a Color Depth of 256 or
16 colors, you have a Dithering choice of Error Diffusion or None.
If you select a Color Depth of 256 or
16 colors, you have a Dithering choice of Error Diffusion or None.
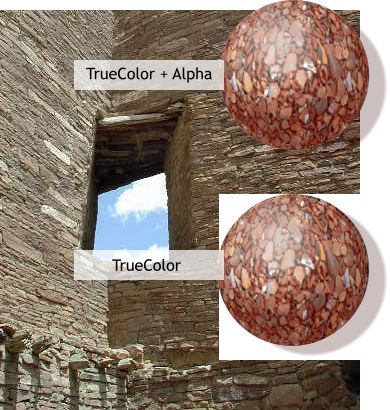 If you want the bitmap's background to be
transparent, use the TrueColor + Alpha Color Depth option. You can see how seamlessly it integrates with the background photo.
If you want the bitmap's background to be
transparent, use the TrueColor + Alpha Color Depth option. You can see how seamlessly it integrates with the background photo.
 Between the two side-by-side preview windows is the
Control Bar. The two preview windows let you try different options and compare the results. Click in either window to select it and then try different Color Depth and Palette options. The
results are displayed at the bottom of the preview window along with the increase or decrease in file size.
Between the two side-by-side preview windows is the
Control Bar. The two preview windows let you try different options and compare the results. Click in either window to select it and then try different Color Depth and Palette options. The
results are displayed at the bottom of the preview window along with the increase or decrease in file size.