 |
 |
 |
 |
 |
 |
 |
New Xara Features
DISCLAIMER: The features shown here are from the beta (test) version of Xara. The design of the features and interface may change in the release version and certain features may not be released with the next version of Xara.
OK, what this means is that at the current time, many of these features are still under development. And while most of the features I am going to show you are reasonably stable (for a beta version), if Xara does not feel the features are ready for prime time, they will save them for a future release.
Profiles are available for many of the new Xara tools and effects. The preset Profiles shown here have been applied to a 2-color Linear filled rectangle.
Profiles are used with most of the major effects and are the equivalent of CorelDRAW's Interactive Controls.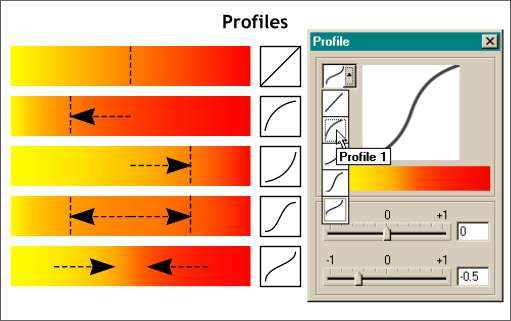
Profiles are a new interface feature that determine how an effect is executed. They come in two kinds, Presets (the boxes with the funny lines), and user defined (the sliders).
The chrome pretzel is in reality two multicolored filled circles that have been
blended in 999 steps on a path. Blends on a Path blend along the whole path and can also be rotated along the path. Shown at the bottom of the illustration are various profile settings.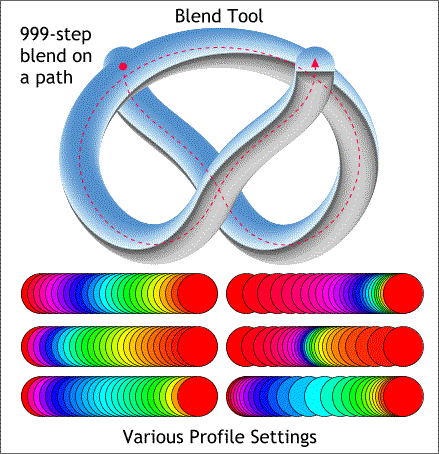 BLENDS As you can see on the left there is much excitement in the Blend Tool department.
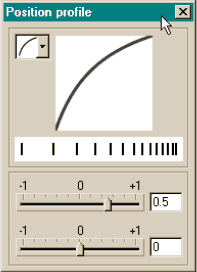
Not shown is the Position Profile dialog that changes the distribution of the blend colors as seen top left.
 While the preset Profiles
are the same for the Blend Tool, there are two dialogs. Shown here is the Attribute Profile dialog which determines the spacing of the objects seen in the three blends top right above.
The vertical row of lines, in the Position Profile, change to graphically represent the settings effect.
While the preset Profiles
are the same for the Blend Tool, there are two dialogs. Shown here is the Attribute Profile dialog which determines the spacing of the objects seen in the three blends top right above.
The vertical row of lines, in the Position Profile, change to graphically represent the settings effect.