


 Color Tips
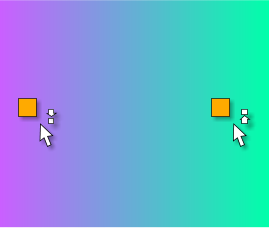 Intuitive Color Replacement Feedback You can bypass the Fill Tool
when changing start and end colors for a two color Linear fill. Drag a
color from the screen palette, or the Color Editor over the Linear
filled object. After a moment the cursor will change to display a tiny up
or down facing arrow and the dropped color will replace either the
current start or end color.
Intuitive Color Replacement Feedback You can bypass the Fill Tool
when changing start and end colors for a two color Linear fill. Drag a
color from the screen palette, or the Color Editor over the Linear
filled object. After a moment the cursor will change to display a tiny up
or down facing arrow and the dropped color will replace either the
current start or end color.
 Drag and Drop a Custom Color Most users know that you can drag and
drop a color from the screen palette onto another object, or text
object. And with version 7 products you can drag and drop a color from
the screen palette onto the page or the pasteboard area.
But in recent versions, the color palette has shrunk down to a few
dozen primary colors. Well here’s the tip: You can mix a color in the
Color Editor (Ctrl e) and drag and drop it onto an object, text object,
or onto the page or pasteboard area.
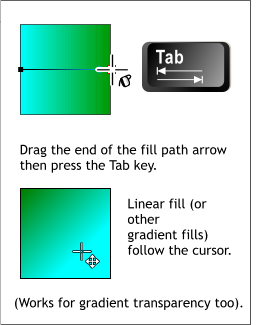
Interactive Linear Fill or Transparency When you create a Linear fill
or Linear transparency, you can drag either end of the fill path arrow
to change the length and direction of the fill or transparency. That’s
pretty cool in and of itself. But, if you want to have some real fun, tap
the Tab key after you start dragging and the fill becomes truly
interactive. The fill will follow the cursor as you drag on the fill.
Drag and Drop a Custom Color Most users know that you can drag and
drop a color from the screen palette onto another object, or text
object. And with version 7 products you can drag and drop a color from
the screen palette onto the page or the pasteboard area.
But in recent versions, the color palette has shrunk down to a few
dozen primary colors. Well here’s the tip: You can mix a color in the
Color Editor (Ctrl e) and drag and drop it onto an object, text object,
or onto the page or pasteboard area.
Interactive Linear Fill or Transparency When you create a Linear fill
or Linear transparency, you can drag either end of the fill path arrow
to change the length and direction of the fill or transparency. That’s
pretty cool in and of itself. But, if you want to have some real fun, tap
the Tab key after you start dragging and the fill becomes truly
interactive. The fill will follow the cursor as you drag on the fill.
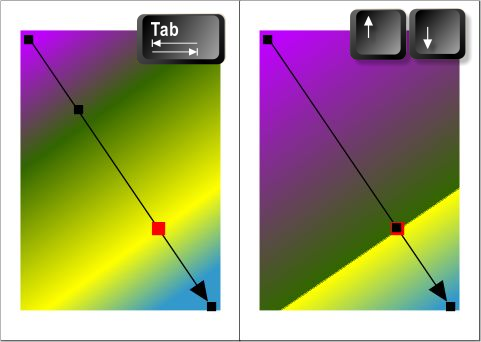 Selecting and Moving Color and Transparency Control Points You can
add a color to the fill path arrow by either double clicking on the fill
path or by dropping a color on the fill path. You can add an additional
transparency control point by double clicking on the arrow. And you can
reposition the control points by dragging them.
But this is not always easy if say a point is partially hidden under
another. You can toggle through the control points by selecting any one
point then pressing the Tab key. The selected point will highlight. You
can move the control points along the fill path by pressing the up and
down arrow keys on your keyboard. Hold down the Alt key and each
click of an arrow key will move the control point one pixel. If you hold
down the Shift key, the control point will move by 10 X your Nudge
Size distance (Page Options > General tabbed section).
Selecting and Moving Color and Transparency Control Points You can
add a color to the fill path arrow by either double clicking on the fill
path or by dropping a color on the fill path. You can add an additional
transparency control point by double clicking on the arrow. And you can
reposition the control points by dragging them.
But this is not always easy if say a point is partially hidden under
another. You can toggle through the control points by selecting any one
point then pressing the Tab key. The selected point will highlight. You
can move the control points along the fill path by pressing the up and
down arrow keys on your keyboard. Hold down the Alt key and each
click of an arrow key will move the control point one pixel. If you hold
down the Shift key, the control point will move by 10 X your Nudge
Size distance (Page Options > General tabbed section).


 Removing a Black Background from a Bitmap If you need to remove a
solid black background from a bitmap such as the g on the left, place a
white rectangle in front of the bitmap and apply a Flat, 0%,
Luminosity transparency. The left half of the example shown above
shows the result but also shows that any anti-aliasing (smoothing) has
also been removed. The solution is simple. Create a new Bitmap Copy,
True Color, and I like to use 300dpi Bitmap Resolution. The anti-
aliased results are shown on the right half.
Removing a Black Background from a Bitmap If you need to remove a
solid black background from a bitmap such as the g on the left, place a
white rectangle in front of the bitmap and apply a Flat, 0%,
Luminosity transparency. The left half of the example shown above
shows the result but also shows that any anti-aliasing (smoothing) has
also been removed. The solution is simple. Create a new Bitmap Copy,
True Color, and I like to use 300dpi Bitmap Resolution. The anti-
aliased results are shown on the right half.


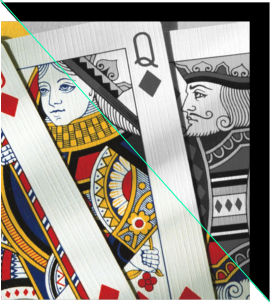 Changing a Color Bitmap to
Grayscale In a related method
to the last tip, you can remove
all color from a colored bitmap,
or even color vector image.
Place a solid black object or
rectangle over the color bitmap
and apply Flat, 0%, Saturation
transparency. (You can also
accomplish this in the Photo
Tool > Enhance >setting the
Saturation setting to 0%).
Changing a Color Bitmap to
Grayscale In a related method
to the last tip, you can remove
all color from a colored bitmap,
or even color vector image.
Place a solid black object or
rectangle over the color bitmap
and apply Flat, 0%, Saturation
transparency. (You can also
accomplish this in the Photo
Tool > Enhance >setting the
Saturation setting to 0%).
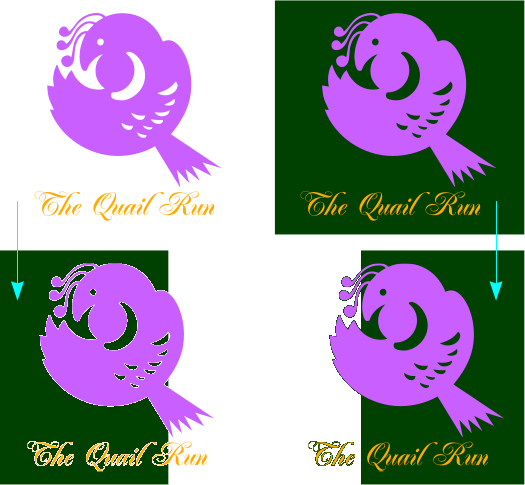
 8-Bit PNG Transparent Background Export Tip If you are exporting
text and/or graphics for a website and these objects will appear over a
colored or textured background, place the objects over a rectangle
containing the same color or texture as the web page background. Do
not select the rectangle, just the text or object. Xara anti-aliases
(smooths) to the background color. You can see the results of this
above. If the text and object is exported over the white of the page,
the resulting image will have a white fringe. This is OK if the objects
will appear over a white background. But not OK over the deep green
background. The same objects exported over the green background are
anti-aliased to the green background and when placed over this
background on a web page look sharp and clean.
8-Bit PNG Transparent Background Export Tip If you are exporting
text and/or graphics for a website and these objects will appear over a
colored or textured background, place the objects over a rectangle
containing the same color or texture as the web page background. Do
not select the rectangle, just the text or object. Xara anti-aliases
(smooths) to the background color. You can see the results of this
above. If the text and object is exported over the white of the page,
the resulting image will have a white fringe. This is OK if the objects
will appear over a white background. But not OK over the deep green
background. The same objects exported over the green background are
anti-aliased to the green background and when placed over this
background on a web page look sharp and clean.