

 CLICK TO DOWNLOAD
YOUR FREE TRIAL COPY
OF XARA 3D MAKER 7
Creating an Animated Banner
In this tutorial we will create an animated banner. It’s fun. It’s easy.
Well it’s fun. And not all that hard. Honest.
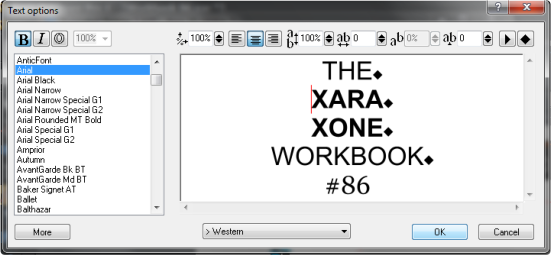 Select the Text Tool (Aa). Enter the text shown above, and add Page
Breaks (the diamond) after each page. I used Arial Regular and Bold and
the #86 is Georgia. Feel free to use your own text and fonts.
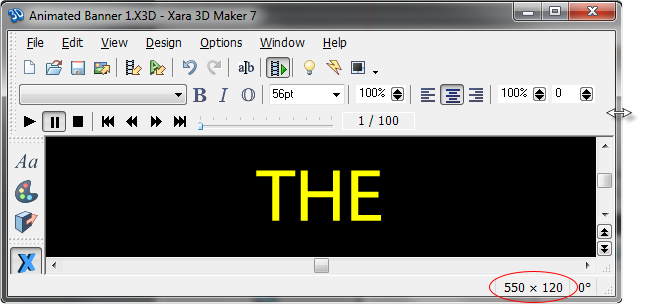
Drag the Options menu off the program onto the desktop. Drag the
edges of the application window to resize Xara 3D Maker 7 to 550 x
120. You can see the size in the lower right corner.
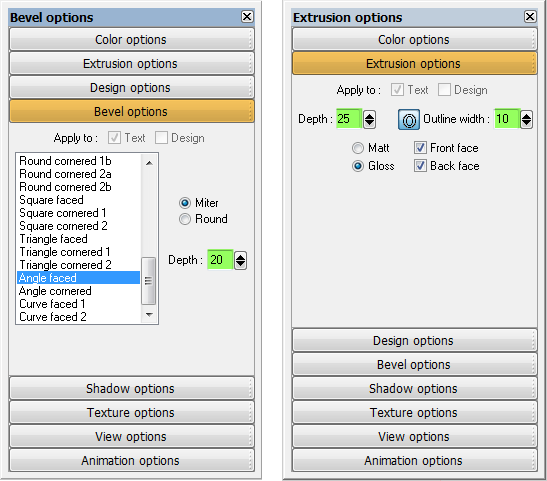 Apply an Angle Faced bevel with a depth of 20. Open the Extrusion
Options, click the outline O icon and change the Outline Width to 10.
Set the Depth: to 25.
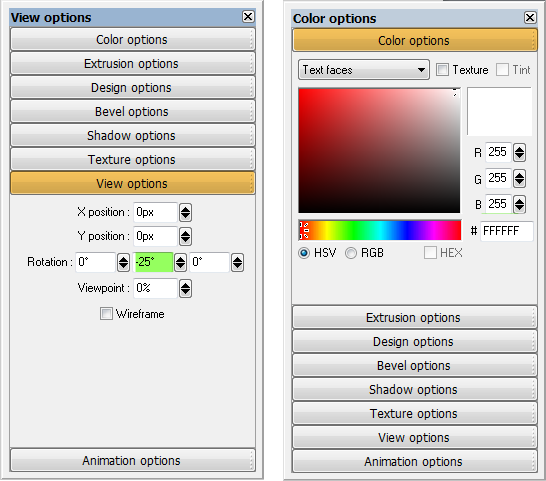
In View Options, set the center Rotation: angle to -25 degrees. This
tilts the text slightly downwards and reveals the top edge of the text.
In Color Options, change the setting for Text Faces to RGB 255, 255,
255 (white). We will color the text using the light settings. From the
drop down list change Light 1 to RGB 255, 0, 255 (Magenta). Light 2
to RGB 255, 255, 0 (Yellow) and Light 3 to RGB 0, 255, 255 (Cyan).
Finally, from the drop down list, select Text Sides and change the
value to RGB 80, 80, 80 (Grey).
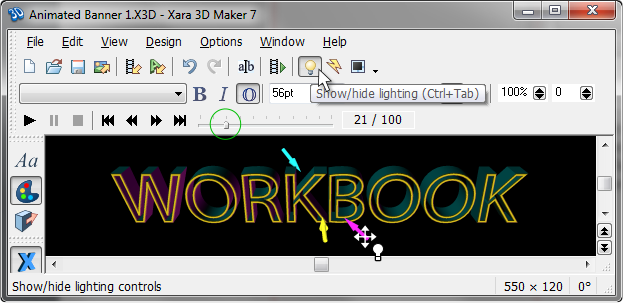
Click Show/Hide Lighting to make the lighting arrows visible. This is
kind of tricky but Move the cursor over the colored arrows. The cursor
will change to four arrows and a light bulb when it is over a light.
These arrows represent the color of the light and the direction the light
is pointing. Drag each of the light arrows so they are pointing more or
less as shown here. The lights rotate in elliptical obits but getting them
in the right place requires a bit of patience plus trial and error. The
main idea is you want the front of the text to be yellow and magenta
and the sides cyan. Take your time. Advance the frame slider (shown
inside the green circle) until you can see all the lights.
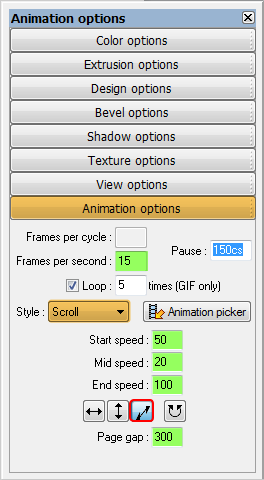 Open Animation Options. Select Scroll from the drop down list. Set the
frames to 15. Higher numbers produce smoother animation but at a
cost of larger file size. Set the speed settings as shown. The Start
Speed is the speed at which the text moves forward. Mid Speed is the
speed the text slows or accelerates before coming to a stop (set the
Pause to 150cs, about 1 1/2 seconds). The End Speed represents the
exit speed for the text. Click the diagonal arrow button and set the
Page Gap to 300. Page Gap determines how close the moving words
come to one another. A lesser setting causes the words to stack up and
touch. A higher setting puts more room between the moving words. You
need to experiment with these settings as they may need to change
with the direction in which the text is moving.
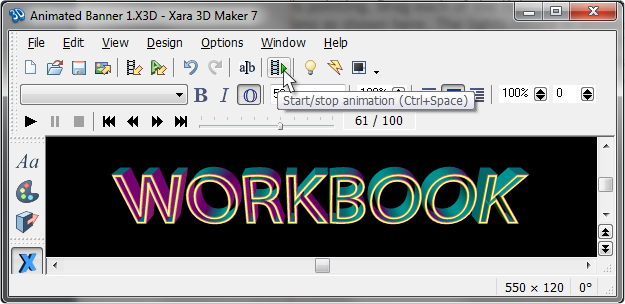 And this is how it turns out. File size is a substantial 316K. If you do not
have a lot of other images you could probably get away with the file size. I
Exported this file as an Animated GIF file. No dithering, Optimized
palette, no transparency, and 64 colors.
The thing to consider here is the number of frames. Faster animation will
result in fewer frames but not as much drama. So you need to experiment
to see what works best for your animation.


 CLICK TO DOWNLOAD
YOUR FREE TRIAL COPY
OF XARA 3D MAKER 7
Creating an Animated Banner
In this tutorial we will create an animated banner. It’s fun. It’s easy.
Well it’s fun. And not all that hard. Honest.

 Select the Text Tool (Aa). Enter the text shown above, and add Page
Breaks (the diamond) after each page. I used Arial Regular and Bold and
the #86 is Georgia. Feel free to use your own text and fonts.
Drag the Options menu off the program onto the desktop. Drag the
edges of the application window to resize Xara 3D Maker 7 to 550 x
120. You can see the size in the lower right corner.
 Apply an Angle Faced bevel with a depth of 20. Open the Extrusion
Options, click the outline O icon and change the Outline Width to 10.
Set the Depth: to 25.
In View Options, set the center Rotation: angle to -25 degrees. This
tilts the text slightly downwards and reveals the top edge of the text.
In Color Options, change the setting for Text Faces to RGB 255, 255,
255 (white). We will color the text using the light settings. From the
drop down list change Light 1 to RGB 255, 0, 255 (Magenta). Light 2
to RGB 255, 255, 0 (Yellow) and Light 3 to RGB 0, 255, 255 (Cyan).
Finally, from the drop down list, select Text Sides and change the
value to RGB 80, 80, 80 (Grey).
Click Show/Hide Lighting to make the lighting arrows visible. This is
kind of tricky but Move the cursor over the colored arrows. The cursor
will change to four arrows and a light bulb when it is over a light.
These arrows represent the color of the light and the direction the light
is pointing. Drag each of the light arrows so they are pointing more or
less as shown here. The lights rotate in elliptical obits but getting them
in the right place requires a bit of patience plus trial and error. The
main idea is you want the front of the text to be yellow and magenta
and the sides cyan. Take your time. Advance the frame slider (shown
inside the green circle) until you can see all the lights.
 Open Animation Options. Select Scroll from the drop down list. Set the
frames to 15. Higher numbers produce smoother animation but at a
cost of larger file size. Set the speed settings as shown. The Start
Speed is the speed at which the text moves forward. Mid Speed is the
speed the text slows or accelerates before coming to a stop (set the
Pause to 150cs, about 1 1/2 seconds). The End Speed represents the
exit speed for the text. Click the diagonal arrow button and set the
Page Gap to 300. Page Gap determines how close the moving words
come to one another. A lesser setting causes the words to stack up and
touch. A higher setting puts more room between the moving words. You
need to experiment with these settings as they may need to change
with the direction in which the text is moving.
 And this is how it turns out. File size is a substantial 316K. If you do not
have a lot of other images you could probably get away with the file size. I
Exported this file as an Animated GIF file. No dithering, Optimized
palette, no transparency, and 64 colors.
The thing to consider here is the number of frames. Faster animation will
result in fewer frames but not as much drama. So you need to experiment
to see what works best for your animation.

