WEBSITE AND WEBSITE GRAPHICS CREATED WITH XARA DESIGNER PRO 6Opacity Mask One of the more esoteric new features found in Xara Designer Pro 6 and Xara Photo and Graphic Designer 6, is the Opacity Mask. Like Enhance transparency, and the new Clone Tool, the Opacity Mask is a vector-based solution that can be applied without permanently altering the object to which it is being applied. As we saw with the Clone Tool, all of the cloned areas are really just vector shapes grouped to the photo. The photo itself is unchanged and the cloned areas can be reedited, or even deleted. OK. But what exactly is an Opacity Mask and how does it work? I am glad you asked.An opacity mask is a vector image that when applied to a photo or vector shape, lets parts of the photo show through. It works in much the same way that Photoshop used to use when creating a gradient transparency. Photoshop used a grayscale intermediate gradient image to which transparency was applied to create a gradient transparency.Now because Xara has always been able to create a one-step, intuitive gradient transparency, the need for an intermediate grayscale shape has not been necessary. So why is it necessary now? A picture is worth a thousand words, etc. Let’s continue.Opacity masks make part of an image transparent and as far as I have discovered, work best when one object or image is placed over another. You could use more images if you want but for these examples we will stick with two. Otherwise you and I will both be totally confused.The first example will use the sunset mountain, and cloudy sky photos.The illustration above will visually demonstrate how the percentages of black and white affect a photo when applied as an Opacity Mask. The background is white, while the type is in percentages of black from 10 to 90%. The rectangle is the same size as the mountain photo, which is the same size as the cloud photo. We’ll just copy the text and rectangle to the clipboard (there’s no need to group or create a bitmap copy).With the photo of the mountains centered over the photo of the blue sky and clouds, and with only the top photo selected, from the Edit menu, select Paste Opacity Mask > Paste Opacity Mask.And here are the results. The white becomes totally opaque and reveals nothing of the blue sky image below. 10% black reveals a bit of the image while 90% makes the top photo almost totally transparent. Black will make that portion of the top photo totally transparent. The big difference between using basic transparency, is an Opacity Mask gives you the ability to have a variety of transparencies on in one operation.Here is another Opacity Mask. A Contour has been applied to the text, the background is a dark gray rectangle with an Elliptical fill and feathering has been applied to the rectangle to feather the edges to white. We’ll copy this to the clipboard (remember, just select the objects, there is no need to group or create a bitmap copy)...The Opacity Mask has been applied to the mountain photo revealing varying amounts of the blue sky and white cloud photo.OK Let’s say you are not happy with the effect. Simply select the photo to which the mask was applied, and Ungroup it. The mask objects are restored to grayscale and can be edited, copied to the clipboard and reapplied as an Opacity Mask.OK, Someone out there just asked, can you use colors for your Opacity Mask. Yes, but the colors will be treated as grayscale values. Let’s see.To demonstrate my previous point, I copied the cloud photo to the clipboard.......and have applied the cloud photo Opacity Mask to the actual cloud photo. The results are a montage of the two images.As I mentioned, the advantage of using an opacity mask is multiple levels of transparency can be applied in one operation. The image above is from the Photographs 1 folder from Xara Xtreme 5.0. The photo has not appeared so far in the Designs Gallery though it may well be on the Designer Pro 6 and Photo & Graphic Designer discs when they ship. If you want to follow along, you can drag the photo above onto your desktop and then drag and drop it back into Designer Pro 6.Here is an opacity mask that was created by tracing the pencil shapes and grouping all the pencil shapes except the white pencil on the left.An Elliptical (20% to 80%) fill is applied to the group of pencils and a black rectangle is added the same size as the photo underneath.The mask is copied to the clipboard.The Opacity Mask is applied to the pencils photo which has been placed over a sunset photo. The result, the black rectangle removes the background from the pencils photo. It makes the pencil on the left totally nontransparent and makes the other pencils fade back into the sunset photo. The text was added later.I have a feeling that we have just scratched the surface of what is possible with an opacity mask but these examples should give you the basics of how it works. Experiment and see what uses you can come up with. It is a non-destructive process and you cannot break or destroy anything by experimenting.There are many more new tools and features in new Xara Designer Pro 6. See for yourself. You can download a free, fully functional, 30-day trial copy here. Give it a try and let me know what you think.Gary W. PriesterYour EditorSend e-mailH1234 5 Download Zipped Tutorial


 WEBSITE AND WEBSITE GRAPHICS CREATED WITH XARA DESIGNER PRO 6

 Opacity Mask One of the more esoteric new features found in Xara
Designer Pro 6 and Xara Photo and Graphic Designer 6, is the Opacity
Mask. Like Enhance transparency, and the new Clone Tool, the Opacity
Mask is a vector-based solution that can be applied without
permanently altering the object to which it is being applied. As we saw
with the Clone Tool, all of the cloned areas are really just vector
shapes grouped to the photo. The photo itself is unchanged and the
cloned areas can be reedited, or even deleted.
OK. But what exactly is an Opacity Mask and how does it work? I am
glad you asked.
An opacity mask is a vector image that when applied to a photo or
vector shape, lets parts of the photo show through. It works in much
the same way that Photoshop used to use when creating a gradient
transparency. Photoshop used a grayscale intermediate gradient image
to which transparency was applied to create a gradient transparency.
Now because Xara has always been able to create a one-step, intuitive
gradient transparency, the need for an intermediate grayscale shape
has not been necessary. So why is it necessary now? A picture is worth a
thousand words, etc. Let’s continue.
Opacity Mask One of the more esoteric new features found in Xara
Designer Pro 6 and Xara Photo and Graphic Designer 6, is the Opacity
Mask. Like Enhance transparency, and the new Clone Tool, the Opacity
Mask is a vector-based solution that can be applied without
permanently altering the object to which it is being applied. As we saw
with the Clone Tool, all of the cloned areas are really just vector
shapes grouped to the photo. The photo itself is unchanged and the
cloned areas can be reedited, or even deleted.
OK. But what exactly is an Opacity Mask and how does it work? I am
glad you asked.
An opacity mask is a vector image that when applied to a photo or
vector shape, lets parts of the photo show through. It works in much
the same way that Photoshop used to use when creating a gradient
transparency. Photoshop used a grayscale intermediate gradient image
to which transparency was applied to create a gradient transparency.
Now because Xara has always been able to create a one-step, intuitive
gradient transparency, the need for an intermediate grayscale shape
has not been necessary. So why is it necessary now? A picture is worth a
thousand words, etc. Let’s continue.
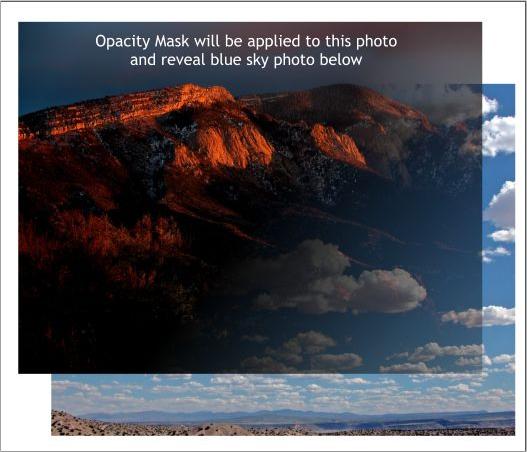 Opacity masks make part of an image transparent and as far as I have
discovered, work best when one object or image is placed over another.
You could use more images if you want but for these examples we will
stick with two. Otherwise you and I will both be totally confused.
The first example will use the sunset mountain, and cloudy sky photos.
Opacity masks make part of an image transparent and as far as I have
discovered, work best when one object or image is placed over another.
You could use more images if you want but for these examples we will
stick with two. Otherwise you and I will both be totally confused.
The first example will use the sunset mountain, and cloudy sky photos.
 The illustration above will visually demonstrate how the percentages of
black and white affect a photo when applied as an Opacity Mask. The
background is white, while the type is in percentages of black from 10
to 90%. The rectangle is the same size as the mountain photo, which is
the same size as the cloud photo. We’ll just copy the text and rectangle
to the clipboard (there’s no need to group or create a bitmap copy).
The illustration above will visually demonstrate how the percentages of
black and white affect a photo when applied as an Opacity Mask. The
background is white, while the type is in percentages of black from 10
to 90%. The rectangle is the same size as the mountain photo, which is
the same size as the cloud photo. We’ll just copy the text and rectangle
to the clipboard (there’s no need to group or create a bitmap copy).
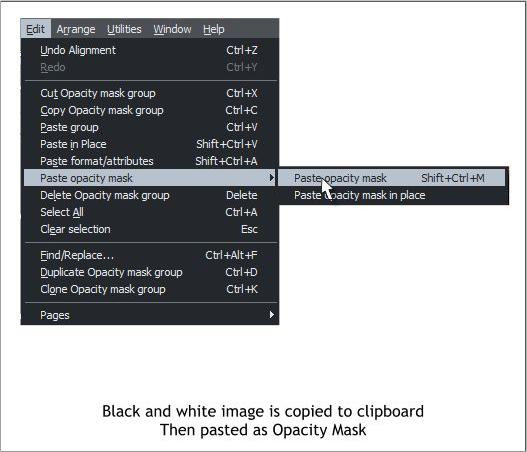 With the photo of the mountains centered over the photo of the blue
sky and clouds, and with only the top photo selected, from the Edit
menu, select Paste Opacity Mask > Paste Opacity Mask.
With the photo of the mountains centered over the photo of the blue
sky and clouds, and with only the top photo selected, from the Edit
menu, select Paste Opacity Mask > Paste Opacity Mask.
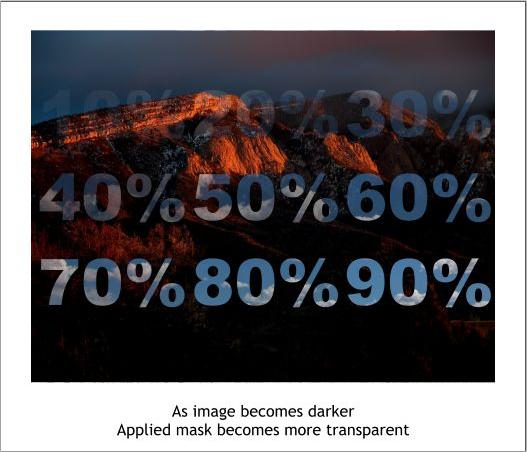 And here are the results. The white becomes totally opaque and reveals
nothing of the blue sky image below. 10% black reveals a bit of the
image while 90% makes the top photo almost totally transparent. Black
will make that portion of the top photo totally transparent. The big
difference between using basic transparency, is an Opacity Mask gives
you the ability to have a variety of transparencies on in one operation.
And here are the results. The white becomes totally opaque and reveals
nothing of the blue sky image below. 10% black reveals a bit of the
image while 90% makes the top photo almost totally transparent. Black
will make that portion of the top photo totally transparent. The big
difference between using basic transparency, is an Opacity Mask gives
you the ability to have a variety of transparencies on in one operation.
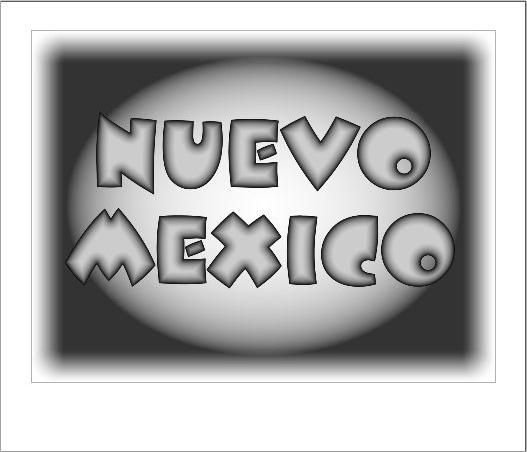 Here is another Opacity Mask. A Contour has been applied to the text,
the background is a dark gray rectangle with an Elliptical fill and
feathering has been applied to the rectangle to feather the edges to
white. We’ll copy this to the clipboard (remember, just select the
objects, there is no need to group or create a bitmap copy)...
Here is another Opacity Mask. A Contour has been applied to the text,
the background is a dark gray rectangle with an Elliptical fill and
feathering has been applied to the rectangle to feather the edges to
white. We’ll copy this to the clipboard (remember, just select the
objects, there is no need to group or create a bitmap copy)...
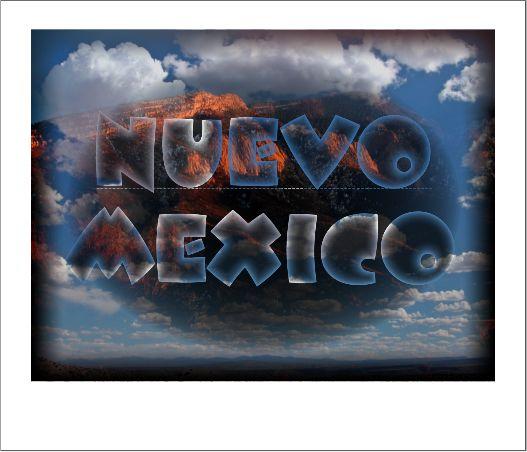 The Opacity Mask has been applied to the mountain photo revealing
varying amounts of the blue sky and white cloud photo.
OK Let’s say you are not happy with the effect. Simply select the photo
to which the mask was applied, and Ungroup it. The mask objects are
restored to grayscale and can be edited, copied to the clipboard and
reapplied as an Opacity Mask.
OK, Someone out there just asked, can you use colors for your Opacity
Mask. Yes, but the colors will be treated as grayscale values. Let’s see.
The Opacity Mask has been applied to the mountain photo revealing
varying amounts of the blue sky and white cloud photo.
OK Let’s say you are not happy with the effect. Simply select the photo
to which the mask was applied, and Ungroup it. The mask objects are
restored to grayscale and can be edited, copied to the clipboard and
reapplied as an Opacity Mask.
OK, Someone out there just asked, can you use colors for your Opacity
Mask. Yes, but the colors will be treated as grayscale values. Let’s see.
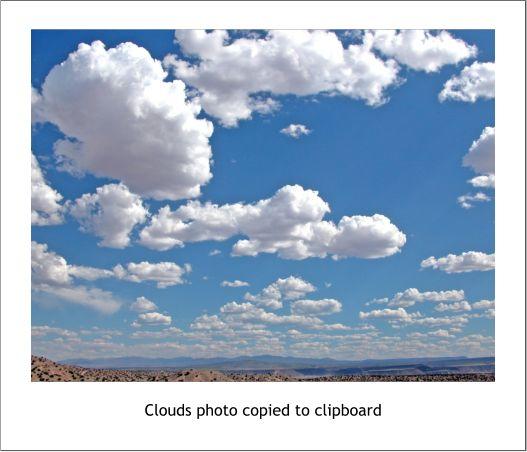 To demonstrate my previous point, I copied the cloud photo to the
clipboard....
To demonstrate my previous point, I copied the cloud photo to the
clipboard....
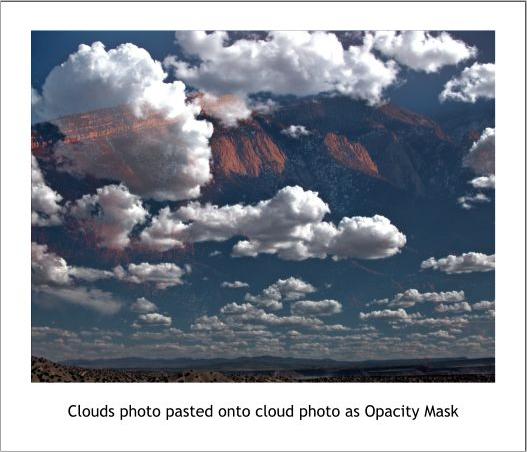 ...and have applied the cloud photo Opacity Mask to the actual cloud
photo. The results are a montage of the two images.
...and have applied the cloud photo Opacity Mask to the actual cloud
photo. The results are a montage of the two images.
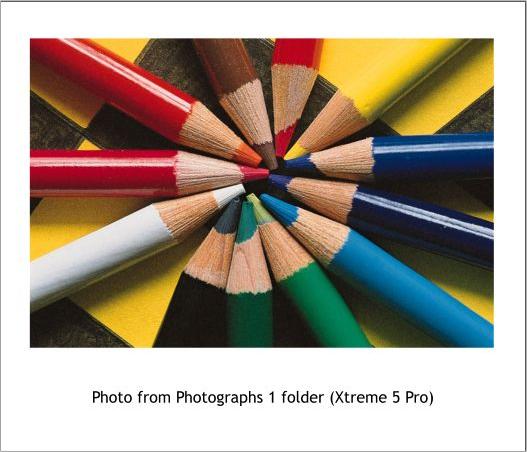 As I mentioned, the advantage of using an opacity mask is multiple
levels of transparency can be applied in one operation. The image
above is from the Photographs 1 folder from Xara Xtreme 5.0. The
photo has not appeared so far in the Designs Gallery though it may well
be on the Designer Pro 6 and Photo & Graphic Designer discs when
they ship. If you want to follow along, you can drag the photo above
onto your desktop and then drag and drop it back into Designer Pro 6.
As I mentioned, the advantage of using an opacity mask is multiple
levels of transparency can be applied in one operation. The image
above is from the Photographs 1 folder from Xara Xtreme 5.0. The
photo has not appeared so far in the Designs Gallery though it may well
be on the Designer Pro 6 and Photo & Graphic Designer discs when
they ship. If you want to follow along, you can drag the photo above
onto your desktop and then drag and drop it back into Designer Pro 6.
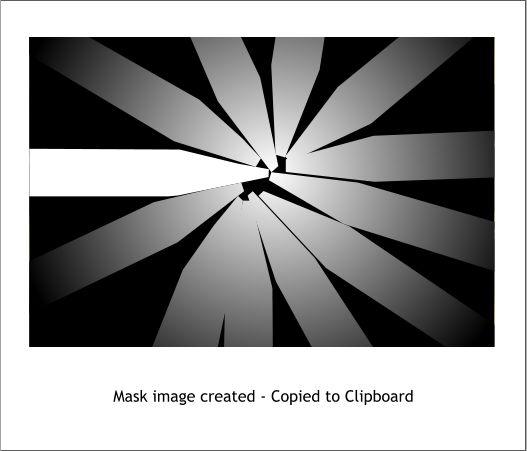 Here is an opacity mask that was created by tracing the pencil shapes
and grouping all the pencil shapes except the white pencil on the left.
An Elliptical (20% to 80%) fill is applied to the group of pencils and a
black rectangle is added the same size as the photo underneath.
The mask is copied to the clipboard.
Here is an opacity mask that was created by tracing the pencil shapes
and grouping all the pencil shapes except the white pencil on the left.
An Elliptical (20% to 80%) fill is applied to the group of pencils and a
black rectangle is added the same size as the photo underneath.
The mask is copied to the clipboard.
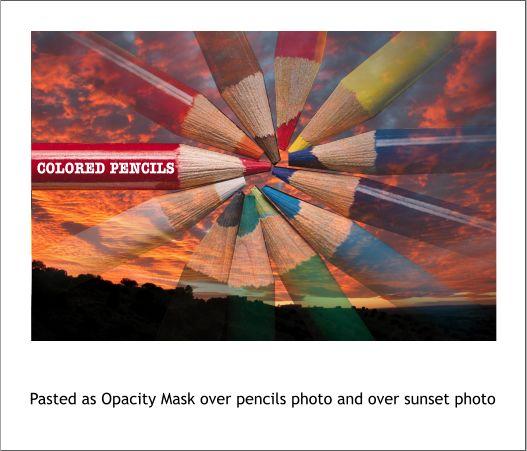 The Opacity Mask is applied to the pencils photo which has been placed
over a sunset photo. The result, the black rectangle removes the
background from the pencils photo. It makes the pencil on the left
totally nontransparent and makes the other pencils fade back into the
sunset photo. The text was added later.
I have a feeling that we have just scratched the surface of what is
possible with an opacity mask but these examples should give you the
basics of how it works. Experiment and see what uses you can come up
with. It is a non-destructive process and you cannot break or destroy
anything by experimenting.
There are many more new tools and features in new Xara Designer Pro
6. See for yourself. You can download a free, fully functional, 30-day
trial copy here. Give it a try and let me know what you think.
Gary W. Priester
Your Editor
Send e-mail
The Opacity Mask is applied to the pencils photo which has been placed
over a sunset photo. The result, the black rectangle removes the
background from the pencils photo. It makes the pencil on the left
totally nontransparent and makes the other pencils fade back into the
sunset photo. The text was added later.
I have a feeling that we have just scratched the surface of what is
possible with an opacity mask but these examples should give you the
basics of how it works. Experiment and see what uses you can come up
with. It is a non-destructive process and you cannot break or destroy
anything by experimenting.
There are many more new tools and features in new Xara Designer Pro
6. See for yourself. You can download a free, fully functional, 30-day
trial copy here. Give it a try and let me know what you think.
Gary W. Priester
Your Editor
Send e-mail


 H 1 2 3 4 5 Download Zipped Tutorial


