WEBSITE AND WEBSITE GRAPHICS CREATED WITH XARA DESIGNER PRO 6The Photo Tool has been reconfigured and contains some new and improved features. Also, as you can see, the tools are now contained in a neat and tidy fly out menu.Perspective Correction is handy for dealing with wide angle effects such as shown in the photo above. The house is not really collapsing inwards, it is just the distortion caused by the wide angle lens. When you select this feature, Xara chugs away for a few moments, actually if the photo is large and high resolution, several moments....And then before you know it, the photo corrects itself. Professional photographers with large format view cameras can accomplish this by tilting the front part of the camera that holds the lens. But who needs an expensive 4 x 5 or 8 x 10 Deardorf studio camera when you have Perspective Correction?But don’t trade in your large format studio camera just yet. First, let’s see what it can do with this distorted photo of one of my framed stereograms.Hmmm? At least the sides are straight. But the top and bottom of the frame that were parallel in the original distorted photo, are now distorted. This feature works better when there are a lot more distorted sides. Actually, just moving the camera back and using more of the telephoto lens works better for photographing flat art work.Content-Aware Photo Resize was introduced in Xara Xtreme Pro 5, I believe. So while it is not new, it has been improved and a new Zoomfeature added. I need more area on either side of the photo above, but simply stretching it would cause distortion. So we’ll try Content-Aware Photo Resize. Select the photo, click the icon, and then click Prepare. Xara grinds away for a few moments analyzing the photo.After Xara finishes analyzing, four arrow handles appear that you can drag to expand the photo. Notice the portal in the photo above remains almost the same size while the edges have been extended. It actually looks like we can see more of the garage when in fact the garage has only been stretched. But the result is convincing.Let’s try the Content-Aware Photo Resize - Zoom feature on the balloon photo above. It would be nice to zoom in on the balloon and leave the rest of the photo unchanged, which is what Xara shows in its demonstrations of this tool.Sliding the Content Zoom slider does in fact zoom in on the balloon revealing more detail, and the foreground is mostly unchanged. But we also zoomed in on the mesas at the expense of the sky. But you can get an idea of how this feature works. In theory, a little man who resides inside Xara Designer Pro 6 and his brother who resides in Xara Photo & Graphic Designer 6, look at the photo, scratch their collective heads, then try to determines what to preserve and what to make bigger. Tough job if you ask me. I’ll think I’ll stick to text editing. The Brightness-Levels Dialog has been improved adding a Curves editing feature. This lets you drag a curve to more intuitively adjust the lightness and darkness of a photo. I like the drama of the photo above, but I think I can make it more dramatic by making it darker. I will try this with the Curves tool.It is a little hard to see because the dialog is in the way, but I have dragged the curve down and to the right a bit making the sky darker and making the pink sunset light on the mountain more intense.No that is not a typo for EXIT. EXIF stands for Exchangeable Image File Format and contains relevant data for photos taken with a digital camera such as the camera model, ISO, date and other info. Click here for more information. At last, a Clone Tool!!! Can a Magic Wand Tool be far behind?Unlike most Clone Tools that actually change an image’s pixels, Xara’s Clone Tool is non-destructive. The cloned area is really grouped with the photo and can be ungrouped at any time by merely ungrouping the cloned areas.When you select the Clone Tool, with a photo selected of course, you draw/define an area to which you wish to apply the cloned content. When the shape closes, you select part of the current photo, or even another photo somewhere on your desktop, and drag across it. The defined area is filled with that content. You can continue to drag on the photo until you have achieved the best fill. If you go back next week and click on the cloned area, it becomes active again and you can change the fill. It is a live effect. It’s alive! It’s alive! (Sorry).It is not always easy to find a large area that works for a large cloned area. So you can create many smaller areas. Increase the Feathering setting on the Infobar helps the new area blend. The final example on the right is not too bad. And if we decide we liked the wall better with the window, just ungroup, and delete the cloned areas.Your editor has never quite figured out why some photos import too large while others import too small. But in the case of either, if you select the photo, then the Photo Tool and press Scale Photo to 100%, the photo will increase or decrease to 96dpi, Windows screen resolution. To the left of the Scale Photo icon is an icon that zooms to 1:1 instead of resizing the photo. The photo above imported at the small size but the status bar revealed the size as 225dpi. I pressed the Scale Photo button and it increased to the full size at 96dpi as shown.H12 3 45Download Zipped Tutorial


 WEBSITE AND WEBSITE GRAPHICS CREATED WITH XARA DESIGNER PRO 6


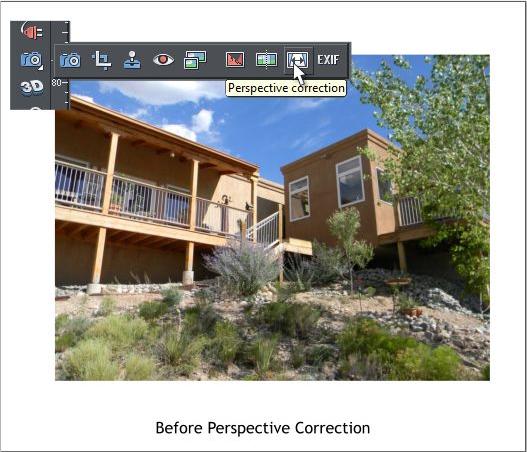 The Photo Tool has been reconfigured and contains some new and
improved features. Also, as you can see, the tools are now contained in
a neat and tidy fly out menu.
Perspective Correction is handy for dealing with wide angle effects
such as shown in the photo above. The house is not really collapsing
inwards, it is just the distortion caused by the wide angle lens. When
you select this feature, Xara chugs away for a few moments, actually if
the photo is large and high resolution, several moments....
The Photo Tool has been reconfigured and contains some new and
improved features. Also, as you can see, the tools are now contained in
a neat and tidy fly out menu.
Perspective Correction is handy for dealing with wide angle effects
such as shown in the photo above. The house is not really collapsing
inwards, it is just the distortion caused by the wide angle lens. When
you select this feature, Xara chugs away for a few moments, actually if
the photo is large and high resolution, several moments....
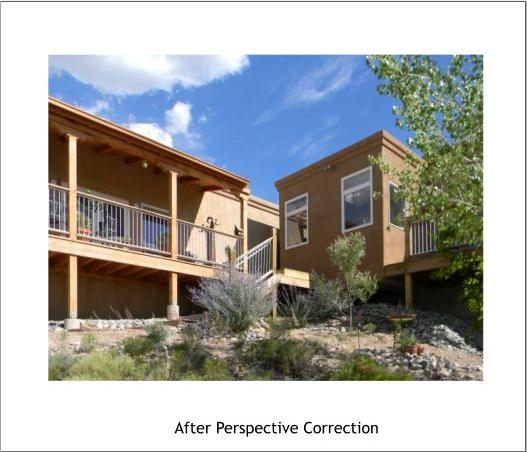 And then before you know it, the photo corrects itself. Professional
photographers with large format view cameras can accomplish this by
tilting the front part of the camera that holds the lens. But who needs
an expensive 4 x 5 or 8 x 10 Deardorf studio camera when you have
Perspective Correction?
And then before you know it, the photo corrects itself. Professional
photographers with large format view cameras can accomplish this by
tilting the front part of the camera that holds the lens. But who needs
an expensive 4 x 5 or 8 x 10 Deardorf studio camera when you have
Perspective Correction?
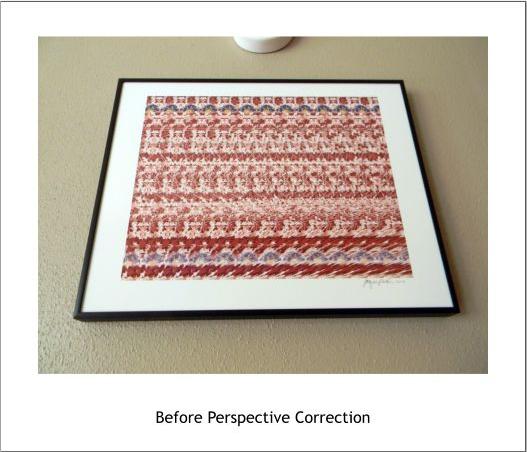 But don’t trade in your large format studio camera just yet. First, let’s
see what it can do with this distorted photo of one of my framed
stereograms.
But don’t trade in your large format studio camera just yet. First, let’s
see what it can do with this distorted photo of one of my framed
stereograms.
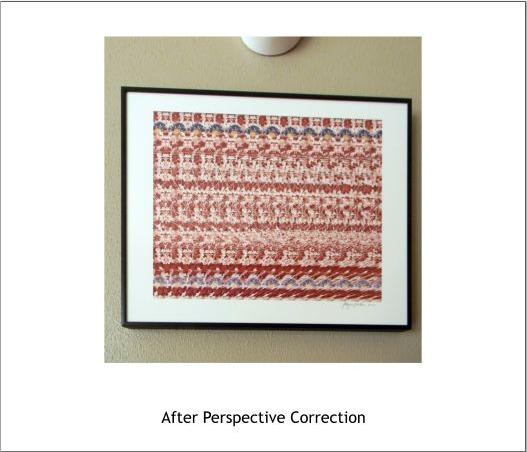 Hmmm? At least the sides are straight. But the top and bottom of the
frame that were parallel in the original distorted photo, are now
distorted. This feature works better when there are a lot more
distorted sides. Actually, just moving the camera back and using more
of the telephoto lens works better for photographing flat art work.
Hmmm? At least the sides are straight. But the top and bottom of the
frame that were parallel in the original distorted photo, are now
distorted. This feature works better when there are a lot more
distorted sides. Actually, just moving the camera back and using more
of the telephoto lens works better for photographing flat art work.
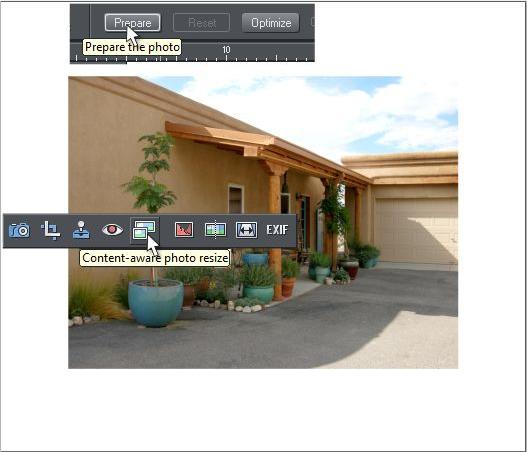 Content-Aware Photo Resize was introduced in Xara Xtreme Pro 5, I
believe. So while it is not new, it has been improved and a new Zoom
feature added. I need more area on either side of the photo above, but
simply stretching it would cause distortion. So we’ll try Content-Aware
Photo Resize. Select the photo, click the icon, and then click Prepare.
Xara grinds away for a few moments analyzing the photo.
Content-Aware Photo Resize was introduced in Xara Xtreme Pro 5, I
believe. So while it is not new, it has been improved and a new Zoom
feature added. I need more area on either side of the photo above, but
simply stretching it would cause distortion. So we’ll try Content-Aware
Photo Resize. Select the photo, click the icon, and then click Prepare.
Xara grinds away for a few moments analyzing the photo.
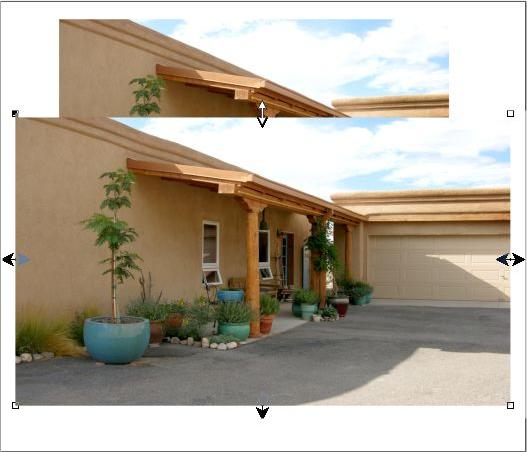 After Xara finishes analyzing, four arrow handles appear that you can
drag to expand the photo. Notice the portal in the photo above remains
almost the same size while the edges have been extended. It actually
looks like we can see more of the garage when in fact the garage has
only been stretched. But the result is convincing.
After Xara finishes analyzing, four arrow handles appear that you can
drag to expand the photo. Notice the portal in the photo above remains
almost the same size while the edges have been extended. It actually
looks like we can see more of the garage when in fact the garage has
only been stretched. But the result is convincing.
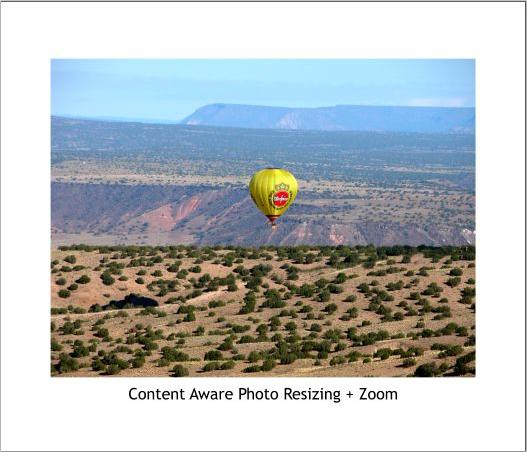 Let’s try the Content-Aware Photo Resize - Zoom feature on the
balloon photo above. It would be nice to zoom in on the balloon and
leave the rest of the photo unchanged, which is what Xara shows in its
demonstrations of this tool.
Let’s try the Content-Aware Photo Resize - Zoom feature on the
balloon photo above. It would be nice to zoom in on the balloon and
leave the rest of the photo unchanged, which is what Xara shows in its
demonstrations of this tool.
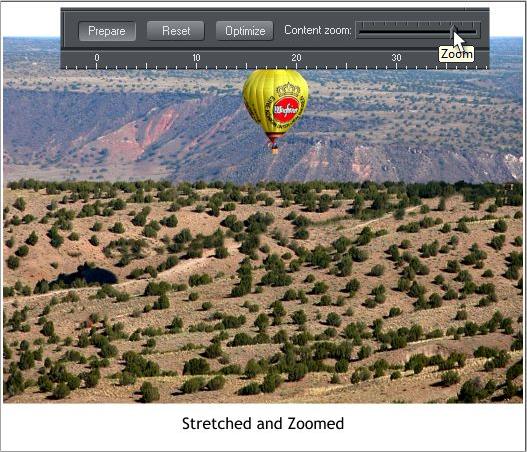 Sliding the Content Zoom slider does in fact zoom in on the balloon
revealing more detail, and the foreground is mostly unchanged. But we
also zoomed in on the mesas at the expense of the sky. But you can get
an idea of how this feature works. In theory, a little man who resides
inside Xara Designer Pro 6 and his brother who resides in Xara Photo &
Graphic Designer 6, look at the photo, scratch their collective heads,
then try to determines what to preserve and what to make bigger.
Tough job if you ask me. I’ll think I’ll stick to text editing.
Sliding the Content Zoom slider does in fact zoom in on the balloon
revealing more detail, and the foreground is mostly unchanged. But we
also zoomed in on the mesas at the expense of the sky. But you can get
an idea of how this feature works. In theory, a little man who resides
inside Xara Designer Pro 6 and his brother who resides in Xara Photo &
Graphic Designer 6, look at the photo, scratch their collective heads,
then try to determines what to preserve and what to make bigger.
Tough job if you ask me. I’ll think I’ll stick to text editing.
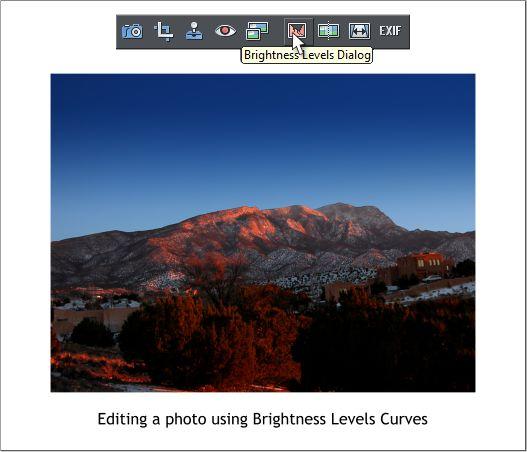 The Brightness-Levels Dialog has been improved adding a Curves
editing feature. This lets you drag a curve to more intuitively adjust the
lightness and darkness of a photo. I like the drama of the photo above,
but I think I can make it more dramatic by making it darker. I will try
this with the Curves tool.
The Brightness-Levels Dialog has been improved adding a Curves
editing feature. This lets you drag a curve to more intuitively adjust the
lightness and darkness of a photo. I like the drama of the photo above,
but I think I can make it more dramatic by making it darker. I will try
this with the Curves tool.
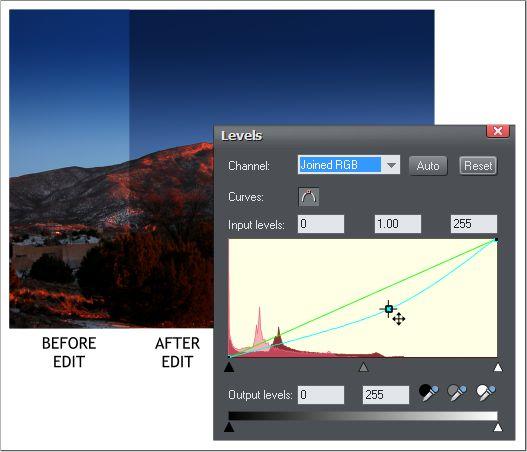 It is a little hard to see because the dialog is in the way, but I have
dragged the curve down and to the right a bit making the sky darker
and making the pink sunset light on the mountain more intense.
It is a little hard to see because the dialog is in the way, but I have
dragged the curve down and to the right a bit making the sky darker
and making the pink sunset light on the mountain more intense.
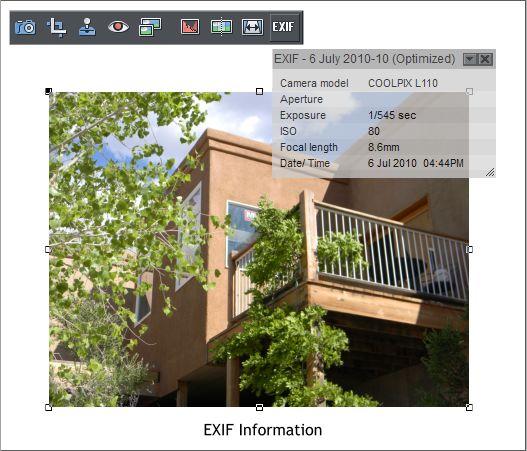 No that is not a typo for EXIT. EXIF stands for Exchangeable Image File
Format and contains relevant data for photos taken with a digital
camera such as the camera model, ISO, date and other info. Click here
for more information.
No that is not a typo for EXIT. EXIF stands for Exchangeable Image File
Format and contains relevant data for photos taken with a digital
camera such as the camera model, ISO, date and other info. Click here
for more information.
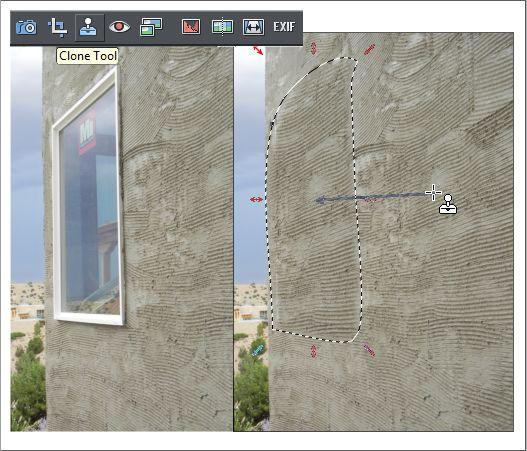 At last, a Clone Tool!!! Can a Magic Wand Tool be far behind?
Unlike most Clone Tools that actually change an image’s pixels, Xara’s
Clone Tool is non-destructive. The cloned area is really grouped with
the photo and can be ungrouped at any time by merely ungrouping the
cloned areas.
When you select the Clone Tool, with a photo selected of course, you
draw/define an area to which you wish to apply the cloned content.
When the shape closes, you select part of the current photo, or even
another photo somewhere on your desktop, and drag across it. The
defined area is filled with that content. You can continue to drag on the
photo until you have achieved the best fill. If you go back next week
and click on the cloned area, it becomes active again and you can
change the fill. It is a live effect. It’s alive! It’s alive! (Sorry).
At last, a Clone Tool!!! Can a Magic Wand Tool be far behind?
Unlike most Clone Tools that actually change an image’s pixels, Xara’s
Clone Tool is non-destructive. The cloned area is really grouped with
the photo and can be ungrouped at any time by merely ungrouping the
cloned areas.
When you select the Clone Tool, with a photo selected of course, you
draw/define an area to which you wish to apply the cloned content.
When the shape closes, you select part of the current photo, or even
another photo somewhere on your desktop, and drag across it. The
defined area is filled with that content. You can continue to drag on the
photo until you have achieved the best fill. If you go back next week
and click on the cloned area, it becomes active again and you can
change the fill. It is a live effect. It’s alive! It’s alive! (Sorry).
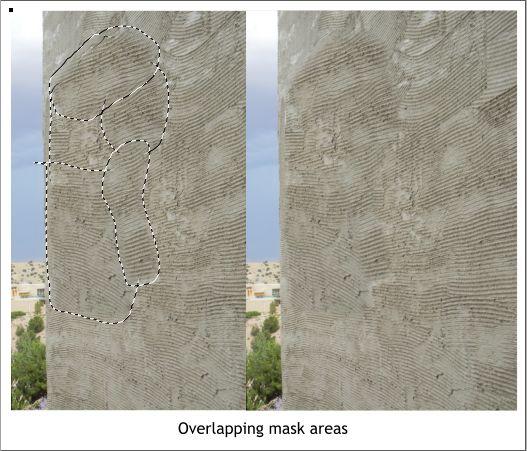 It is not always easy to find a large area that works for a large cloned
area. So you can create many smaller areas. Increase the Feathering
setting on the Infobar helps the new area blend. The final example on
the right is not too bad. And if we decide we liked the wall better with
the window, just ungroup, and delete the cloned areas.
It is not always easy to find a large area that works for a large cloned
area. So you can create many smaller areas. Increase the Feathering
setting on the Infobar helps the new area blend. The final example on
the right is not too bad. And if we decide we liked the wall better with
the window, just ungroup, and delete the cloned areas.
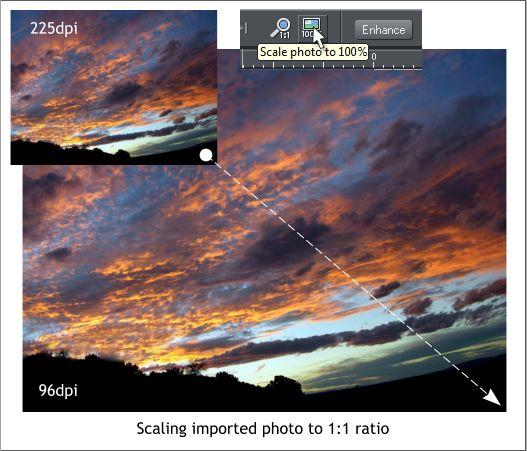 Your editor has never quite figured out why some photos import too
large while others import too small. But in the case of either, if you
select the photo, then the Photo Tool and press Scale Photo to 100%,
the photo will increase or decrease to 96dpi, Windows screen
resolution. To the left of the Scale Photo icon is an icon that zooms to
1:1 instead of resizing the photo. The photo above imported at the
small size but the status bar revealed the size as 225dpi. I pressed the
Scale Photo button and it increased to the full size at 96dpi as shown.
Your editor has never quite figured out why some photos import too
large while others import too small. But in the case of either, if you
select the photo, then the Photo Tool and press Scale Photo to 100%,
the photo will increase or decrease to 96dpi, Windows screen
resolution. To the left of the Scale Photo icon is an icon that zooms to
1:1 instead of resizing the photo. The photo above imported at the
small size but the status bar revealed the size as 225dpi. I pressed the
Scale Photo button and it increased to the full size at 96dpi as shown.


 H 1 2 3 4 5 Download Zipped Tutorial


