WEBSITE AND WEBSITE GRAPHICS CREATED WITH XARA DESIGNER PRO 6Enhance Transparency There is a new transparency type at the bottom of the Transparency Type drop down list, Enhance. If you apply this to any object, you may be surprised to see that nothing happens except the object to which you applied it, is now 100% transparent.Enhance transparency works with the Photo Tool > Enhance Photoscontrols and controls Brightness, Contrast, Saturation, and Photo Temperature (from cool to warm), but not Blur/Sharpen. This last option produces a rude message that informs you that this feature only works directly on a bitmap. OK. I can live with that.You can apply Enhance transparency to a rectangle over a photo and edit the photo as you would normally. But why would you want to add an extra step? You wouldn’t. But what you can do, and this is what I hope to demonstrate, is you can apply Enhance transparency to a shape, any shape, and use this shape to edit the portion of an image under the shape while leaving the rest of the photo unchanged.The photo above was taken inside a dark room and is properly exposed for the windows. We will use Enhance transparency to brighten only the inside of the room.Add a light gray rectangle over the the photo and apply 50% Mixtransparency so you can see what is behind the photo. If you want to follow along, make a copy of the first photo.Use the Shape Editor Tool (F4) to draw shapes over the windows. Extend the shape, that goes over the right window, a little bit beyond the top and right side. Group (Ctrl g) the three window shapes and copy them to the clipboard. We’ll need them later on.Select the grouped window shapes and the rectangle and from the Arrange menu, select Combine Shapes > Subtract Shapes or use the keyboard shortcut, Ctrl + 2.Set the transparency to none. This gives us a shape we can use to brighten the inside of the room.Select the shape then select the Transparency Tool (F6). From the drop down list of Transparency Types, select Enhance. See what I mean? The shape is now transparent.With the shape selected, select the Enhance Photo option from the Photo Tool fly out. Increase the Brightness setting to about +20 and increase the Color Temperature to +10 to warm up the interior. This is about as far as we can push the photo before it starts getting grainy.Oddly enough, when we brighten the inside, the windows look washed out (see the previous photo). We can now paste the window shapes group back on top and edit it to make the windows brighter.Edit > Paste in Place. Ungroup the three shapes (I am not sure why, but this is what I had to do), then with the three window objects selected, apply a new Enhance transparency. Edit the window shapes in the Photo Tool > Enhance Photo mode. Make the changes shown above. Now the windows look as they should. And the room is a bit lighter.Here’s another example using a photo of Chloe and Sophie, the “Girls from Española.” If we darken the photo around the cats, it will put more focus on the cats and make a better photo.Create a rectangle the same size as the photo and add 50% Mix transparency so that we can see the cats under the rectangle.Draw an outline just around the cats. Select the Contour Tool (Ctrl F7), and add a 2 pixel Inner Contour. Press the Inset Path icon to create just the inside shape. Copy the shape to the clipboard (Ctrl c).Select the cats shape and then rectangle and Arrange > Combine Shapes > Subtract Shapes (or press Ctrl 2). Set the transparency to none.Apply 3pix (or now you can use px instead of pix, either one works) of feathering using the Feathering slider on the top right area of the Infobar. Select the Shape Editor Tool (F4) and extend the sides of the feathered rectangle to cover the the edges of the photo.Apply Enhance transparency to the shape and edit the shape in the Photo Tool > Enhance Photo mode as shown above. The photo around the cats is a bit darker but now the cats look too dark. (It is always something!)Paste the cats shape in place (Edit > Paste in Place - or pressShift Ctrl v). If you can select Ungroup from the Arrange menu, do so. I cannot remember if I did this or not. Apply Enhance transparency, and then edit the shape with the Photo Tool.Here is the before and after photo. This should give you an idea of how the new Enhance transparency works. If you have any other ideas, let me know and we can share.H123 4 5Download Zipped Tutorial


 WEBSITE AND WEBSITE GRAPHICS CREATED WITH XARA DESIGNER PRO 6


 Enhance Transparency There is a new transparency type at the bottom
of the Transparency Type drop down list, Enhance. If you apply this to
any object, you may be surprised to see that nothing happens except
the object to which you applied it, is now 100% transparent.
Enhance transparency works with the Photo Tool > Enhance Photos
controls and controls Brightness, Contrast, Saturation, and Photo
Temperature (from cool to warm), but not Blur/Sharpen. This last
option produces a rude message that informs you that this feature only
works directly on a bitmap. OK. I can live with that.
You can apply Enhance transparency to a rectangle over a photo and
edit the photo as you would normally. But why would you want to add
an extra step? You wouldn’t. But what you can do, and this is what I
hope to demonstrate, is you can apply Enhance transparency to a
shape, any shape, and use this shape to edit the portion of an image
under the shape while leaving the rest of the photo unchanged.
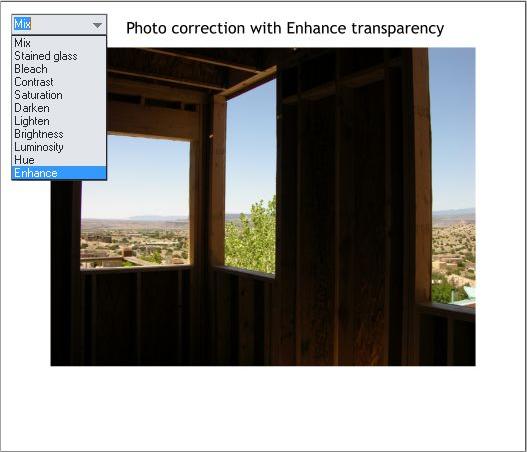
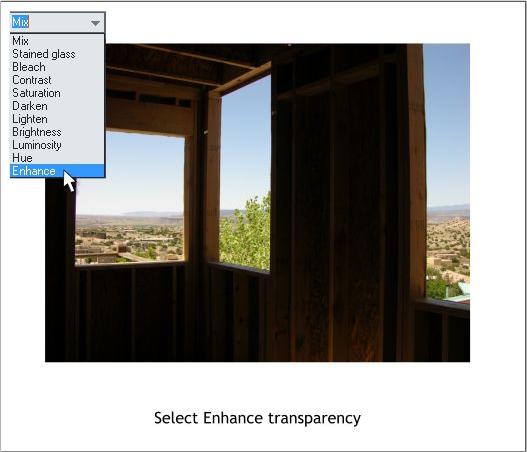
The photo above was taken inside a dark room and is properly exposed
for the windows. We will use Enhance transparency to brighten only
the inside of the room.
Enhance Transparency There is a new transparency type at the bottom
of the Transparency Type drop down list, Enhance. If you apply this to
any object, you may be surprised to see that nothing happens except
the object to which you applied it, is now 100% transparent.
Enhance transparency works with the Photo Tool > Enhance Photos
controls and controls Brightness, Contrast, Saturation, and Photo
Temperature (from cool to warm), but not Blur/Sharpen. This last
option produces a rude message that informs you that this feature only
works directly on a bitmap. OK. I can live with that.
You can apply Enhance transparency to a rectangle over a photo and
edit the photo as you would normally. But why would you want to add
an extra step? You wouldn’t. But what you can do, and this is what I
hope to demonstrate, is you can apply Enhance transparency to a
shape, any shape, and use this shape to edit the portion of an image
under the shape while leaving the rest of the photo unchanged.
The photo above was taken inside a dark room and is properly exposed
for the windows. We will use Enhance transparency to brighten only
the inside of the room.
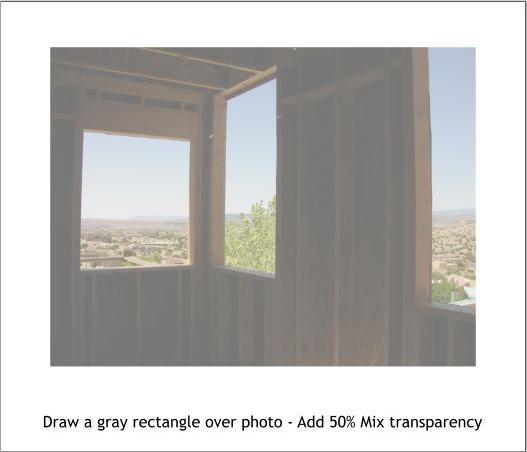 Add a light gray rectangle over the the photo and apply 50% Mix
transparency so you can see what is behind the photo. If you want to
follow along, make a copy of the first photo.
Add a light gray rectangle over the the photo and apply 50% Mix
transparency so you can see what is behind the photo. If you want to
follow along, make a copy of the first photo.
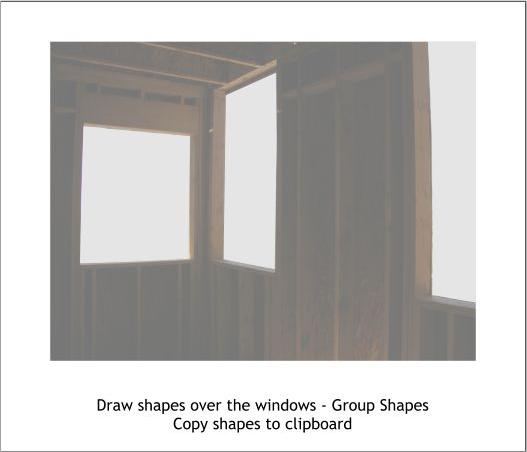 Use the Shape Editor Tool (F4) to draw shapes over the windows.
Extend the shape, that goes over the right window, a little bit beyond
the top and right side. Group (Ctrl g) the three window shapes and copy
them to the clipboard. We’ll need them later on.
Use the Shape Editor Tool (F4) to draw shapes over the windows.
Extend the shape, that goes over the right window, a little bit beyond
the top and right side. Group (Ctrl g) the three window shapes and copy
them to the clipboard. We’ll need them later on.
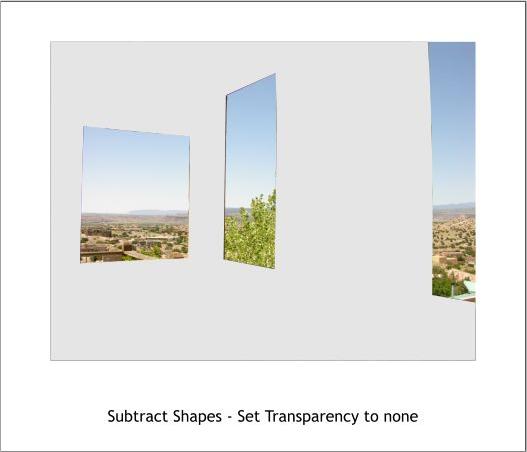 Select the grouped window shapes and the rectangle and from the
Arrange menu, select Combine Shapes > Subtract Shapes or use the
keyboard shortcut, Ctrl + 2.
Set the transparency to none. This gives us a shape we can use to
brighten the inside of the room.
Select the grouped window shapes and the rectangle and from the
Arrange menu, select Combine Shapes > Subtract Shapes or use the
keyboard shortcut, Ctrl + 2.
Set the transparency to none. This gives us a shape we can use to
brighten the inside of the room.
 Select the shape then select the Transparency Tool (F6). From the
drop down list of Transparency Types, select Enhance. See what I
mean? The shape is now transparent.
Select the shape then select the Transparency Tool (F6). From the
drop down list of Transparency Types, select Enhance. See what I
mean? The shape is now transparent.
 With the shape selected, select the Enhance Photo option from the
Photo Tool fly out. Increase the Brightness setting to about +20 and
increase the Color Temperature to +10 to warm up the interior. This is
about as far as we can push the photo before it starts getting grainy.
With the shape selected, select the Enhance Photo option from the
Photo Tool fly out. Increase the Brightness setting to about +20 and
increase the Color Temperature to +10 to warm up the interior. This is
about as far as we can push the photo before it starts getting grainy.
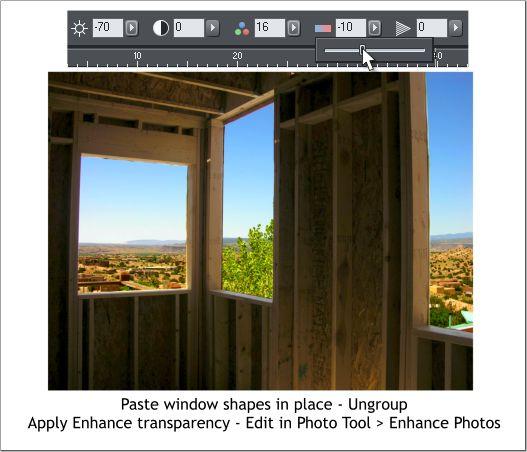 Oddly enough, when we brighten the inside, the windows look washed
out (see the previous photo). We can now paste the window shapes
group back on top and edit it to make the windows brighter.
Edit > Paste in Place. Ungroup the three shapes (I am not sure why, but
this is what I had to do), then with the three window objects selected,
apply a new Enhance transparency. Edit the window shapes in the
Photo Tool > Enhance Photo mode. Make the changes shown above.
Now the windows look as they should. And the room is a bit lighter.
Oddly enough, when we brighten the inside, the windows look washed
out (see the previous photo). We can now paste the window shapes
group back on top and edit it to make the windows brighter.
Edit > Paste in Place. Ungroup the three shapes (I am not sure why, but
this is what I had to do), then with the three window objects selected,
apply a new Enhance transparency. Edit the window shapes in the
Photo Tool > Enhance Photo mode. Make the changes shown above.
Now the windows look as they should. And the room is a bit lighter.
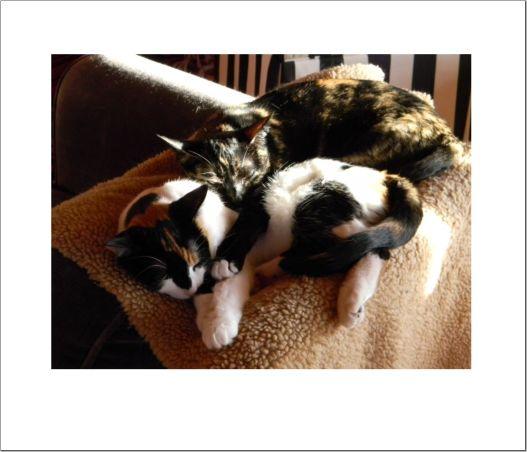 Here’s another example using a photo of Chloe and Sophie, the “Girls
from Española.” If we darken the photo around the cats, it will put
more focus on the cats and make a better photo.
Here’s another example using a photo of Chloe and Sophie, the “Girls
from Española.” If we darken the photo around the cats, it will put
more focus on the cats and make a better photo.
 Create a rectangle the same size as the photo and add 50% Mix
transparency so that we can see the cats under the rectangle.
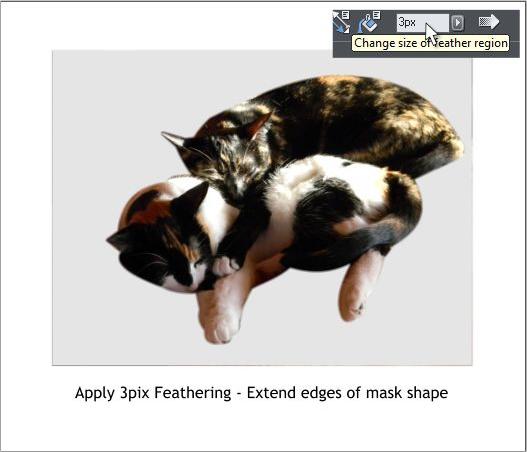
Draw an outline just around the cats. Select the Contour Tool (Ctrl F7),
and add a 2 pixel Inner Contour. Press the Inset Path icon to create just
the inside shape. Copy the shape to the clipboard (Ctrl c).
Create a rectangle the same size as the photo and add 50% Mix
transparency so that we can see the cats under the rectangle.
Draw an outline just around the cats. Select the Contour Tool (Ctrl F7),
and add a 2 pixel Inner Contour. Press the Inset Path icon to create just
the inside shape. Copy the shape to the clipboard (Ctrl c).
 Select the cats shape and then rectangle and Arrange > Combine
Shapes > Subtract Shapes (or press Ctrl 2). Set the transparency to
none.
Apply 3pix (or now you can use px instead of pix, either one works) of
feathering using the Feathering slider on the top right area of the
Infobar. Select the Shape Editor Tool (F4) and extend the sides of the
feathered rectangle to cover the the edges of the photo.
Select the cats shape and then rectangle and Arrange > Combine
Shapes > Subtract Shapes (or press Ctrl 2). Set the transparency to
none.
Apply 3pix (or now you can use px instead of pix, either one works) of
feathering using the Feathering slider on the top right area of the
Infobar. Select the Shape Editor Tool (F4) and extend the sides of the
feathered rectangle to cover the the edges of the photo.
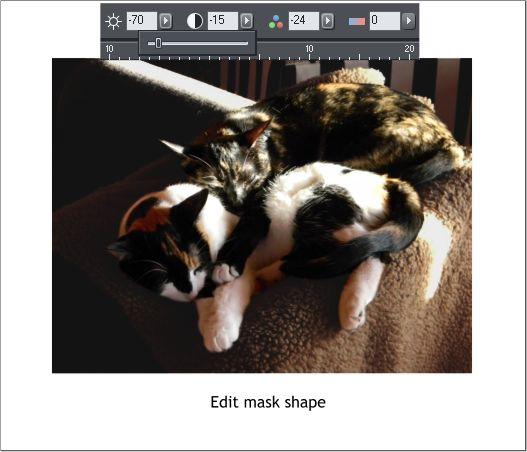 Apply Enhance transparency to the shape and edit the shape in the
Photo Tool > Enhance Photo mode as shown above. The photo around
the cats is a bit darker but now the cats look too dark. (It is always
something!)
Apply Enhance transparency to the shape and edit the shape in the
Photo Tool > Enhance Photo mode as shown above. The photo around
the cats is a bit darker but now the cats look too dark. (It is always
something!)
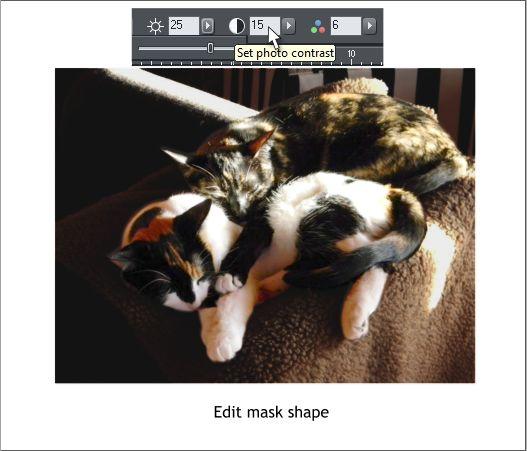 Paste the cats shape in place (Edit > Paste in Place - or press
Shift Ctrl v). If you can select Ungroup from the Arrange menu, do so.
I cannot remember if I did this or not. Apply Enhance transparency, and
then edit the shape with the Photo Tool.
Paste the cats shape in place (Edit > Paste in Place - or press
Shift Ctrl v). If you can select Ungroup from the Arrange menu, do so.
I cannot remember if I did this or not. Apply Enhance transparency, and
then edit the shape with the Photo Tool.
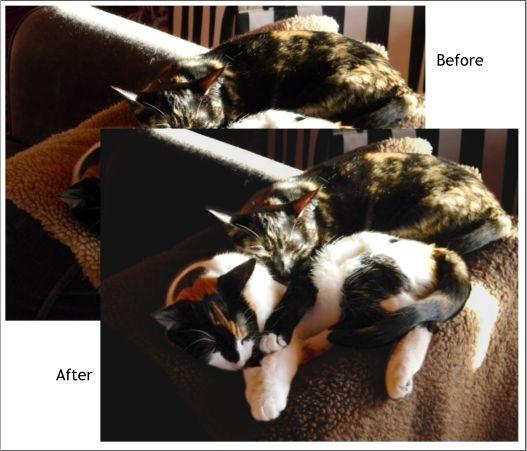 Here is the before and after photo. This should give you an idea of how
the new Enhance transparency works. If you have any other ideas, let
me know and we can share.
Here is the before and after photo. This should give you an idea of how
the new Enhance transparency works. If you have any other ideas, let
me know and we can share.


 H 1 2 3 4 5 Download Zipped Tutorial


