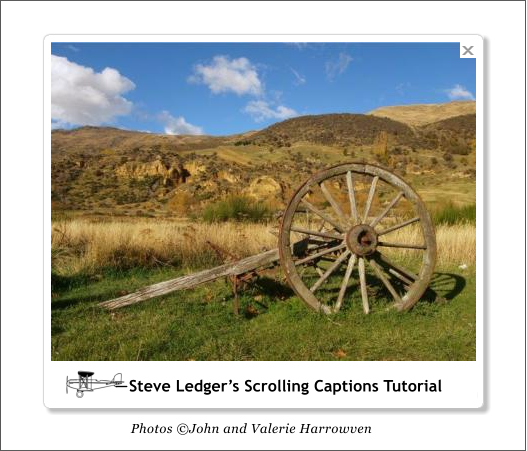
WEBSITE AND WEBSITE GRAPHICS CREATED WITH XARA DESIGNER PRO 6One of the really cool new features in Designer Pro 6 is the ability to quickly and easily create a slide show using pop-ups images and new controls found in the Web Properties > Image Properties section. You can create simple pop up images that pop up one at a time, or you can create a slide show complete with thumbnail images, navigation bar, and more.I am not going to go into the mechanics of creating a slide show here because I covered this extensively in Workbook 82. And while Workbook 82 deals with Web Designer 6, the features works almost exactly the same in Designer Pro 6.What I want to cover here is how you can customize your slides with scrolling titles and captions. We will use HTML commands to accomplish a variety of scrolling title effects. Thanks go out to Steve Ledger (sledger) for coming up with all these effects and for Steve’s cousins John and Valerie Harrowven for the excellent vacation photos used in this tutorial. Obviously you will have to use your own photosPop up photos can have two captions, a pop up title which goes at the top of the pop up photo and an image caption that goes at the bottom of the pop up photo. We will start by animating the Image Caption, which is also the Alt text. To back up for a second, Alt text is important for the identification of images on the Internet. Search engines see a bitmap entitled DSCN039.jpg for example and have no idea what the content of the photo is. Using a more descriptive title, such as Gary’s-New-Shoes.jpg can help. But an Alt tag can contain even more descriptive material that will be discovered by search engines, should you wish. Such as “Gary’s New gray and maroon Columbia Walking Shoes”. So if you have a bitmap header with text, it’s always a good idea to add an Alt tag with the same text. Such as the Xara Xone banner at the top of the page.There is a limit of 256 characters but that is more than enough for what we are going to be doing as you will see.Shown above is a simple script that will scroll the words Xara Designer Pro 6 from right to left as you will see when you click the small thumbnail image above. We will do this for each example.The statement must be written as shown above (caps and/or lowercase are both acceptable) and must be enclosed in opening and closing angle brackets as shown. The command shown above is a Marquee tag which tells the browser to scroll the specified text. It starts with the opening command <MARQUEE and includes the width of scrolling area WIDTH=600 (the same width as specified for the Pop up image and which can be adjusted for whatever width you wish) and the height of the scrolling area HEIGHT=20> There is a closing angle bracket after the Height statement. The text to be scrolled is not included in angle brackets. Finally there is a closing statement </MARQUEE> The forward slash / in front of MARQUEE turns off the command and the closing command is also enclosed in angle brackets. In HTML, commands are enclosed in angles brackets and are not visible in the browser.For openers, create a pop up photo and key in the above script into the Alt Text window. Preview the page to see the effect.Most of the examples that follow build upon this basic script.In the example shown above, a <font size=4> statement has been added and is shown in red preceding the scrolling text.The text can also be in color. In the example above the text is green. (Click here for a page of acceptable browser color names). As you can see the font statement is also enclosed in <B> tags so the text is bold face as well as green.In the example shown here, the font Georgia, a browser safe serif font has been specified. And the <B> tags have been changed to <i> tags. Any idea what the <I> tags do? And the text color has been changed to Brown. You can see how you can build a lot into a simple HTML statement. The top fonts in the Font drop down menu are all browser safe fonts. This means that these fonts are most likely installed on most computers and will display in the specified font.You don’t have to have a white background for the scrolling text. The statement above, BGCOLOR=OLIVE changes the background color of the scroll area to olive green. The text is white and has been changed to Verdana Bold.When using a colored background, reduce the WIDTH statement by 5.You can specify which direction the text scrolls.If you add a SCROLLAMOUNT tag, you can specify how fast or slow the text scrolls. For the slow example I have used SCROLLAMOUNT=1. The example on the right is SCROLLAMOUNT=50. See the difference?You may have been wondering if text can scroll up and down. Click on each example above to answer this question. For up or down scrolling, use a very low SCROLLAMOUNT and increase the HEIGHT setting.To force a line break use a <BR> command. You only need one of these after each line.For the down scrolling text, reverse the order of the lines so the text reveals in the proper order.Notice in the above HTML statement the addition of the <CENTER>tags. This command centers the vertically scrolling text under the photo.In the example above, a small plane image has been added to pull the scrolling message across the image. The <img src= tag specifies where the small plane image is located. I am not sure but I believe this is an abbreviation for Image Source.In this case, the image biplane.png is in the index_html_files folder that is created when you export your site. Because Xara assigns a number to each image instead of a name, you can use a placeholder linked to the image to ensure the image gets placed with the correct name in the correct folder.Finally, you can also have scrolling text or a caption top and bottom of the pop up. The top area is called Pop-up Title. But you can include a title in here as well. In the following example, there is scrolling text in the title area and a non-scrolling caption on the bottom Alt Text area.In the early days of the Xara Xone, I used to code my tutorials manually in HTML. Those days are long gone and I have forgotten just about everything I ever knew about HTML. Fortunately, Steve Ledger and John Horn and a few other are still up on their HTML and can come up with simple, yet effective applications such as those shown on this page.Big thanks to both John and Steve for their help on this tutorial.The <B> tag makes the scrolling text bold face.H 1 2345Download Zipped Tutorial


 WEBSITE AND WEBSITE GRAPHICS CREATED WITH XARA DESIGNER PRO 6


 One of the really cool new features in Designer Pro 6 is the ability to
quickly and easily create a slide show using pop-ups images and new
controls found in the Web Properties > Image Properties section. You
can create simple pop up images that pop up one at a time, or you can
create a slide show complete with thumbnail images, navigation bar,
and more.
I am not going to go into the mechanics of creating a slide show here
because I covered this extensively in Workbook 82. And while Workbook
82 deals with Web Designer 6, the features works almost exactly the
same in Designer Pro 6.
What I want to cover here is how you can customize your slides with
scrolling titles and captions. We will use HTML commands to accomplish
a variety of scrolling title effects. Thanks go out to Steve Ledger
(sledger) for coming up with all these effects and for Steve’s cousins
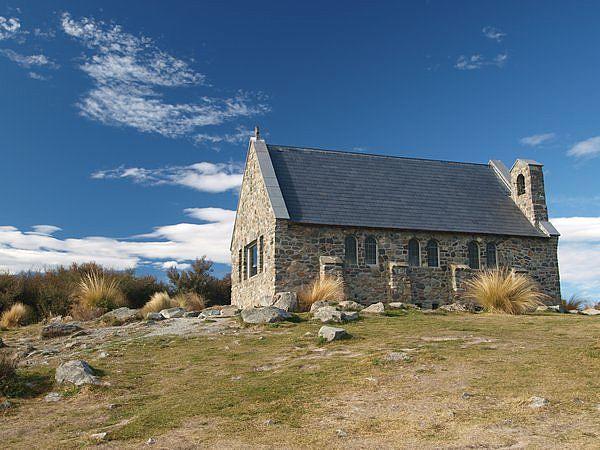
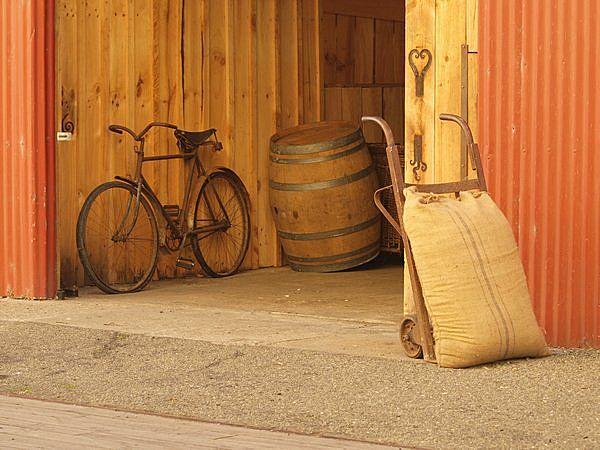
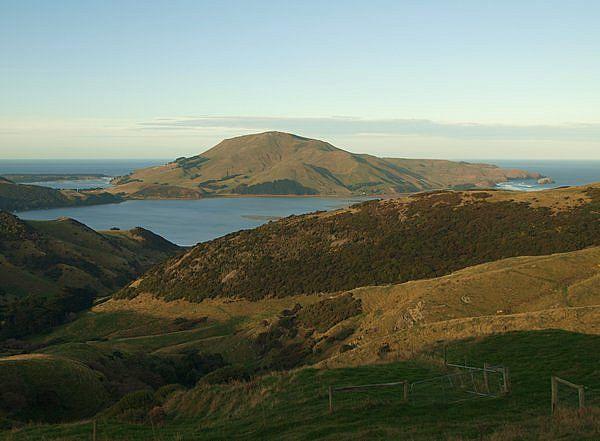
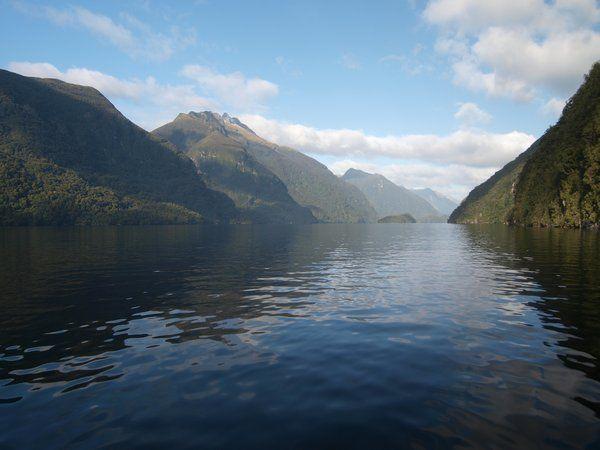
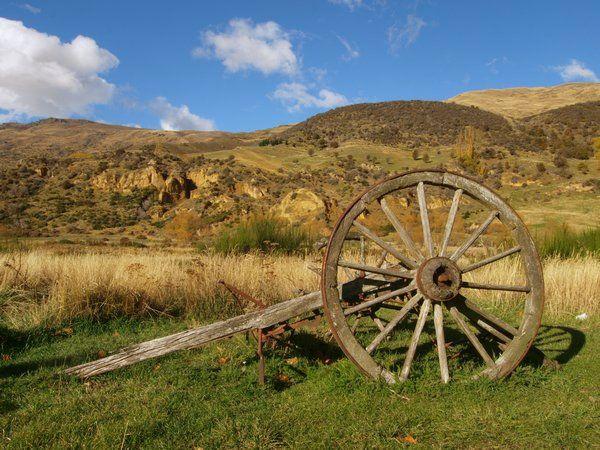
John and Valerie Harrowven for the excellent vacation photos used in
this tutorial. Obviously you will have to use your own photos
One of the really cool new features in Designer Pro 6 is the ability to
quickly and easily create a slide show using pop-ups images and new
controls found in the Web Properties > Image Properties section. You
can create simple pop up images that pop up one at a time, or you can
create a slide show complete with thumbnail images, navigation bar,
and more.
I am not going to go into the mechanics of creating a slide show here
because I covered this extensively in Workbook 82. And while Workbook
82 deals with Web Designer 6, the features works almost exactly the
same in Designer Pro 6.
What I want to cover here is how you can customize your slides with
scrolling titles and captions. We will use HTML commands to accomplish
a variety of scrolling title effects. Thanks go out to Steve Ledger
(sledger) for coming up with all these effects and for Steve’s cousins
John and Valerie Harrowven for the excellent vacation photos used in
this tutorial. Obviously you will have to use your own photos
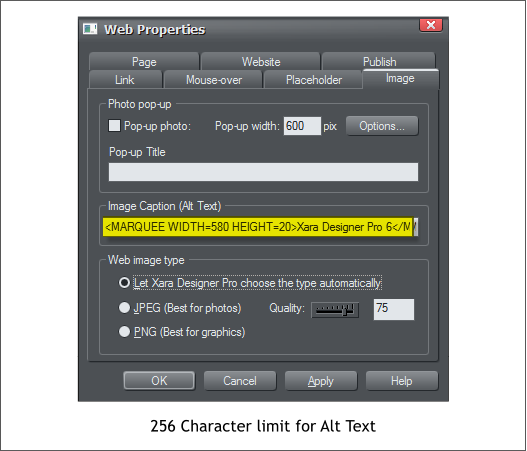 Pop up photos can have two captions, a pop up title which goes at the
top of the pop up photo and an image caption that goes at the bottom
of the pop up photo. We will start by animating the Image Caption,
which is also the Alt text. To back up for a second, Alt text is
important for the identification of images on the Internet. Search
engines see a bitmap entitled DSCN039.jpg for example and have no
idea what the content of the photo is. Using a more descriptive title,
such as Gary’s-New-Shoes.jpg can help. But an Alt tag can contain even
more descriptive material that will be discovered by search engines,
should you wish. Such as “Gary’s New gray and maroon Columbia
Walking Shoes”. So if you have a bitmap header with text, it’s always a
good idea to add an Alt tag with the same text. Such as the Xara Xone
banner at the top of the page.
There is a limit of 256 characters but that is more than enough for what
we are going to be doing as you will see.
Pop up photos can have two captions, a pop up title which goes at the
top of the pop up photo and an image caption that goes at the bottom
of the pop up photo. We will start by animating the Image Caption,
which is also the Alt text. To back up for a second, Alt text is
important for the identification of images on the Internet. Search
engines see a bitmap entitled DSCN039.jpg for example and have no
idea what the content of the photo is. Using a more descriptive title,
such as Gary’s-New-Shoes.jpg can help. But an Alt tag can contain even
more descriptive material that will be discovered by search engines,
should you wish. Such as “Gary’s New gray and maroon Columbia
Walking Shoes”. So if you have a bitmap header with text, it’s always a
good idea to add an Alt tag with the same text. Such as the Xara Xone
banner at the top of the page.
There is a limit of 256 characters but that is more than enough for what
we are going to be doing as you will see.
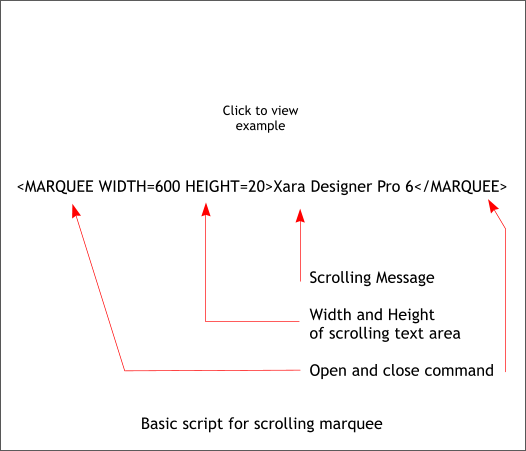
 Shown above is a simple script that will scroll the words Xara Designer
Pro 6 from right to left as you will see when you click the small
thumbnail image above. We will do this for each example.
The statement must be written as shown above (caps and/or lowercase
are both acceptable) and must be enclosed in opening and closing angle
brackets as shown. The command shown above is a Marquee tag which
tells the browser to scroll the specified text. It starts with the opening
command <MARQUEE and includes the width of scrolling area
WIDTH=600 (the same width as specified for the Pop up image and
which can be adjusted for whatever width you wish) and the height of
the scrolling area HEIGHT=20> There is a closing angle bracket after
the Height statement. The text to be scrolled is not included in angle
brackets. Finally there is a closing statement </MARQUEE> The forward
slash / in front of MARQUEE turns off the command and the closing
command is also enclosed in angle brackets. In HTML, commands are
enclosed in angles brackets and are not visible in the browser.
For openers, create a pop up photo and key in the above script into the
Alt Text window. Preview the page to see the effect.
Most of the examples that follow build upon this basic script.
Shown above is a simple script that will scroll the words Xara Designer
Pro 6 from right to left as you will see when you click the small
thumbnail image above. We will do this for each example.
The statement must be written as shown above (caps and/or lowercase
are both acceptable) and must be enclosed in opening and closing angle
brackets as shown. The command shown above is a Marquee tag which
tells the browser to scroll the specified text. It starts with the opening
command <MARQUEE and includes the width of scrolling area
WIDTH=600 (the same width as specified for the Pop up image and
which can be adjusted for whatever width you wish) and the height of
the scrolling area HEIGHT=20> There is a closing angle bracket after
the Height statement. The text to be scrolled is not included in angle
brackets. Finally there is a closing statement </MARQUEE> The forward
slash / in front of MARQUEE turns off the command and the closing
command is also enclosed in angle brackets. In HTML, commands are
enclosed in angles brackets and are not visible in the browser.
For openers, create a pop up photo and key in the above script into the
Alt Text window. Preview the page to see the effect.
Most of the examples that follow build upon this basic script.

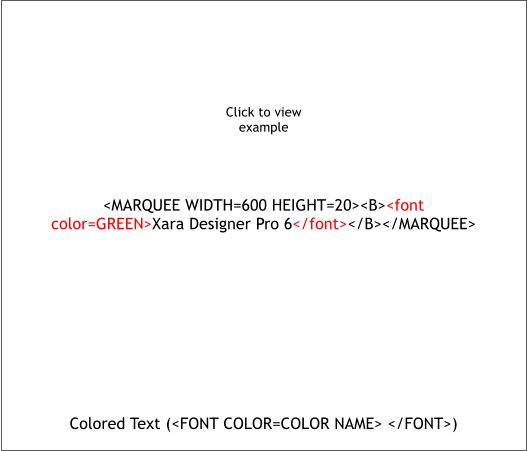
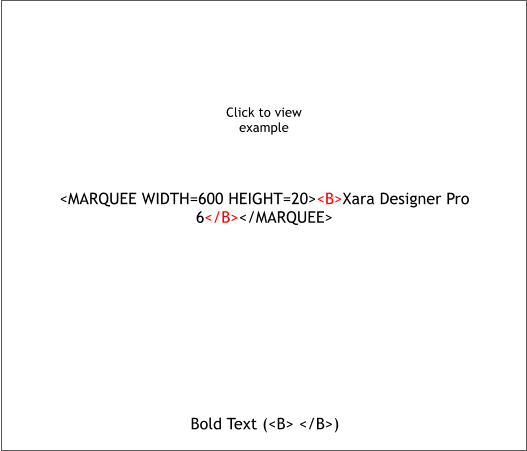 The text can also be in color. In the example above the text is green.
(Click here for a page of acceptable browser color names). As you can
see the font statement is also enclosed in <B> tags so the text is bold
face as well as green.
The text can also be in color. In the example above the text is green.
(Click here for a page of acceptable browser color names). As you can
see the font statement is also enclosed in <B> tags so the text is bold
face as well as green.


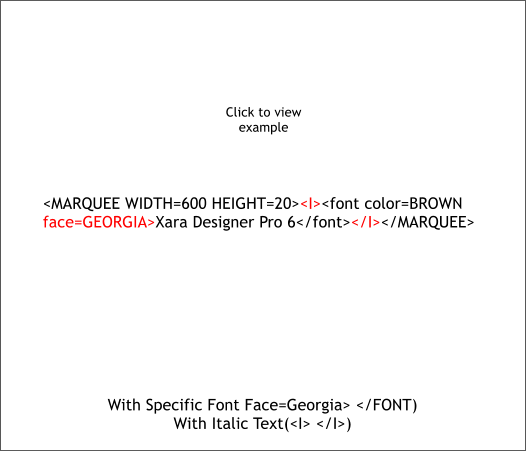
 In the example shown here, the font Georgia, a browser safe serif font
has been specified. And the <B> tags have been changed to <i> tags.
Any idea what the <I> tags do? And the text color has been changed to
Brown. You can see how you can build a lot into a simple HTML
statement. The top fonts in the Font drop down menu are all browser
safe fonts. This means that these fonts are most likely installed on most
computers and will display in the specified font.
In the example shown here, the font Georgia, a browser safe serif font
has been specified. And the <B> tags have been changed to <i> tags.
Any idea what the <I> tags do? And the text color has been changed to
Brown. You can see how you can build a lot into a simple HTML
statement. The top fonts in the Font drop down menu are all browser
safe fonts. This means that these fonts are most likely installed on most
computers and will display in the specified font.
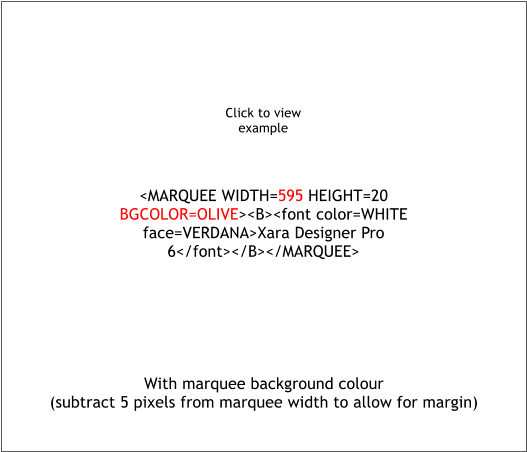
 You don’t have to have a white background for the scrolling text. The
statement above, BGCOLOR=OLIVE changes the background color of
the scroll area to olive green. The text is white and has been changed
to Verdana Bold.
When using a colored background, reduce the WIDTH statement by 5.
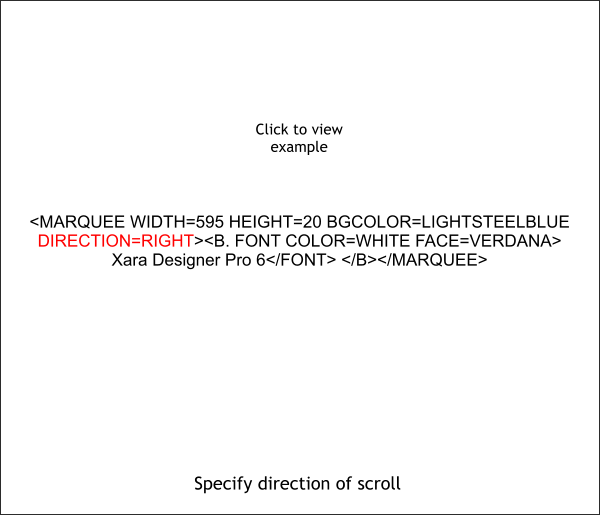
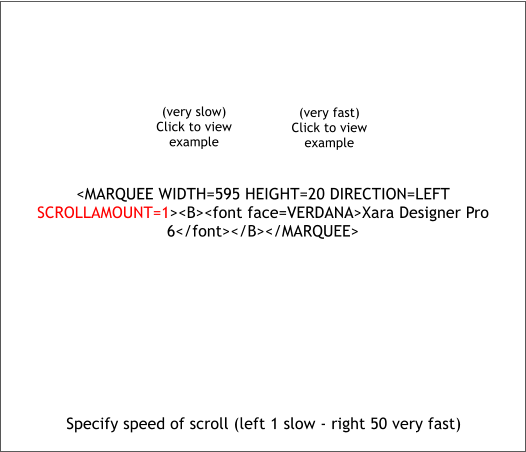
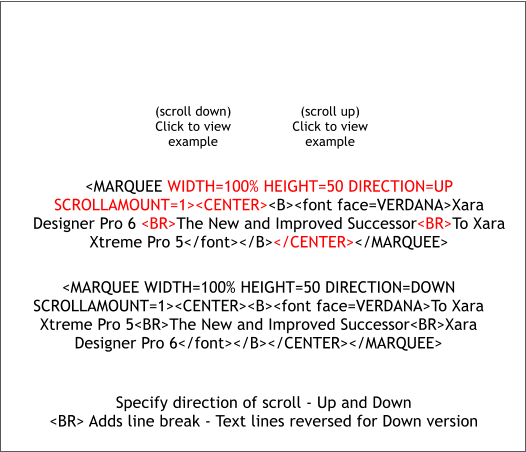
You can specify which direction the text scrolls.
You don’t have to have a white background for the scrolling text. The
statement above, BGCOLOR=OLIVE changes the background color of
the scroll area to olive green. The text is white and has been changed
to Verdana Bold.
When using a colored background, reduce the WIDTH statement by 5.
You can specify which direction the text scrolls.
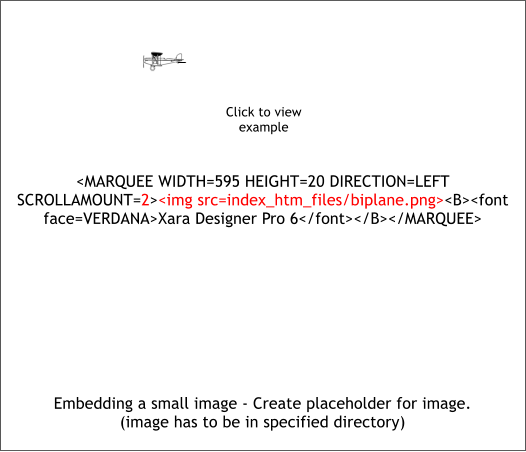
 In the example above, a small plane image has been added to pull the
scrolling message across the image. The <img src= tag specifies where
the small plane image is located. I am not sure but I believe this is an
abbreviation for Image Source.
In this case, the image biplane.png is in the index_html_files folder
that is created when you export your site. Because Xara assigns a
number to each image instead of a name, you can use a placeholder
linked to the image to ensure the image gets placed with the correct
name in the correct folder.
In the example above, a small plane image has been added to pull the
scrolling message across the image. The <img src= tag specifies where
the small plane image is located. I am not sure but I believe this is an
abbreviation for Image Source.
In this case, the image biplane.png is in the index_html_files folder
that is created when you export your site. Because Xara assigns a
number to each image instead of a name, you can use a placeholder
linked to the image to ensure the image gets placed with the correct
name in the correct folder.

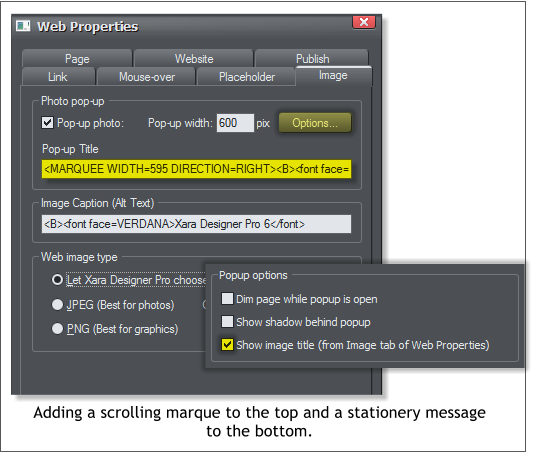 Finally, you can also have scrolling text or a caption top and bottom of
the pop up. The top area is called Pop-up Title. But you can include a
title in here as well. In the following example, there is scrolling text in
the title area and a non-scrolling caption on the bottom Alt Text area.
Finally, you can also have scrolling text or a caption top and bottom of
the pop up. The top area is called Pop-up Title. But you can include a
title in here as well. In the following example, there is scrolling text in
the title area and a non-scrolling caption on the bottom Alt Text area.
 In the early days of the Xara Xone, I used to code my tutorials manually
in HTML. Those days are long gone and I have forgotten just about
everything I ever knew about HTML. Fortunately, Steve Ledger and John
Horn and a few other are still up on their HTML and can come up with
simple, yet effective applications such as those shown on this page.
Big thanks to both John and Steve for their help on this tutorial.
In the early days of the Xara Xone, I used to code my tutorials manually
in HTML. Those days are long gone and I have forgotten just about
everything I ever knew about HTML. Fortunately, Steve Ledger and John
Horn and a few other are still up on their HTML and can come up with
simple, yet effective applications such as those shown on this page.
Big thanks to both John and Steve for their help on this tutorial.


 The <B> tag makes the scrolling text bold face.