
 WEBSITE AND WEBSITE GRAPHICS CREATED WITH XARA XTREME PRO

 H 1 2 3 4 5 Download Zipped Tutorial
 John Horn’s (covoxer) Web Designer 6 Helpers
Web Designer 6 has many features which add flexibility and power, but
you have to dig a bit to find them. And some are not documented. We’ll
look at some of these and see how they work. But before we do, a big
thanks to John Horn (covoxer) for all the hard work and intelligent
thought that he has contributed to make Web Designer 6 such a
powerful yet easy program. Thanks John!
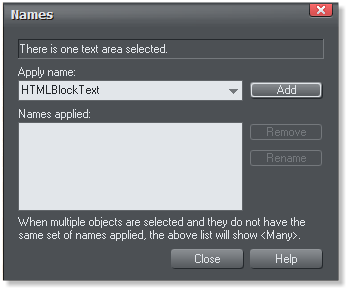
HTMLBlockText If you have a web page and you want your visitors to be
able to copy the text on the web page, then Paste the text into another
document, Microsoft Word, or Dreamweaver for example, and you want
the formatting to be retained, use this option.
With normal HTML text, when you copy and paste the text into another
document, you loose all formatting; indents, paragraph breaks, etc. The
HTMLBlockText command retains the basic formatting when the text is
pasted. So how do you add this? Simple. Really!
Select the text area, or text column with the Selector Tool, and press
the yellow (Names) tag icon on the Infobar.
John Horn’s (covoxer) Web Designer 6 Helpers
Web Designer 6 has many features which add flexibility and power, but
you have to dig a bit to find them. And some are not documented. We’ll
look at some of these and see how they work. But before we do, a big
thanks to John Horn (covoxer) for all the hard work and intelligent
thought that he has contributed to make Web Designer 6 such a
powerful yet easy program. Thanks John!
HTMLBlockText If you have a web page and you want your visitors to be
able to copy the text on the web page, then Paste the text into another
document, Microsoft Word, or Dreamweaver for example, and you want
the formatting to be retained, use this option.
With normal HTML text, when you copy and paste the text into another
document, you loose all formatting; indents, paragraph breaks, etc. The
HTMLBlockText command retains the basic formatting when the text is
pasted. So how do you add this? Simple. Really!
Select the text area, or text column with the Selector Tool, and press
the yellow (Names) tag icon on the Infobar.
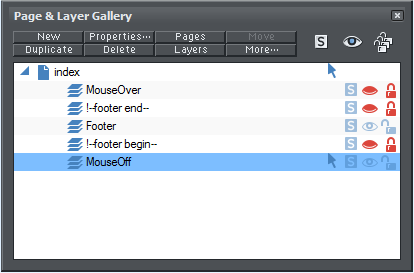
 What you don’t see is what you get. John assures me that even though
a layer is invisible, there may be times when you want to force this
layer to export. John’s example is Dynamic Page or Sticky Footers (part
of the WD6 Tweakset). If you just export the page to HTML this
formatting is lost. Web Designer 6 just treats these layers as if they
have been deleted.
The solution is to add an exclamation point to the beginning of the
invisible layer. For example, !My Hidden Layer. What matters is for the
first word of the layer name to be preceded by the exclamation mark.
We’ll look at John’s Tweakset a little later on.
NoHighSlide Web Designer 6 now has an easy way to create a slide show.
You simply drag photos onto the page, resize the photos down to
thumbnail size, select all and open the Web Properties > Image
Properties tab. Check Pop-up Photo, set a maximum Pop-up width and
select from a variety of slide show Options. Creating a Slide Show is
covered in detail on Page 3.
The slide show feature is created with a program called High Slide. If
the implementation of High Slide has a down side, it is you can only
have one slide show per page. OK. So maybe that is not a bad thing. But
there are instances when you may want to have a slide show, and also a
pop up photo or two. Well as things now stand, any photo pop up you
add, even if it is not part of the slide show, becomes part of the slide
show. And after a while, this can become tedious.
However, if you Name the photo, or photos, NoHighSlide, the photo or
photos are treated as simple pop ups. So you can have your slide show
and pop ups too.
Centering slide show photos If you have your thumbnail images spread
out across or over the page, each pop up photo opens centered on the
thumbnail image. If you would rather have each pop up photo centered
on the page, add this scrip to a placeholder in the Web Properties >
Placeholder > Replace with HTML Code text entry box:
<script type="text/javascript">hs.align = "center";</script>
NoPageClipping If you have rectangular objects that extend off the page
the portion of the objects that extend beyond the page margins are
automatically cropped. A placeholder named NoPageClipping allows
these objects to be seen in their entirety. The page is still centered in
the browser.
NoAutoHighlight If you use the new Navigation Bar Tool to create a
navigation button bar for your website, the button for the current page
is different (highlighted using the mouse over state) to identify the
current page. If for some reason you decide you that you do not want
this to happen and you would rather keep your visitors in the dark as to
which page they are visiting, name the button NoAutoHighlight. And if
you do this, please let your editor know why.
<html> Some scripts that you may add to your site require that the
script be entered at the beginning of the HTML script (for server side
scripts). Just name the placeholder <html> (include the angle
brackets), and the script will be added to the very start of the HTML
file. If you add a <head> named placeholder, the script will be placed
between the <head> tags.
You can find more of these “helpers” in this TalkGraphics thread.
John Horn’s Tweakset
Those of you who have used Web Designer 5 and/or Xtreme 5, may be
familiar with John Horn’s Tweakset. These tweaks add features and
functions not present in Xtreme or Web Designer. John has updated
some of these tweaks for Web Designer 6.
I’ll explain some of these tweaks here so you can understand how they
work and what they do. You can download the Tweakset here. Please
read the README.TXT file for instructions on how to add these to the
Designs Gallery. And by all means read the Manual.html file (included
in the ZIP file) for illustrated details.
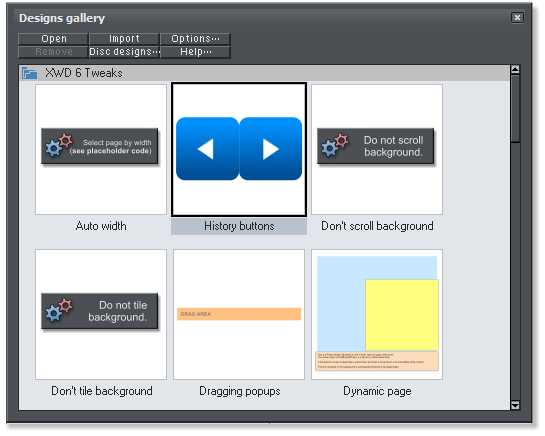
You can use Bill Taylor’s XaReg utility (available in the Xara Xone
Shareware Page) to rename the folder and to move it to the top of the
Designs Gallery list as I have done in the illustration above.
History Buttons These are simply pre-programmed Previous Page and
Next Page buttons. Drag and drop them from the Designs Gallery > XWD
Tweaks folder onto the page and place them wherever you wish.
Left Aligned Page By default, Web Designer and Xtreme centers all web
pages in the browser. But there may be times and reasons when you
would rather the page align to the left side of the browser. Drag and
drop this tweak onto the page. That all there is to it.
Tile Background Horizontally You may want a bitmap image that only
appears at the top of the page. And you do not want this image to fill
the entire page, the way a background image normally does. Drag and
drop this tweak onto the page and the background image will tile
horizontally only and not vertically. In addition, if you want the
background that is not tiled to be a different color (by default it is the
page color) you can change the color in the placeholder script.
Tile Background Vertically Drag and drop this tweak onto the page to
make the background bitmap image tile in the vertical direction only.
The image aligns to the left side of the page so consider this when
designing the tile image. If you want the image to continue under the
page, then design the tile to the width of the page. You can also modify
the placeholder script to change the background color not covered by
the background bitmap.
Don’t Tile Background This makes the background image align to the
top left corner of the page and the image will not tile. You can also
change the background color by altering the placeholder script.
Static Background By default, the background pattern starts from the
top left corner of the page. Drag and drop this tweak onto the page to
force the background pattern to tile starting at the top left corner of
the browser window.
Don’t Scroll Background This tweak locks the background image in
place when the page scrolls.
Dragging Pop-Ups This tweak creates a predefined bar or area that lets
your visitors to drag a popup anywhere on the browser screen.
Auto Load Next Page Automatically loads a new page into the browser
after a specified length of time. You can modify the script to determine
the time and the page to be opened.
Auto Width Use this tweak to create multiple page widths that are
determined by the visitor’s screen size. You need to create separate
sites for each page width and then this tweak redirects the visitor to the
appropriate website based upon browser information. The result is a
visitor with a small screen computer sees a page designed specifically
for his computer and a person with a 24” monitor will see a website
designed for that width and any size in between.
What you don’t see is what you get. John assures me that even though
a layer is invisible, there may be times when you want to force this
layer to export. John’s example is Dynamic Page or Sticky Footers (part
of the WD6 Tweakset). If you just export the page to HTML this
formatting is lost. Web Designer 6 just treats these layers as if they
have been deleted.
The solution is to add an exclamation point to the beginning of the
invisible layer. For example, !My Hidden Layer. What matters is for the
first word of the layer name to be preceded by the exclamation mark.
We’ll look at John’s Tweakset a little later on.
NoHighSlide Web Designer 6 now has an easy way to create a slide show.
You simply drag photos onto the page, resize the photos down to
thumbnail size, select all and open the Web Properties > Image
Properties tab. Check Pop-up Photo, set a maximum Pop-up width and
select from a variety of slide show Options. Creating a Slide Show is
covered in detail on Page 3.
The slide show feature is created with a program called High Slide. If
the implementation of High Slide has a down side, it is you can only
have one slide show per page. OK. So maybe that is not a bad thing. But
there are instances when you may want to have a slide show, and also a
pop up photo or two. Well as things now stand, any photo pop up you
add, even if it is not part of the slide show, becomes part of the slide
show. And after a while, this can become tedious.
However, if you Name the photo, or photos, NoHighSlide, the photo or
photos are treated as simple pop ups. So you can have your slide show
and pop ups too.
Centering slide show photos If you have your thumbnail images spread
out across or over the page, each pop up photo opens centered on the
thumbnail image. If you would rather have each pop up photo centered
on the page, add this scrip to a placeholder in the Web Properties >
Placeholder > Replace with HTML Code text entry box:
<script type="text/javascript">hs.align = "center";</script>
NoPageClipping If you have rectangular objects that extend off the page
the portion of the objects that extend beyond the page margins are
automatically cropped. A placeholder named NoPageClipping allows
these objects to be seen in their entirety. The page is still centered in
the browser.
NoAutoHighlight If you use the new Navigation Bar Tool to create a
navigation button bar for your website, the button for the current page
is different (highlighted using the mouse over state) to identify the
current page. If for some reason you decide you that you do not want
this to happen and you would rather keep your visitors in the dark as to
which page they are visiting, name the button NoAutoHighlight. And if
you do this, please let your editor know why.
<html> Some scripts that you may add to your site require that the
script be entered at the beginning of the HTML script (for server side
scripts). Just name the placeholder <html> (include the angle
brackets), and the script will be added to the very start of the HTML
file. If you add a <head> named placeholder, the script will be placed
between the <head> tags.
You can find more of these “helpers” in this TalkGraphics thread.
John Horn’s Tweakset
Those of you who have used Web Designer 5 and/or Xtreme 5, may be
familiar with John Horn’s Tweakset. These tweaks add features and
functions not present in Xtreme or Web Designer. John has updated
some of these tweaks for Web Designer 6.
I’ll explain some of these tweaks here so you can understand how they
work and what they do. You can download the Tweakset here. Please
read the README.TXT file for instructions on how to add these to the
Designs Gallery. And by all means read the Manual.html file (included
in the ZIP file) for illustrated details.
You can use Bill Taylor’s XaReg utility (available in the Xara Xone
Shareware Page) to rename the folder and to move it to the top of the
Designs Gallery list as I have done in the illustration above.
History Buttons These are simply pre-programmed Previous Page and
Next Page buttons. Drag and drop them from the Designs Gallery > XWD
Tweaks folder onto the page and place them wherever you wish.
Left Aligned Page By default, Web Designer and Xtreme centers all web
pages in the browser. But there may be times and reasons when you
would rather the page align to the left side of the browser. Drag and
drop this tweak onto the page. That all there is to it.
Tile Background Horizontally You may want a bitmap image that only
appears at the top of the page. And you do not want this image to fill
the entire page, the way a background image normally does. Drag and
drop this tweak onto the page and the background image will tile
horizontally only and not vertically. In addition, if you want the
background that is not tiled to be a different color (by default it is the
page color) you can change the color in the placeholder script.
Tile Background Vertically Drag and drop this tweak onto the page to
make the background bitmap image tile in the vertical direction only.
The image aligns to the left side of the page so consider this when
designing the tile image. If you want the image to continue under the
page, then design the tile to the width of the page. You can also modify
the placeholder script to change the background color not covered by
the background bitmap.
Don’t Tile Background This makes the background image align to the
top left corner of the page and the image will not tile. You can also
change the background color by altering the placeholder script.
Static Background By default, the background pattern starts from the
top left corner of the page. Drag and drop this tweak onto the page to
force the background pattern to tile starting at the top left corner of
the browser window.
Don’t Scroll Background This tweak locks the background image in
place when the page scrolls.
Dragging Pop-Ups This tweak creates a predefined bar or area that lets
your visitors to drag a popup anywhere on the browser screen.
Auto Load Next Page Automatically loads a new page into the browser
after a specified length of time. You can modify the script to determine
the time and the page to be opened.
Auto Width Use this tweak to create multiple page widths that are
determined by the visitor’s screen size. You need to create separate
sites for each page width and then this tweak redirects the visitor to the
appropriate website based upon browser information. The result is a
visitor with a small screen computer sees a page designed specifically
for his computer and a person with a 24” monitor will see a website
designed for that width and any size in between.
 Sticky Footer Double click on the tweak icon to create a new page with
a sticky footer layer. Place text, graphic objects, etc. at the bottom of
the page and these items will appear on the bottom of the page even if
the browser window is resized or the page is scrolled. The large blue
rectangle automatically scales to the size of the page. You can change
the color to your background color but do not delete the rectangle and
do not alter the sticky footer layers or their position.
Loading Screen Double click this icon to create a new page with a
special Loading Screen layer. Place the objects you want your visitor to
see while the rest of the page objects load. For example, if you have a
gallery page with a lot of large photo objects that may take a slower
browser some time to load, use a simple loading screen that gives your
visitor some information and informs her or him that the page will load
in a few moments. When the page has loaded, the loading screen
disappears revealing the full page.
Dynamic Page This tweak causes the page to expand or contract based
on dynamic created content which is created via a PHP script. An
example of this is content loaded from a data base. The Dynamic Page
layer expands and contracts to accommodate the content.
If you have questions about these tweaks, or to request or find new
tweaks, visit the Tweakset for WD6 TalkGraphics thread.
And special thanks to John for holding my hand and walking me through
these tweaks. And thanks to John and Steve for the technical edit help.
Comments, questions, corrections or suggestions? Use the e-mail link
below to forward your feedback to your editor (that’s still me).
Gary W. Priester
Your Editor
Send e-mail
Sticky Footer Double click on the tweak icon to create a new page with
a sticky footer layer. Place text, graphic objects, etc. at the bottom of
the page and these items will appear on the bottom of the page even if
the browser window is resized or the page is scrolled. The large blue
rectangle automatically scales to the size of the page. You can change
the color to your background color but do not delete the rectangle and
do not alter the sticky footer layers or their position.
Loading Screen Double click this icon to create a new page with a
special Loading Screen layer. Place the objects you want your visitor to
see while the rest of the page objects load. For example, if you have a
gallery page with a lot of large photo objects that may take a slower
browser some time to load, use a simple loading screen that gives your
visitor some information and informs her or him that the page will load
in a few moments. When the page has loaded, the loading screen
disappears revealing the full page.
Dynamic Page This tweak causes the page to expand or contract based
on dynamic created content which is created via a PHP script. An
example of this is content loaded from a data base. The Dynamic Page
layer expands and contracts to accommodate the content.
If you have questions about these tweaks, or to request or find new
tweaks, visit the Tweakset for WD6 TalkGraphics thread.
And special thanks to John for holding my hand and walking me through
these tweaks. And thanks to John and Steve for the technical edit help.
Comments, questions, corrections or suggestions? Use the e-mail link
below to forward your feedback to your editor (that’s still me).
Gary W. Priester
Your Editor
Send e-mail


