WEBSITE AND WEBSITE GRAPHICS CREATED WITH XARA XTREME PRO
 H 1 2 3 4 5 Download Zipped Tutorial
 Creating a Navigation Bar with Fly-out Sub-menus
Xara Web Designer 6 has a new and powerful Create Nav Bar tool that
simplifies the process of creating a navigation bar and includes the
ability to create drop down and fly out menus. The current page button
is automatically highlighted to
indicate that this is the page your
visitor is on. And the page links are
automatic, even if you change the
order of the pages.
In this tutorial we’ll create a vertical
navigation bar with fly out sub menus.
And we will preview a special Tweak
created especially for this Workbook
by the Tweakmeister, John Horn
(covoxer).
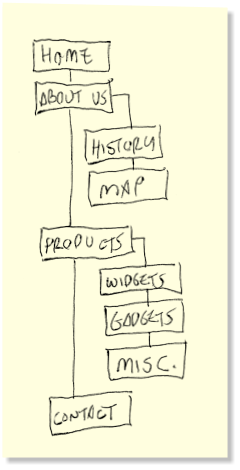
My sketch on the left reflects the page
structure with four main pages and
five sub pages. A flow chart such as
this makes putting the website
together a lot easier.
Creating a Navigation Bar with Fly-out Sub-menus
Xara Web Designer 6 has a new and powerful Create Nav Bar tool that
simplifies the process of creating a navigation bar and includes the
ability to create drop down and fly out menus. The current page button
is automatically highlighted to
indicate that this is the page your
visitor is on. And the page links are
automatic, even if you change the
order of the pages.
In this tutorial we’ll create a vertical
navigation bar with fly out sub menus.
And we will preview a special Tweak
created especially for this Workbook
by the Tweakmeister, John Horn
(covoxer).
My sketch on the left reflects the page
structure with four main pages and
five sub pages. A flow chart such as
this makes putting the website
together a lot easier.
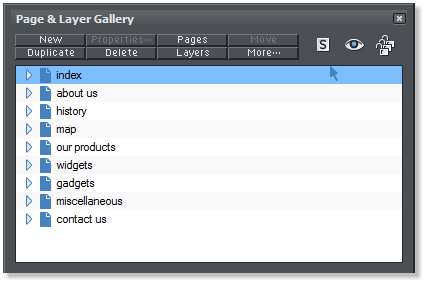
 Open the Page and Layer Gallery (F10). Select the title bar for the
index page and press New seven times to create seven new pages.
Click two times on the title bar for each new page (do not double click,
just click and click) to enable text editing. Edit each page name as
shown. These are all the pages represented in my site map sketch.
Don’t worry because the titles are all lowercase. We will changes these
when we create the navigation menu.
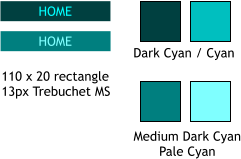
Make four squares and apply the
colors shown on the left. These colors
are from the screen palette.
Create a button rectangle, 110 pixels
wide by 20 pixels tall. Add the text
HOME in 13px Trebuchet MS caps. Use
the first two colors for the rectangle
and text. Center justify the text and
center on the rectangle and group.
Open the Page and Layer Gallery (F10). Select the title bar for the
index page and press New seven times to create seven new pages.
Click two times on the title bar for each new page (do not double click,
just click and click) to enable text editing. Edit each page name as
shown. These are all the pages represented in my site map sketch.
Don’t worry because the titles are all lowercase. We will changes these
when we create the navigation menu.
Make four squares and apply the
colors shown on the left. These colors
are from the screen palette.
Create a button rectangle, 110 pixels
wide by 20 pixels tall. Add the text
HOME in 13px Trebuchet MS caps. Use
the first two colors for the rectangle
and text. Center justify the text and
center on the rectangle and group.
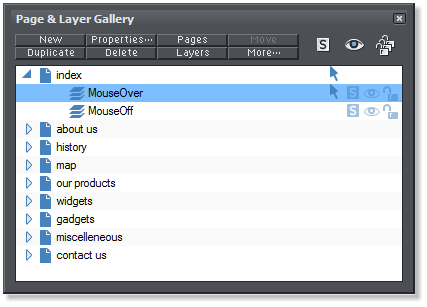 Copy the button group to the clipboard (Ctrl c). Open the Page & Layer
Gallery (F10). Select the MouseOver layer for the index page and click
the red eye icon to make the MouseOver layer visible.
From the Edit menu, select Paste in Place. Drag a selection rectangle
around both buttons with the Selection Tool (the arrow pointer) and
from the Arrange menu, select Apply Soft Group. A soft group spans
several layers and soft grouped objects remain on these layers if you
copy and paste to another page.
Select the button soft group.
Mouse over the Website Properties icon and from the drop down menu,
select Create Navigation Bar.
Copy the button group to the clipboard (Ctrl c). Open the Page & Layer
Gallery (F10). Select the MouseOver layer for the index page and click
the red eye icon to make the MouseOver layer visible.
From the Edit menu, select Paste in Place. Drag a selection rectangle
around both buttons with the Selection Tool (the arrow pointer) and
from the Arrange menu, select Apply Soft Group. A soft group spans
several layers and soft grouped objects remain on these layers if you
copy and paste to another page.
Select the button soft group.
Mouse over the Website Properties icon and from the drop down menu,
select Create Navigation Bar.
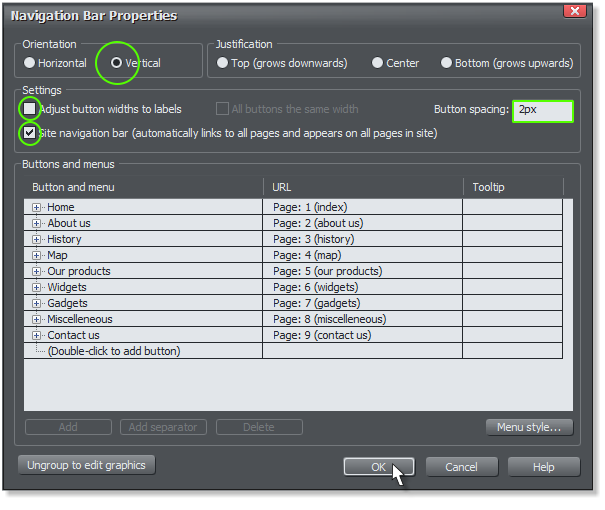
 Make the changes shown in the screen capture above
and press OK. A vertical button bar is created with 2
pixels of space between each button. If you preview
the site (Export and Preview Website), you will notice
that the current page is represented by a highlighted
button, this example, the About Us page.
Make the changes shown in the screen capture above
and press OK. A vertical button bar is created with 2
pixels of space between each button. If you preview
the site (Export and Preview Website), you will notice
that the current page is represented by a highlighted
button, this example, the About Us page.

 Double click on the vertical navigation bar. This bypasses the Web
Properties dialog and goes directly to the Navigation Bar Properties
dialog. One by one, select the pages that will be sub menus and press
Delete until you just have the four main pages left. This includes the
MISCELLANEOUS page shown above.
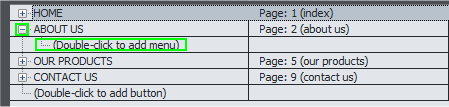
Click the small + next button next to ABOUT US. A menu appears asking
you to double click to add menu. So, double click already!
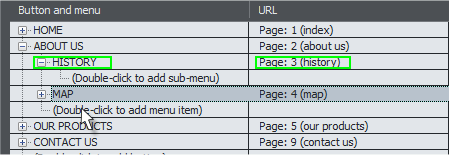
The text New Item appears on a new line under ABOUT US. While the
text is still highlighted, change “New Item” to HISTORY. Click to the
right under About Us in the URL column. The Link dialog will open.
From the Link to Page: drop down menu, select History and press
Apply. The link now appears as shown above.
Repeat this step to add MAP and link MAP to Page: 4 (map)
Under OUR PRODUCTS, add new pages and page links for WIDGETS,
GADGETS, and MISCELLANEOUS. Remember to press Apply after each
change. Always remember to press Apply to make a change.
Double click on the vertical navigation bar. This bypasses the Web
Properties dialog and goes directly to the Navigation Bar Properties
dialog. One by one, select the pages that will be sub menus and press
Delete until you just have the four main pages left. This includes the
MISCELLANEOUS page shown above.
Click the small + next button next to ABOUT US. A menu appears asking
you to double click to add menu. So, double click already!
The text New Item appears on a new line under ABOUT US. While the
text is still highlighted, change “New Item” to HISTORY. Click to the
right under About Us in the URL column. The Link dialog will open.
From the Link to Page: drop down menu, select History and press
Apply. The link now appears as shown above.
Repeat this step to add MAP and link MAP to Page: 4 (map)
Under OUR PRODUCTS, add new pages and page links for WIDGETS,
GADGETS, and MISCELLANEOUS. Remember to press Apply after each
change. Always remember to press Apply to make a change.
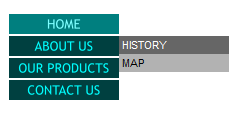
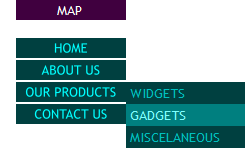
 Preview the page and you can see the fly out sub menus.
The fly out menu is gray. Your Editor thinks the menu will appear more
integrated with the main menu if the colors match. We’ll achieve this
next and you will see why I had you make those four colored squares.
Preview the page and you can see the fly out sub menus.
The fly out menu is gray. Your Editor thinks the menu will appear more
integrated with the main menu if the colors match. We’ll achieve this
next and you will see why I had you make those four colored squares.
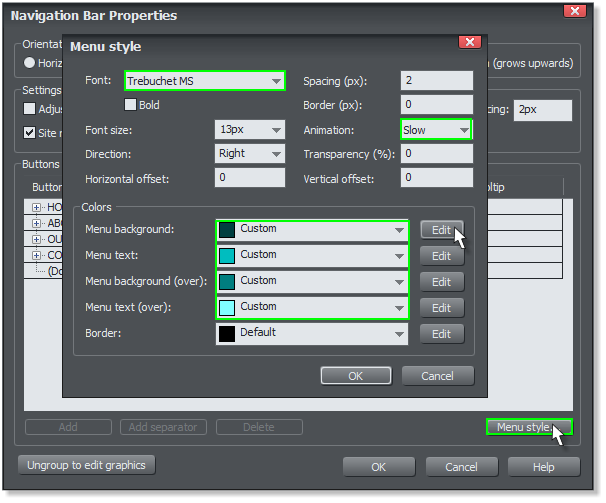 Double click on the menu to open the Navigation Bar Properties dialog.
Click the Menu Style button to open the Menu Style dialog.
Change the font to Trebuchet MS, and the Font Size: to 13px. Change
the Animation: speed to Slow. This makes the fly out menus open more
slowly and with greater effect. Do not close the menu yet.
Double click on the menu to open the Navigation Bar Properties dialog.
Click the Menu Style button to open the Menu Style dialog.
Change the font to Trebuchet MS, and the Font Size: to 13px. Change
the Animation: speed to Slow. This makes the fly out menus open more
slowly and with greater effect. Do not close the menu yet.
 There are five Colors: > Edit buttons (shown in the previous illustration)
that let you customize the color of the fly out menu and text. The first
two modify the fly out mouse down menu color and text color and the
second two change the fly out mouse over menu color and text color.
The last is for the outline color. We are not going to add an outline so
we are not concerned with this button.
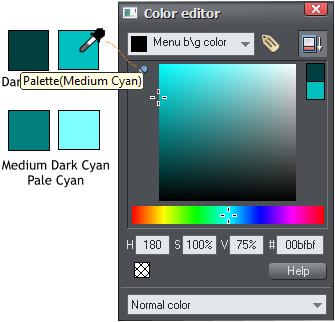
Click each of the Edit buttons to change the color. The Color Editor
opens for you to modify the color. You cannot change the color by
clicking colors on the color palette. This is why I had you make the four
colored squares.
Drag the Color Picker (the eye dropper icon) from the Color Editor and
over the desired color.
When you have edited all four colors, press OK to close the Menu Style
dialog and press OK again to close the Navigation Properties dialog.
There are five Colors: > Edit buttons (shown in the previous illustration)
that let you customize the color of the fly out menu and text. The first
two modify the fly out mouse down menu color and text color and the
second two change the fly out mouse over menu color and text color.
The last is for the outline color. We are not going to add an outline so
we are not concerned with this button.
Click each of the Edit buttons to change the color. The Color Editor
opens for you to modify the color. You cannot change the color by
clicking colors on the color palette. This is why I had you make the four
colored squares.
Drag the Color Picker (the eye dropper icon) from the Color Editor and
over the desired color.
When you have edited all four colors, press OK to close the Menu Style
dialog and press OK again to close the Navigation Properties dialog.
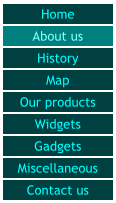
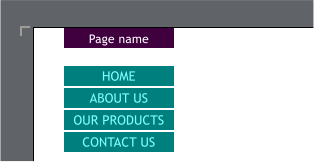
 On the left, you can see the fly out menu now looks integrated with the
normal button bar. And the ABOUT US button is highlighted.
But on the right, is the the menu on the HISTORY page. The problem (or
opportunity if you are an optimist) is how to highlight every page, even
sub menu pages.
John Horn to the rescue!
John has devised a special Tweak just for this Workbook. And what it
does is automatically display the name of the current page. However, it
is not a perfect world. While John’s Page Name Tweak is pure genius,
there is a bit of work involved. I’ll explain in a moment.
First, create a new rectangle 110 pixels wide by 20
pixels tall, the same size as the buttons. Apply a flat,
Dark Magenta fill and delete the outline.
Then locate the file Page Name.xar in the ZIPPED tutorial folder. Drag it
onto the desktop, then drag and drop the file onto the page. Although it
is a XAR file, it is actually a Tweak. When you drag and drop the Page
name file onto the page, it will appear as shown above, in blue text.
You can format the text, but DO NOT CHANGE THE CHARACTERS!
Change the formatting as
follows: Change the font to
Trebuchet MS, 13px,
Center Justification, and
change the text color to
white. Center the text over
the dark magenta rectangle,
but move the text up so the
P is centered vertically on
the magenta rectangle.
Group the text and the rectangle and place it above the regular menu as
shown above. Select the magenta rectangle and then menu and Arrange
> Repeat on All Pages. Now preview your site.
The text in the magenta rectangle changes to indicate the current page,
even the sub menu pages.
And here is where I mentioned there was a problem. Because the text
on my menu is all caps, and because the Page Titles are lowercase, the
text on the buttons has changed to lower case. Ack!
On the left, you can see the fly out menu now looks integrated with the
normal button bar. And the ABOUT US button is highlighted.
But on the right, is the the menu on the HISTORY page. The problem (or
opportunity if you are an optimist) is how to highlight every page, even
sub menu pages.
John Horn to the rescue!
John has devised a special Tweak just for this Workbook. And what it
does is automatically display the name of the current page. However, it
is not a perfect world. While John’s Page Name Tweak is pure genius,
there is a bit of work involved. I’ll explain in a moment.
First, create a new rectangle 110 pixels wide by 20
pixels tall, the same size as the buttons. Apply a flat,
Dark Magenta fill and delete the outline.
Then locate the file Page Name.xar in the ZIPPED tutorial folder. Drag it
onto the desktop, then drag and drop the file onto the page. Although it
is a XAR file, it is actually a Tweak. When you drag and drop the Page
name file onto the page, it will appear as shown above, in blue text.
You can format the text, but DO NOT CHANGE THE CHARACTERS!
Change the formatting as
follows: Change the font to
Trebuchet MS, 13px,
Center Justification, and
change the text color to
white. Center the text over
the dark magenta rectangle,
but move the text up so the
P is centered vertically on
the magenta rectangle.
Group the text and the rectangle and place it above the regular menu as
shown above. Select the magenta rectangle and then menu and Arrange
> Repeat on All Pages. Now preview your site.
The text in the magenta rectangle changes to indicate the current page,
even the sub menu pages.
And here is where I mentioned there was a problem. Because the text
on my menu is all caps, and because the Page Titles are lowercase, the
text on the buttons has changed to lower case. Ack!

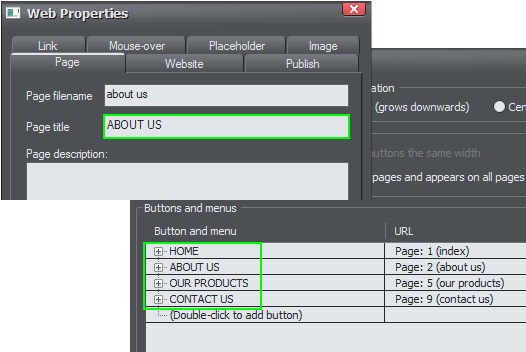 The Page Title for each page needs to be changed to all caps in the Web
Properties > Page tabbed section. You have to do this one page at a
time. Then, as soon as you do this, the names in the Navigation Bar
Properties promptly change to lowercase and so, you have to go back
and redo all the Button and Menu names as shown above.
But the final results are well worth
the extra effort. The example on the
right shows the MAP page as the
current page. Click here to see the
menu bar in action.
The Page Title for each page needs to be changed to all caps in the Web
Properties > Page tabbed section. You have to do this one page at a
time. Then, as soon as you do this, the names in the Navigation Bar
Properties promptly change to lowercase and so, you have to go back
and redo all the Button and Menu names as shown above.
But the final results are well worth
the extra effort. The example on the
right shows the MAP page as the
current page. Click here to see the
menu bar in action.


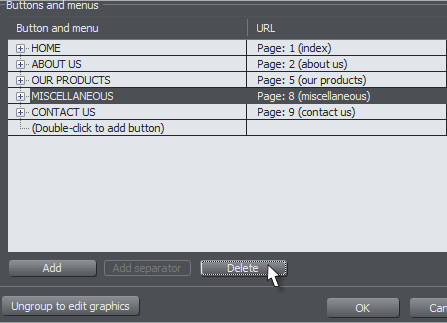
 In the Navigation Bar Properties dialog, Buttons and Menu section,
click twice on each button name, and edit the names to upper case.
If you refer back to my sketch, you will see that my button bar only has
four main buttons, Home, About Us, Products, and Contact Us. All the
other buttons are sub menus. How do we do that? I am glad you asked.
In the Navigation Bar Properties dialog, Buttons and Menu section,
click twice on each button name, and edit the names to upper case.
If you refer back to my sketch, you will see that my button bar only has
four main buttons, Home, About Us, Products, and Contact Us. All the
other buttons are sub menus. How do we do that? I am glad you asked.