
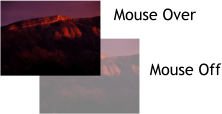
Select all six thumbnails then select
the Transparency Tool (F6). Change
the Transparency slider setting to
50%.
Copy the 6 thumbnail images to the
clipboard (Ctrl c). Select the
MouseOver layer in the Page and
Layer Gallery and Edit > Paste In Place. Change the Transparency
setting to None.
Select each pair of thumbnails (Mouse Off and Mouse Over) and Arrange
> Apply Soft Group.
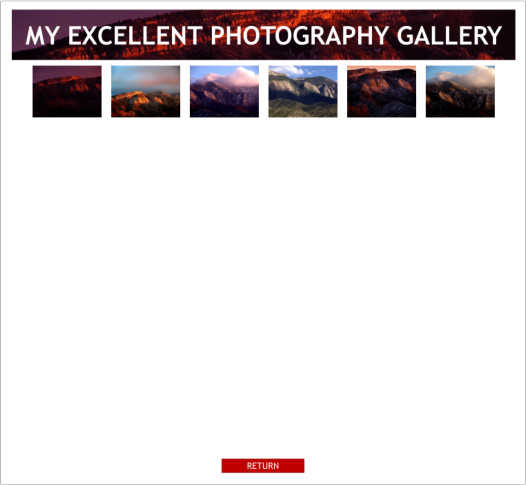
Hold down the Ctrl key and from the screen palette, drag and drop the
color 60% Black onto the pasteboard, the area outside the page. This
creates a background color different from the white of the gallery page.
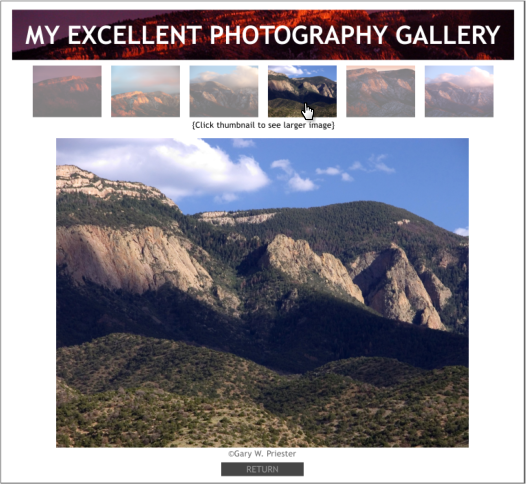
Add a banner and six small thumbnail images and arrange them
attractively as I have endeavored to do in the illustration above. Use
your own photos or use photos from the Designs Gallery > Photography
folders.
 WEBSITE AND WEBSITE GRAPHICS CREATED WITH XARA XTREME PRO

 H 1 2 3 4 5 Download Zipped Tutorial


 Creating a One Page Photo Gallery with Layers
OK Automatic slide shows are cool. But maybe you would rather have
more control over your slides. No pain no gain. You know? So in this
tutorial we’ll create a small photo gallery with mouse over effects and
some different layer options. And we’ll do it all on one page.
Set up a new page SVGA, 760 pixels wide.
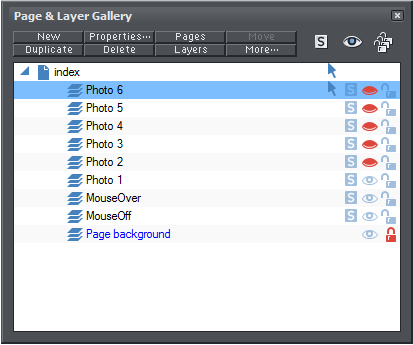
Open the Page and Layer Gallery (F10). Select the MouseOver layer,
then press the New button six times to create six new layers. Click
twice on each layer and rename the layers Photo 1, Photo 2, etc. Click
on the eye icon to make each of the photo layers, except for Photo 1
invisible. When you are done, select the MouseOff layer.
Creating a One Page Photo Gallery with Layers
OK Automatic slide shows are cool. But maybe you would rather have
more control over your slides. No pain no gain. You know? So in this
tutorial we’ll create a small photo gallery with mouse over effects and
some different layer options. And we’ll do it all on one page.
Set up a new page SVGA, 760 pixels wide.
Open the Page and Layer Gallery (F10). Select the MouseOver layer,
then press the New button six times to create six new layers. Click
twice on each layer and rename the layers Photo 1, Photo 2, etc. Click
on the eye icon to make each of the photo layers, except for Photo 1
invisible. When you are done, select the MouseOff layer.

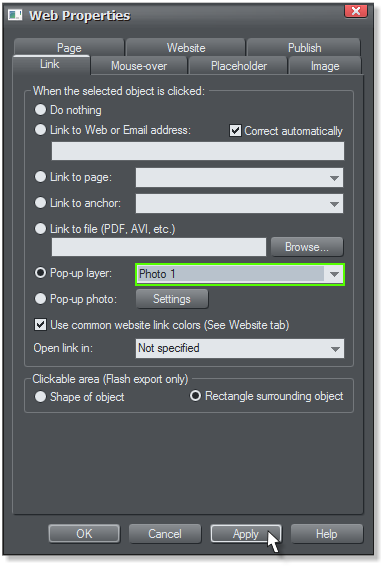 Select the first thumbnail soft group. Open the Web Properties
> Link tabbed section and from the Pop-up Layer drop down list, select
Photo 1.
Link the other thumbnails to their appropriate pop-up layers.
Open the Page & Layer Gallery (F10). One by select each photo layer,
click the red eye icon to make the layer visible, and paste and center
the appropriate photo for each layer (use the thumbnails to remind you
which image goes on each layer). After you paste each image, make that
layer invisible and select the next layer.
Select the first thumbnail soft group. Open the Web Properties
> Link tabbed section and from the Pop-up Layer drop down list, select
Photo 1.
Link the other thumbnails to their appropriate pop-up layers.
Open the Page & Layer Gallery (F10). One by select each photo layer,
click the red eye icon to make the layer visible, and paste and center
the appropriate photo for each layer (use the thumbnails to remind you
which image goes on each layer). After you paste each image, make that
layer invisible and select the next layer.
 Preview your gallery. That was a very simple and elegant way to create
an attractive, effective gallery. Click here to see the actual gallery.
Mouse Over Gallery You can also use the Mouse-over > Show Popup
Layer option (Mouse-over tabbed section) instead of the Pop-up Photo
option. If you do this, the mouse over effect on the thumbnails will not
work. But you can remove the mouse over versions of the thumbnails
and place them on the appropriate photo layers. I like using the Mouse-
over > Show Popup Layer option as it makes it harder for visitors to
“re-use” your images. Click here to see my Mouse Over gallery.
Preview your gallery. That was a very simple and elegant way to create
an attractive, effective gallery. Click here to see the actual gallery.
Mouse Over Gallery You can also use the Mouse-over > Show Popup
Layer option (Mouse-over tabbed section) instead of the Pop-up Photo
option. If you do this, the mouse over effect on the thumbnails will not
work. But you can remove the mouse over versions of the thumbnails
and place them on the appropriate photo layers. I like using the Mouse-
over > Show Popup Layer option as it makes it harder for visitors to
“re-use” your images. Click here to see my Mouse Over gallery.
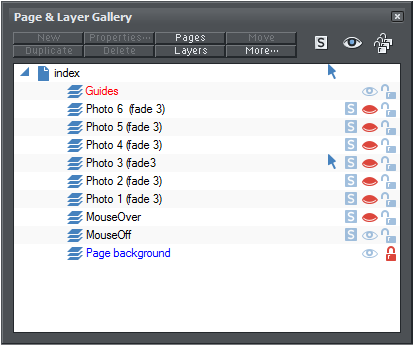 Finally, you can add a fade to the images as they come up. Add a fade
reference to each layer as noted above, for example, Photo 1 (fade 3).
Fade speed ranges from 1 (slowest) to 5 (fastest). Here’s an sampler.
Finally, you can add a fade to the images as they come up. Add a fade
reference to each layer as noted above, for example, Photo 1 (fade 3).
Fade speed ranges from 1 (slowest) to 5 (fastest). Here’s an sampler.


WEBSITE AND WEBSITE GRAPHICS CREATED WITH XARA XTREME PRO
H 1 2 3 4 5 Download Zipped Tutorial
Creating a One Page Photo Gallery with Layers
OK Automatic slide shows are cool. But maybe you would rather have
more control over your slides. No pain no gain. You know? So in this
tutorial we’ll create a small photo gallery with mouse over effects and
some different layer options. And we’ll do it all on one page.
Set up a new page SVGA, 760 pixels wide.
Open the Page and Layer Gallery (F10). Select the MouseOver layer,
then press the New button six times to create six new layers. Click
twice on each layer and rename the layers Photo 1, Photo 2, etc. Click
on the eye icon to make each of the photo layers, except for Photo 1
invisible. When you are done, select the MouseOff layer.
Select the first thumbnail soft group. Open the Web Properties
> Link tabbed section and from the Pop-up Layer drop down list, select
Photo 1.
Link the other thumbnails to their appropriate pop-up layers.
Open the Page & Layer Gallery (F10). One by select each photo layer,
click the red eye icon to make the layer visible, and paste and center
the appropriate photo for each layer (use the thumbnails to remind you
which image goes on each layer). After you paste each image, make that
layer invisible and select the next layer.
Preview your gallery. That was a very simple and elegant way to create
an attractive, effective gallery. Click here to see the actual gallery.
Mouse Over Gallery You can also use the Mouse-over > Show Popup
Layer option (Mouse-over tabbed section) instead of the Pop-up Photo
option. If you do this, the mouse over effect on the thumbnails will not
work. But you can remove the mouse over versions of the thumbnails
and place them on the appropriate photo layers. I like using the Mouse-
over > Show Popup Layer option as it makes it harder for visitors to
“re-use” your images. Click here to see my Mouse Over gallery.
Finally, you can add a fade to the images as they come up. Add a fade
reference to each layer as noted above, for example, Photo 1 (fade 3).
Fade speed ranges from 1 (slowest) to 5 (fastest). Here’s an sampler.