|
|
|
Brushes are a really cool way to apply a texture or fill uniformly to a path. But curved paths present a problem if the brush stroke shape is too large and too square as is the case with my red and white candy stripe pattern. But where there's a will... (there's usually an estate attorney or something like that). Here's how I got around the problem.
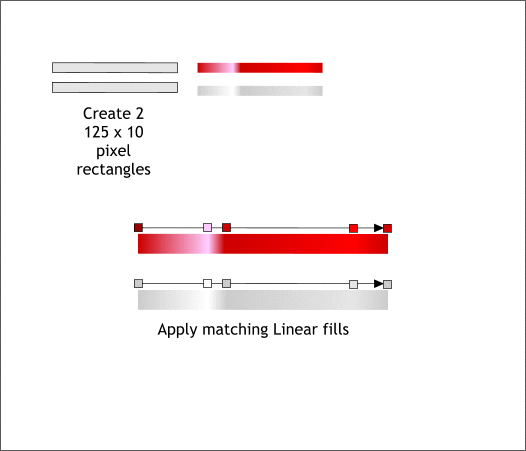
Create two rectangles to the sizes shown above left and using the Fill Tool (F5), apply 2 multi-color Linear fills. The colors I have used are right off the screen palette of web colors. The fill diagram above has been enlarged for detail.
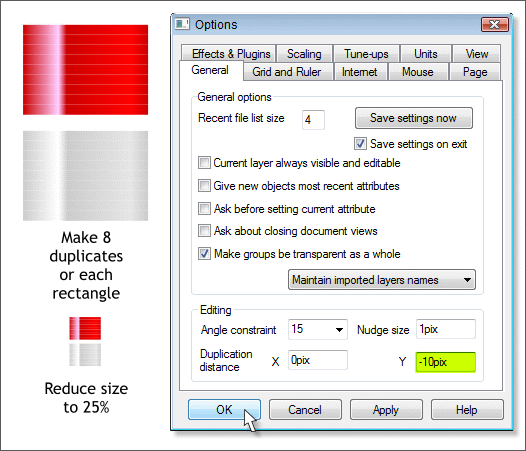
This step is not really necessary but it is how I sometimes make evenly-spaced duplicates. Open the Page Options menu (right click on the page and select Page Options...). In the General tabbed section, set the X Duplication Distance to 0pix. Change the Y Duplication Distance to -10pix. (Minus numbers go down or left). Press Apply or OK. Apply keeps the menu open. Select the red rectangle and press Ctrl d eight times. Place the white rectangle under the last red rectangle and press Ctrl d (duplicate) eight times. Reset the duplication distances to their previous settings (usually 20 and -20 pixels) and press OK to close the dialog. Select all the rectangles and reduce the size to 25% by entering 25 in the % text entry box on the Infobar and then pressing Enter to apply the change. The black padlock icon (Lock Aspect Ratio has to be in the down (enabled) position for the rectangles to scale proportionately).
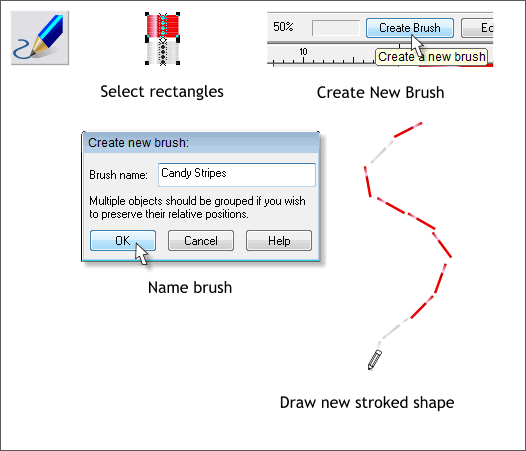
At this point I ran into a snag. Even though I created the red and then the white duplicates, when I created my brush all was not red and white but kind of an odd mixture. So, do this. Select all the rectangles except for the bottom rectangle and press Ctrl f (Bring to Front). Shift click on the second to the last rectangle to deselect it and press Ctrl f again. Repeat this step each time Shift clicking to deselect the last rectangle in the selection and then pressing Ctrl f until you only have one rectangle left. Objects are placed on layers according to their order of creation. This last step organized the rectangles in the proper order. Drag a selection marquee around all the rectangles to select them. Switch to the Freehand and Brush Tool (F3). Click Create Brush on the Infobar. Name your brush Candy Stripes and press OK . Drag a wavy vertical line with the Freehand and Brush Tool. Looks more like a line of rectangles now but that will change. Honest. You can trust me. I'm a doctor.
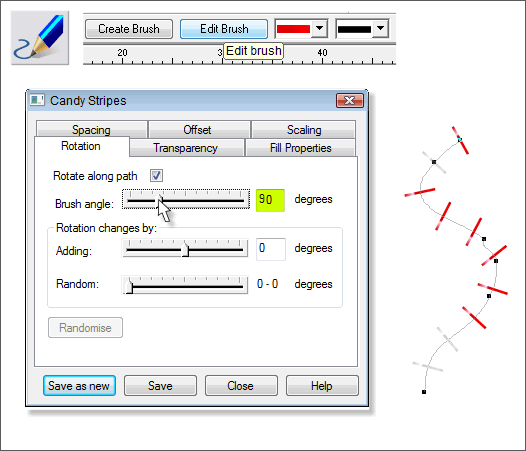
Press Edit Brush. In the Rotation tabbed section, move the slider to 90 degrees. The rectangles should now be at right angles to the path. Open the Spacing tabbed section.
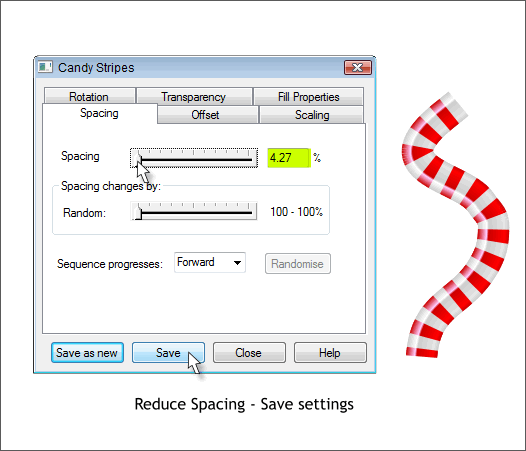
Reduce the Spacing as far to the left as you can. Press Save. You can see the results on the right. By using a series of small rectangles the edges are smooth and not blocky as they would be with a single rectangle.
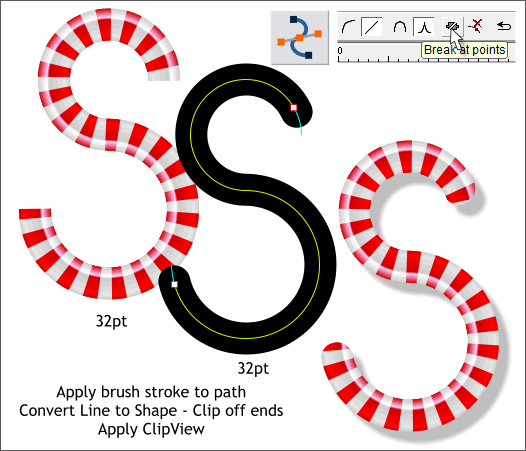
For this example I made an S-shape and applied my Candy Stripe brush by selecting the S-shape line, opening the Line Gallery (F12) > New Brush Strokes folder, selecting my Candy Stripe brush stroke, and pressing Apply. I changed the outline Width to 32pt. I cloned (Ctrl k) the S-shape and in the Select an Existing Brush drop down list on the Infobar, selected the default line shape (none). In the Line Gallery, I changed the ends to Round Caps. Using the Shape Editor Tool (F4) I double clicked on the S-shape towards the end of the shape to add a control point then pressed the Break at Points icon. The end segments were deleted. The resulting path was converted to a shape (Arrange > Convert Line to Shape) then sent behind the candy striped S-shape. Both objects were selected and masked inside the black S-shape with Arrange > Apply ClipView. It's too early for holiday candy canes. Maybe you clever readers can come up with another way to use this technique.
|
||||||
|
|


