|
|
|
Your Editor (that's me) has to admit that he is just as besotted with the new Windows Vista rollover buttons as he was with the Apple GEL buttons of several years past. And just in case you too are equally besotted with this very cool look/effect, here is a short tutorial that recreates the look of the new Vista rollover buttons.
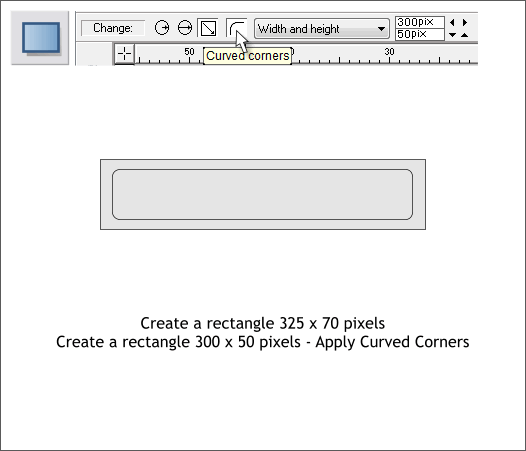
Using the Rectangle Tool (Shift F3), create a rectangle 325 pixels wide x 70 pixels tall. Create a smaller rectangles 300 pixels wide x 50 pixels tall. Center the two rectangles using the Alignment menu (Arrange > Alignment...). Apply Curved Corners to the smaller rectangles by selecting the rectangles with the Rectangle Tool then pressing the Curved Corners icon on the Infobar at the top of the screen. TIP: Curved Corners work best when the rectangle is not modified. Create a rectangle and resize the rectangle as needed. Using the resized rectangle for a guide, draw a new rectangle on top of the resized rectangle and then apply Curved Corners. Delete the first rectangle.
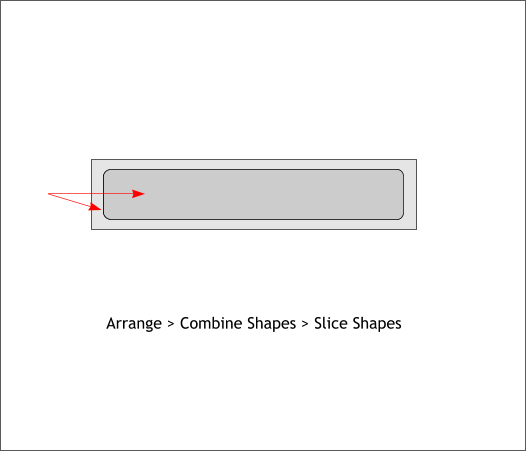
Select the 2 rectangles. From the Arrange menu, select Combine Shapes... and from the fly out menu select Slice Shapes (or use the keyboard shortcut Ctrl 4) . The rounded rectangle will disappear but the bottom rectangle will now be two separate shapes. You'll discover why we did this a little later in the tutorial.
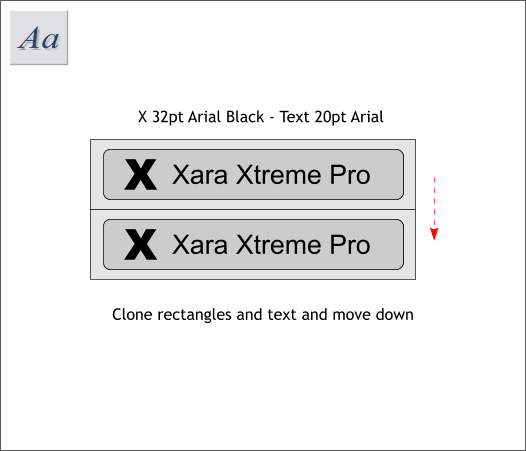
Using the Text Tool (F8) add two text objects to the rounded rectangle. Clone the text and the two rectangles (Ctrl k) and move these objects down under the top objects. NOTE: Xara has several ways to duplicate a selection. Duplicate (Ctrl d) creates a duplicate copy and moves the duplicate down and to the right. Clone (Ctrl k ) creates a copy directly on top of the original. Either method will work here. You can also Copy a selection to the clipboard (Ctrl c) and then Paste using Ctrl v or Edit > Paste which places a copy in the center of the screen, or Paste in Place, Shift Ctrl v or Edit > Paste in Place which places a copy in the exact position from which it was copied.
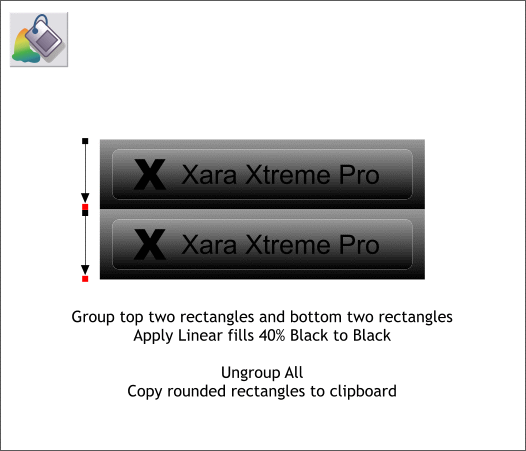
Group the top 2 rectangles (Ctrl g or Arrange > Group) then group the bottom two rectangles. Do not include the text. Select the top group with the Fill Tool (F5). Click on the top of the group, hold down the Ctrl key, and drag downwards to the bottom of the group to apply a Linear fill. The Ctrl key constrains the direction of the fill. With the group and the Fill Tool still selected, click the small square (control handle) at the top of the fill path arrow then click the 40% Black square on the screen palette at the bottom of the page. Click the bottom control handle and then click the Black color on the screen palette. Repeat this fill for the bottom group. Ungroup the rectangles (Ctrl u or Arrange > Ungroup). Copy the two rounded rectangles to the Clipboard (Ctrl c).
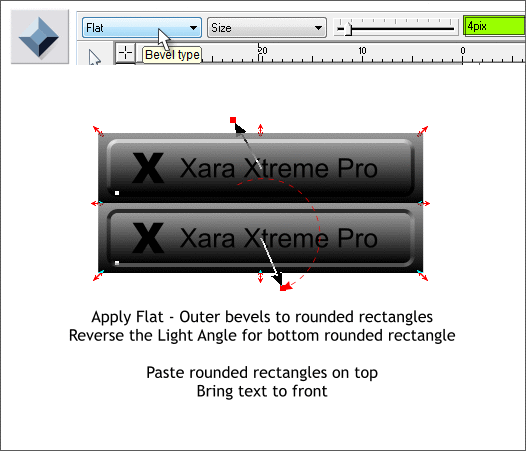
Select both rounded rectangles (hold down the Shift key to select multiple objects). Switch to the Bevel Tool (Ctrl F3).From the Bevel Type drop down list, select Flat. Press the Esc key to deselect. Select just the bottom rounded rectangle with the Bevel Tool . Drag the arrow in the center of the bevel (the Light Angle control handle) about 180 degrees clockwise so it is facing in the opposite direction. This creates the appearance of the button being recessed or in the down position. You now should have one button in the up position and one button in the down position as shown above Paste the rounded rectangles from the clipboard using Shift Ctrl v or Edit > Paste in Place. With both pasted rectangles selected, press Shift Ctrl b a few times until the pasted rectangles are behind the text.
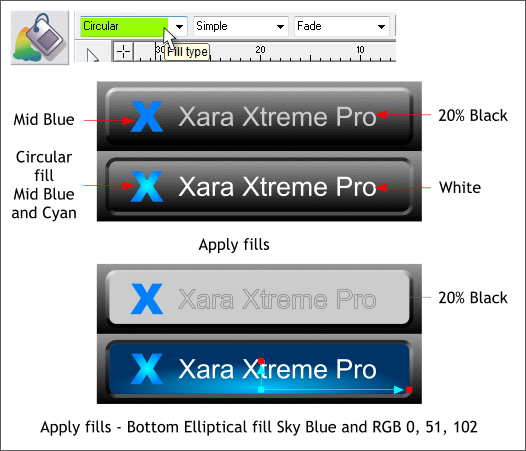
Select the pasted rectangles and press Shift Ctrl b until the pasted rectangles are behind the text. Select the top rounded rectangle and apply a Flat, 20% Black fill. Select the top X and apply a Flat fill of Mid Blue. Select the bottom X then select the Fill Tool (F5). From the drop down list of Fill Types select Circular. Click the outside square and then select Mid Blue from the screen palette. Click the inside square control handle and then click Cyan. Select the bottom rounded rectangle with the Fill Tool (F5). From the drop down list of Fill Types, select Elliptical. Select the middle control point with the Fill Tool and press the down arrow key on your keyboard a few times to move the center of the fill down as shown above. Click the inside control point and change the fill color to Sky Blue. Select the outside control handle, open the Color Editor (Ctrl e), and change the color to deep blue, RGB 0, 51, 102. If you need help editing fills, see Editing Fills in Workbook 31.
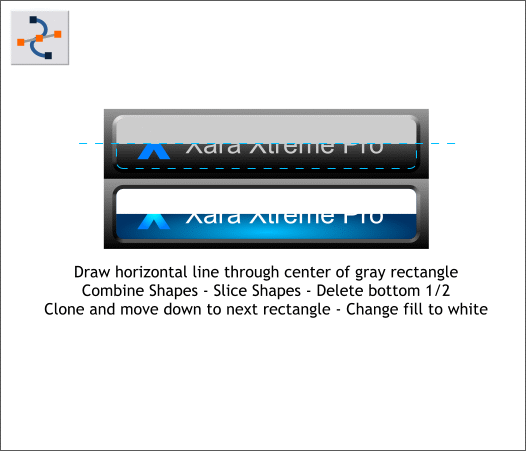
Select the Shape Editor Tool (F4) and draw a horizontal line through the center of the gray rectangle. (Click the Shape Editor Tool on the page, hold down the Ctrl key, click and drag away form the first point in a horizontal direction). The Ctrl key constrains the direction of the line. Center the line vertically over the gray rectangle and make sure the ends of the line extend beyond either side of the rectangle. Select the horizontal line and the gray rectangle and Arrange > Combine Shapes > Slice Shapes or press Ctrl 4. Delete the bottom half of the gray rectangle. Clone (Ctrl k) the remaining shape, change the fill color to White, and position it over the lower rounded rectangle as shown above.
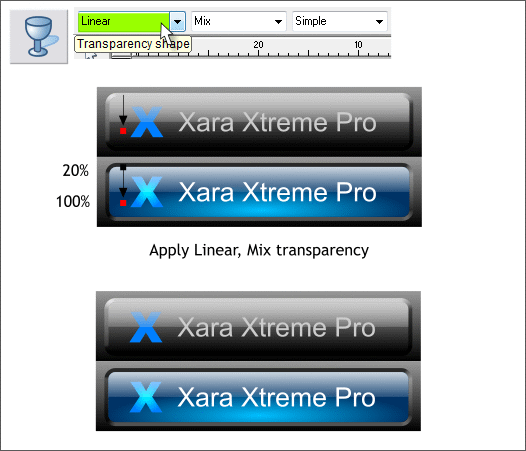
Last step. Select the top gray rectangle with the Transparency Tool (F6). Click on the top edge, hold down the Ctrl key, and drag down and a little beyond the bottom of the rectangle to apply a Linear , Mix transparency. (You can also select Linear from the Transparency Shape drop down list on the Infobar and adjust the fill path arrows as shown). Repeat this step on the bottom White rectangle. When you have applied the Linear transparency, click the top control point and change the Transparency slider setting to 20% on the Infobar. My hat's off to Microsoft's design team. I think these rollover buttons are just as cool, if not a few degrees cooler, than the Apple GEL buttons. You can see a practical application of these buttons just below. One final note. I create all my graphics in Xtreme Pro and I use NetObjects Fusion to create the JavaScript for my rollover buttons (and my web pages). But you can do the same using in Xara using the Button and Nav Bar Tool covered in the April 2007 tutorial.
|
||||||
|
|


