|
|
|
Xara's text handling ability has been excellent up to a point. Line spacing and the tracking, kerning and baseline shift tools were great. But lacking was the ability to format a paragraph of text with indents and tabs or to flow text from one column to another. In Xtreme Pro, this all changes.
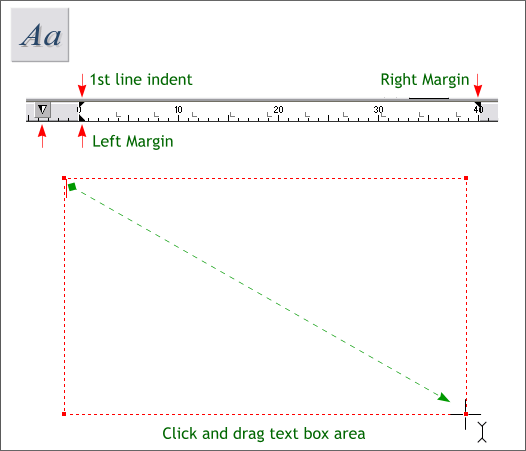
To create a paragraph, or "text area", simply drag a rectangle with the Text Tool (F8). Once the text area has been created, the screen rulers change as shown above. You can key in your text directly, or copy and paste the text from another application such as Microsoft Word. The ruler changes to indicate the measure (the width of the text area) and displays several new objects that will be familiar to those familiar with desktop publishing or word processing software experience. NOTE: You need to have the Screen Rulers displayed (Press Ctrl L to display rulers).
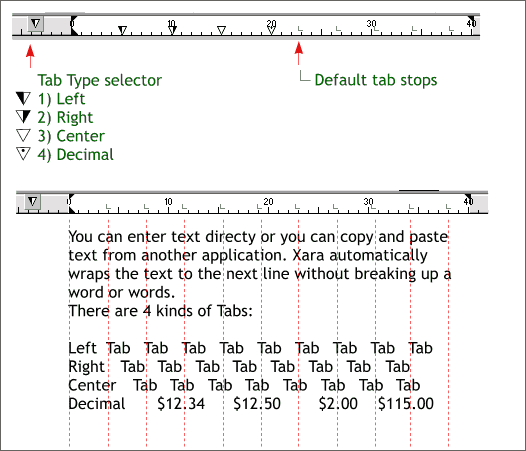
To the left of the white text area section of the screen rulers is a Current Selected Tab icon. Each time you click this icon, it changes to represent the 4 selected tab type: Left Align, Right Align, Center Align, and Decimal Align. To add a tab stop to the ruler, click to select the type of Tab stop you wish to add (the small triangle changes to indicate the tab type as shown above left. Then click on the screen ruler where you want to add the tab. You can reposition the tab stop by dragging it. In addition to the 4 user selected tab options, there are evenly spaced, default tab stops indicated by the L-shaped marks on the screen ruler. The example above demonstrates the 4 tab types. Here is how they work. Left Align: The text starts to the left of the tab stop, Right Align: The text ends at the tab stop, Center Align: The text is centered on the tab stop, and Decimal Align: The text centers on the decimal point. Decimal align is useful for aligning a column of figures with decimal points.
To reposition a Tab stop drag it left or right with the Text Tool. Drag a Tab stop off the ruler to delete it.
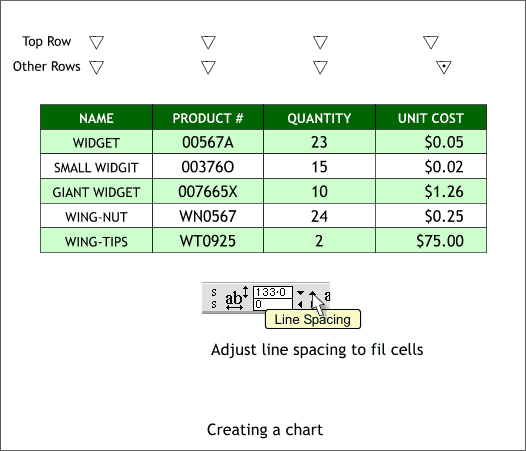
Each line or series of lines can have its own set of tab stops as you can see in the chart above. The top line of text, the cell names, all have Center Align tabs. The following 5 lines all have 3 Center Aligned tabs and 1 Decimal Aligned tab at the end. I have used the Line Spacing adjustment on the Text Tool Infobar to expand the text line spacing to vertically center the text in each cell. The cells were created first. To add different tabs, simply highlight the line or lines of text you wish to format, then add or adjust the existing tabs. Xtreme Pro does not currently have the ability to change an existing tab type. To do this, remove the current tab, click the Tab Type Selector icon to the desired tab, then click on the ruler to add the tab. To move a tab stop, simply drag it with the Text Tool. To remove a tab stop, drag it off the ruler. To add a new tab stop, click the Tab Type icon to set the kind of tab, then click on the ruler.
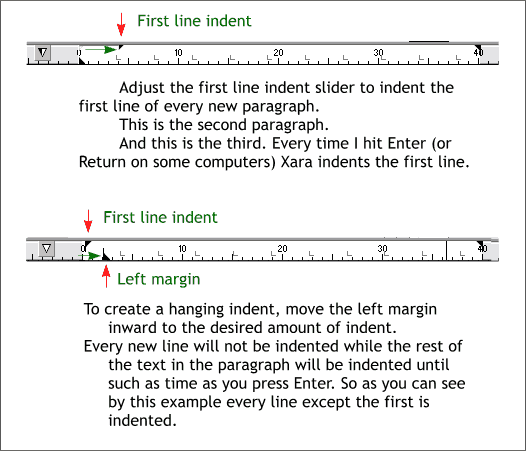
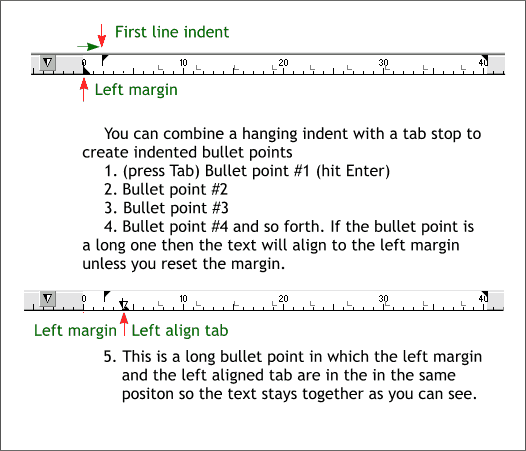
Paragraph Indents If you prefer to have the first line of each new paragraph indented, drag the First Line Indent triangle to the right to the desired locaton . This is shown in the top example above. Every time you hit Enter (or Return), the next line will automatically indent. Do not hit Enter at the end of a line as this will cause the next line to be indented. Soft returns (Shift Enter) are not supported at this time. Hanging Indents To create a "hanging indent" where the first line is not indented but every following line of text is indented, drag the Left Margin indicator to the right to the desired location.
Bullet Points To add bullet points to your text, create a hanging indent. Key in a number or add a symbol, then press the Tab key to start the text at the first default tab stop. This works fine for short lines of text, but as you can see in point 4. in the top example, the additional lines do not indent. So... To get all of the lines of bullet point text to left align to the first line, add a Left Align tab stop in the same place as the Left Margin indicator as shown in point 5 in the bottom example. Add your number, then press the Tab key and enter your bullet point.
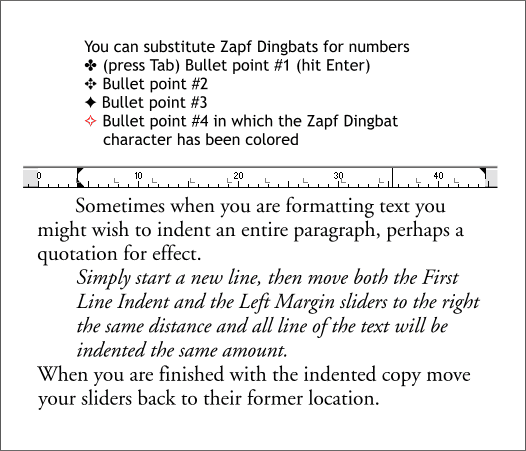
Symbols You can use symbols, such as Zapf Dingbats in place of bullet points. Indenting a Block of Text To indent a block of text, highlight the text with the Text Tool, then move both the First Line Indent and the Left Margin markers to the right to the desired location. If you wish, you can also use the Right Margin indicator to shorten the length of the selected text. Flowing Text into a New Text Area
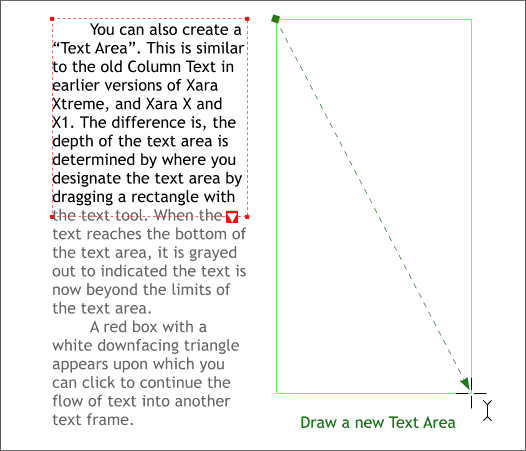
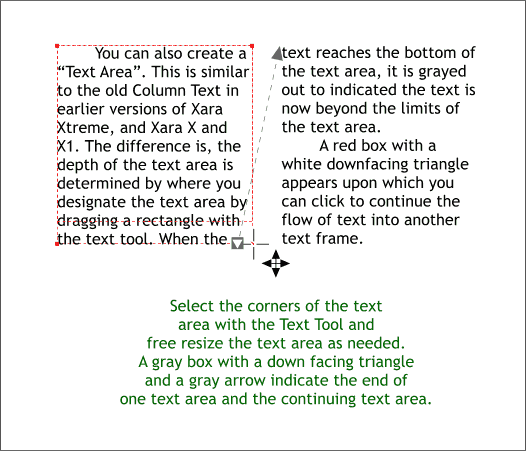
When you key in, or paste text into a text area, any text that extends below the text area is grayed out to indicate that there is more text. This is very useful as you can determine if the text area needs to be extended or shortened. We'll cover modifying the text area in a moment. To create one or more linked text areas, areas into which the text will automatically overflow, click the red box with the white triangle at the bottom of the text area, then drag a new text area. The overflow text will automatically flow into the next text area. You can have as many text areas as you wish. TIP: You can create a newsletter template complete with blank text areas. Create your text areas which appear as green outlined rectangles. Create or paste your text into the first text box, then click the red box with the white triangle, and drag to the next text box and so forth.
To resize a text area, drag any of the four corner control points with the Text Tool. Each corner control point can be dragged side to side or up and down. NOTE: Do not resize the text area by dragging the bounding box handles (the black squares that surround a selected object). This merely distorts the text and has no effect on the actual text area.
|
||
|
|


