|
|
|
ZEB posted a request a month or so ago in the Xtreme Conference for a tapered spiral. He was looking for a way to create a ray gun for one of his cartoon illustrations. There were several solution including one by your editor. In my solution I created a tapered brush. The problem was, on close scrutiny, the links of the spiral did not always line up. This tutorial started out very different. And once I had finished it, I realized that is did not work. So ever mindful of my tenuous reputation, I came up with a totally different approach which I think does the job.
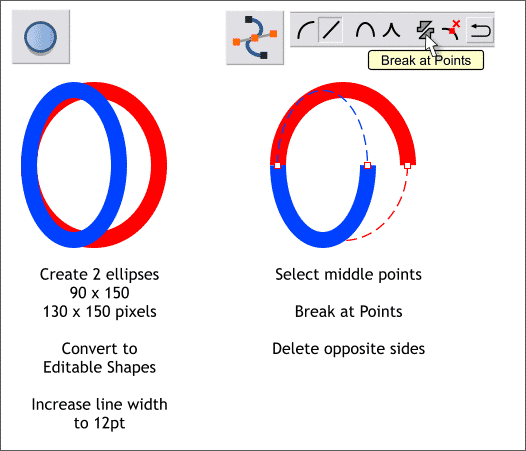
We've used this method several times in the past to make a spiral link but it works and if it works, use it. Create 2 tall ellipses to the sizes shown above. Change the line Width to 12pt and the fill to none. With both ellipses selected, from the Arrange menu, select Convert to Editable Shapes. I have given each ellipse a different outline color to make it easier to see what we are doing. Select both ellipses then switch to the Shape Editor Tool (F4). Select the middle control points (the control points will have a red outline when selected), and click the Break at Points icon on the Infobar, Switch back to the Selector Tool (the arrow pointer) and delete the portions shown above right in dashed outline. TIP: To toggle from one tool to another (with the exception of the Text Tool) press the Space Bar.
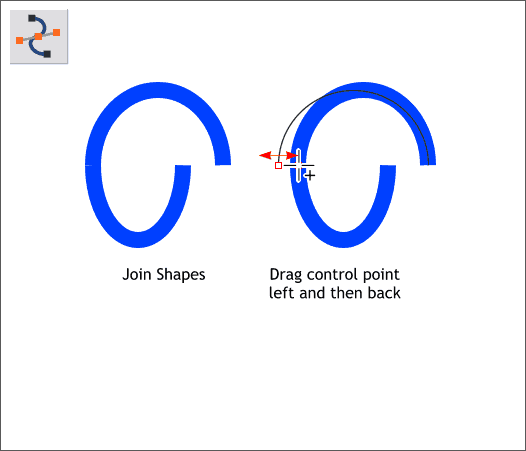
Align the two sections on the left. With both sections selected, Arrange > Join Shapes. Select the Shape Editor Tool (F4). Click where the 2 sections joined and drag one of the control points out to the left a small amount and then back to the right. The cursor will change to display a small + which is your assurance that the two shapes are now officially joined. NOTE: Using Arrange > Join Shapes to join 2 or more paths does not really join the shapes. Hence the above maneuver of pulling one of the joined control points out a bit and then dragging it right back is the only way to really unite the 2 control points and to join 2 or more paths.
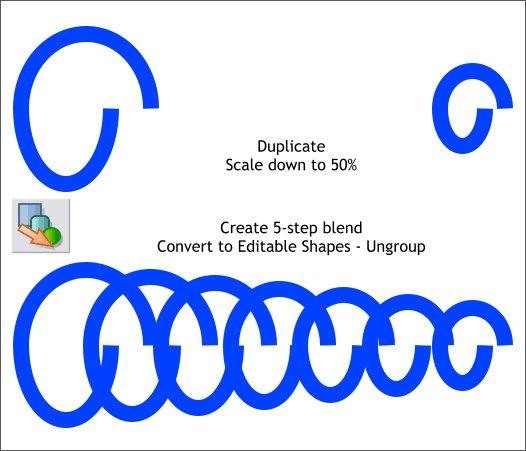
Duplicate (Ctrl d) the loop and reduce the size to 50%. Move the duplicate off to the right about the distance shown above. Select the Blend Tool (F7). Click the smaller loop and drag from the smaller loop to to the larger loop to create a 5-step blend. With the blend selected, Arrange > Convert to Editable Shapes and then Arrange > Ungroup (or Ctrl u).
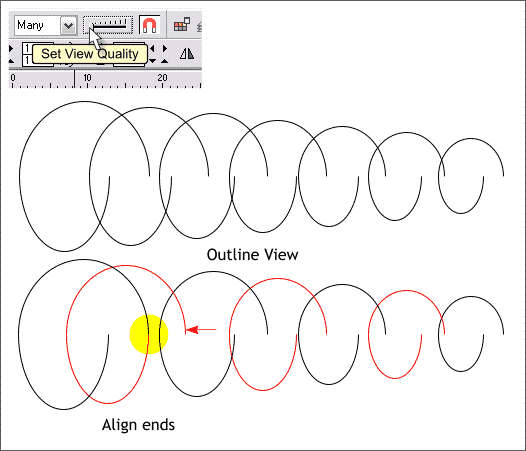
This next step is easier if you work in Outline View. Move the Set View Quality slider all the way to the left or you can go to the Window menu and from the Quality fly out list, select Outline. Individually move the loops so they align as shown above with the 2 left most loops.
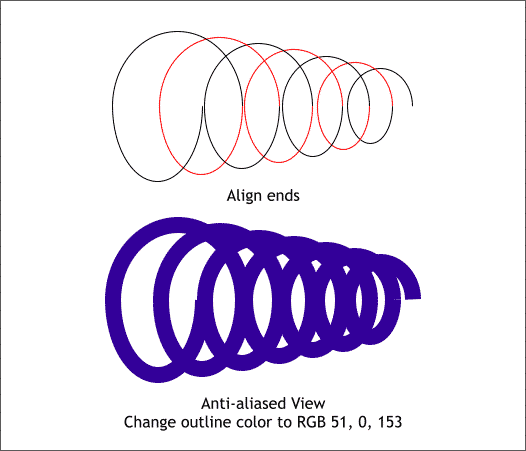
Continue to align all the loops. This is a good time to use Alt z to switch to the Zoom Tool and move in close to get the perfect alignment. Move the Set View Quality slider all the way to the right to return to Anti-aliased view or Window > Quality > Anti-aliased.. Change the outline color to a deep blue violet.
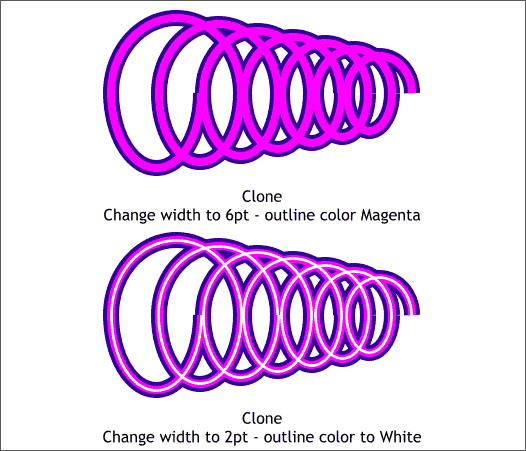
Select all of the loops and clone them (Ctrl k). Change the line Width to 6pt (enter 6pt in the Width text entry box and press Enter to apply the change). Change the outline color to Magenta. With all the clones still selected, clone them again and change the outline Width to 2pt and the outline color to White.
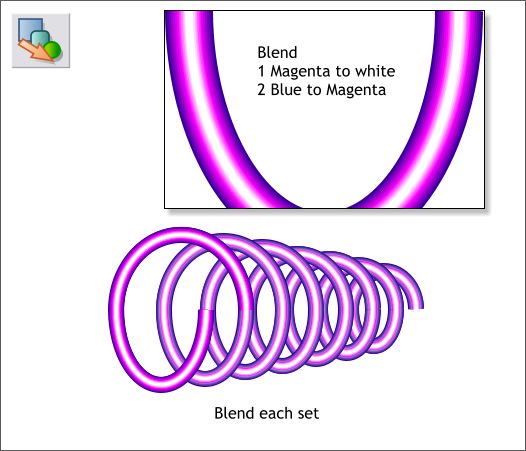
The next step is to create individual blends for each coil using the Blend Tool (F7). I am not sure why, but when you do this you will have do drag from the Magenta line to the White line and then from the Blue outline to the Magenta. At least this was the only way I could make this work. Create blends for each of the coil loops. If your coils do not look like the example above, you may need to reverse the order and bring the coil loops in the back to the front. You will probably also need to do some tweaking of the individual coil loops by holding down the Shift and Ctrl keys and using the arrow keys to move and realign some of the loops.
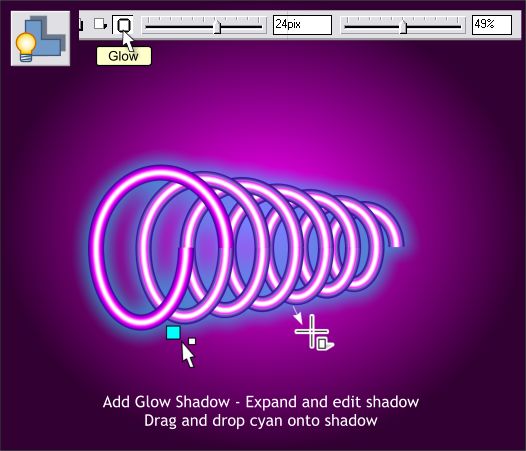
In the example above, the coil has been placed over a background rectangle with a Circular fill to add a glow behind the coil. Group all the coil loops then select the group with the Shadow Tool (Ctrl F2). Click the Glow icon on the Infobar. Using the Shadow Tool cursor, drag the edge of the glow outwards a little and modify the Infobar settings to the settings shown above. Drag the Cyan color from the screen palette and drop it (carefully) onto the glow shadow to alter the glow color. (If you drop it onto the group you will see why I said carefully). This is a very simple and short coil. The number of blend steps can be increased and the size of the smaller coil loop made even smaller to produce a more complex and more pointed coil. Of course ZEB could just draw the whole thing freehand in his enchanting illustration style.
|
||
|
|
