 |
 |
| H 1 2 3 4 5 6 Download Zipped Tutorial |
|
|
|
A little voice in the back of my brain is saying I have probably done this tutorial before. But every time I do a tutorial, I invent it from scratch. So even if I have done something similar, I think this one will be different.
Using the Ellipse Tool, draw an ellipse 300 x 175 pixels. Select the ellipse with the Contour Tool and drag away from the ellipse to apply an Outer Contour. Increase the Contour Width to 18pix and change the number of Contour Steps to 1. Press Enter to apply the changes. From the Arrange menu, select Convert to Editable Shapes. Then from the Arrange menu again, select Ungroup.
Select the smaller ellipse and change the outline Width to 8pt selecting from the Width drop down list on the Infobar. With the 8pt outline selected, Arrange > Convert Line to Shape. Select both ellipses and apply a Linear fill. If you need help applying a multicolor Linear fill, visit Workbook 20. Use the four HSV colors shown on the left. (Select HSV Color Model from the Color Editor Color Model drop down list and enter the colors in the three boxes). The two color stations in the middle should be close to one another with a few pixels between.
Select the smaller ellipse with the Bevel Tool. Drag any of the red arrows towards the center. Select Rounded from the Bevel Type drop down list on the Infobar. Select Size from the Slider Type drop down list, change the setting to 5pix and press Enter to apply the change. Select the end of the Light Angle arrow in the center of the ellipse and drag it clockwise to about the 5 o'clock position as shown. You can also select Light Angle from the drop down list and drag the slider to 115 degrees.
Select the larger ellipse and apply an Inner, Rounded bevel. Increase the Bevel Size to about 106 pixels.
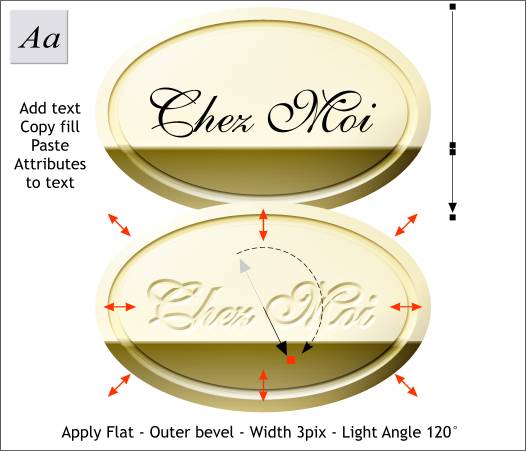
Add some script text to the center. Copy the fill from the large ellipse (Ctrl c). Select the text and Paste Attributes (Shift Ctrl a or Edit > Paste Attributes ). Adjust the fill path arrow so that the fill start and end points match that of the large ellipse. Select the text with the Bevel Tool. Drag outward a little bit to apply an Outer Bevel. Drag the Light Angle arrow to about 120 degrees. Set the Width to 3pix . This creates the impression of the text being recessed into the plaque.
Clone (Ctrl k) the text. Select the text with the Bevel Tool and select None from the Bevel Type drop down list. Change the color of the text to black. Have we done this before? Or is it just my imagination?
|
|
|
|