 |
 |
| H 1 2 3 4 5 6 |
|
|
|
A client recently requested a logo mounted on a piece of desert sandstone. I searched the Internet and could only come up with one good stock image, and for this image they wanted about $150. Ouch! I figured I could create something just as good, and save myself and my client the fee. Here is the technique I came up with.
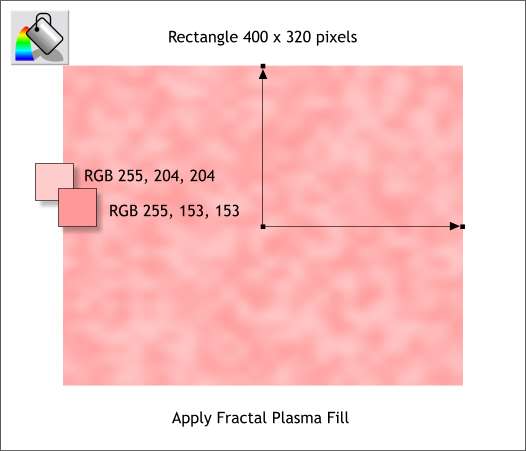
Sandstone is a pinkish sort of stone with a very sandy surface and a variety of ridges caused by where the thin layers of the stone have cracked and fallen off. Step 1 Create a rectangle to the size shown above and apply a two color Fractal Plasma fill. How to: Select the rectangle with the Fill Tool. From the Fill Type drop down list on the Infobar, select Fractal Plasma. Click the center control handle (the small square where the two resizing arrows come together). Open the Color Editor (Ctrl e), select RGB Color Model from the Change Color Model drop down list, and enter the first set of RGB values, one value in each text entry box. Click either of the end control handles (the small squares at the end of the arrows) and enter the second set of RGB values. NOTE: You only need to apply a color to one of the outside handles. The other handle will automatically have the same color.
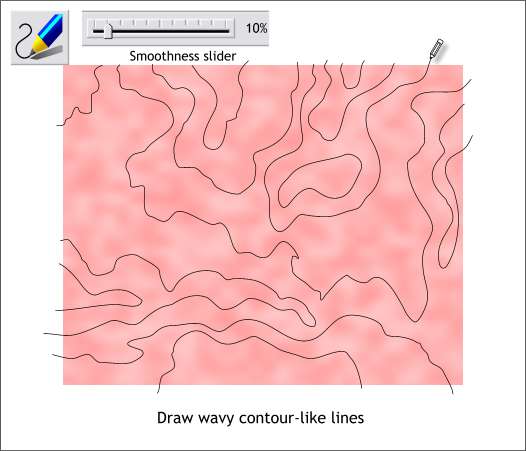
Step 2 Select the Freehand and Brush Tool. Move the Smoothness slider to the left to about 10% for greater line accuracy. Draw a series of lines (like a contour map) as shown above. Start and end each line off the pink rectangle.
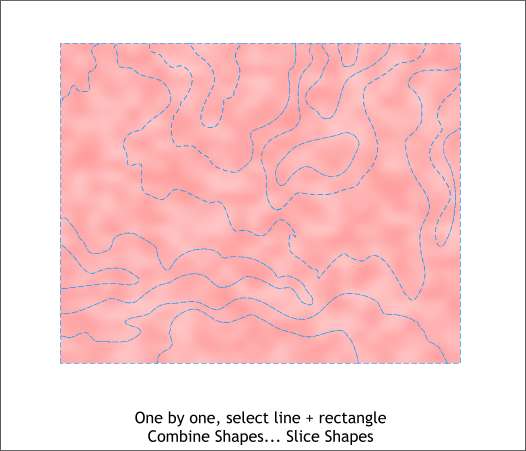
Step 3 Select one of the lines then select the rectangle. From the Arrange menu, select Combine Shapes... Slice Shapes. The line will disappear but the shape will now be sliced into two sections. Continue this step until all the lines are gone and the rectangle is sliced into segments. I have added a blue dashed outline to show all the sections. TIP: Add an outline to the rectangle before you start slicing. It will make it easier to see the shapes. Also, select a line then click on the rectangle close to the line so that you slice the correct area.
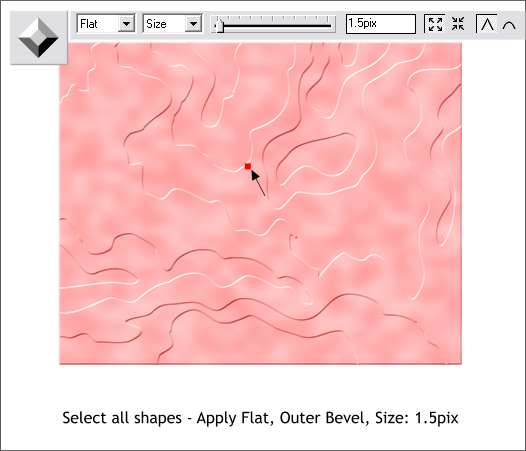
Step 4 Using the Selector Tool, drag a selection rectangle around all the pieces (this is called a Marquee selection). With all sections selected, select the Bevel Tool . Drag any of the red arrow keys away from the shapes a little bit to apply an Outer Bevel. From the drop down list on the Infobar, select Size. Change the size to 1.5pix and press Enter to apply the changes. This creates the layers that are typical of sandstone.
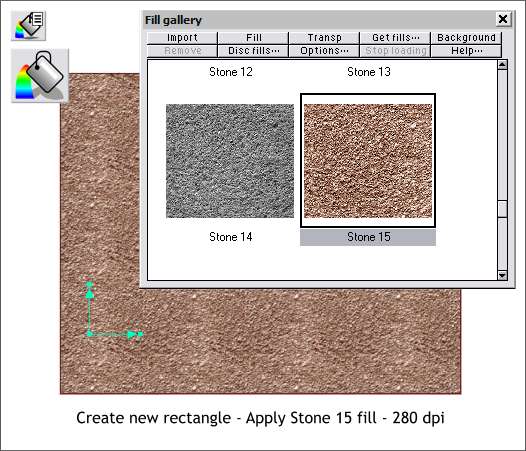
Step 5 Create a new 400 x 320 pixel rectangle. Open the Fill Gallery (the icon is on the top right area of the Infobar), open the Stone Fills section, select the Stone 15 fill, and press Fill. Switch to the Fill Tool and a series of control handles and arrows will appear. Reduce the size of the fill by dragging the ends of the arrows towards the center as shown above. Loading Fills: If like Mother Hubbard, you go to the Fill Gallery and the cupboard is bare, here is what to do. Place the Xara X CD in your CD drive. Open the Fill Gallery and click Disc Fills... Xara will attempt to locate your CD drive and the Xara X disc. If it cannot, Browse to the CD drive. Locate the Fills folder and double click the icon. Select Add. Xara will ask if you want to create an index. Say OK. Xara will add folders and thumbnail images to your Fill Gallery. The actual fills remain on the CD, however, so to apply the fills, you need to have the CD disc in your disc drive.
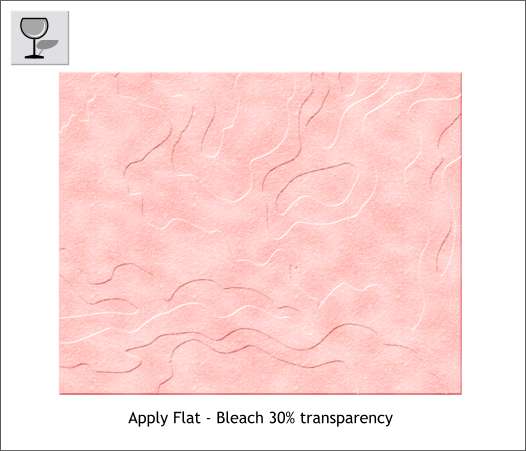
Step 6 Center the stone filled rectangle over the pink beveled shapes. Select the rectangle with the Transparency Tool. From the drop down list of Transparency Types, select Bleach . Move the slider on the Infobar to 30%. What took nature thousands of years to create, we have created in minutes. That is what I call progress!
|
|
|
|
|
|
|