 |
 |
| H 1 2 3 4 5 6 |
|
|
|
Peter Williams recently posted an urgent request for a mosaic tile technique on the Xara X Conference. And while there were some excellent suggestions, I thought perhaps I would take a crack at making my own mosaic tiles.
Recycle or recreate the star and circle from the first tutorial. Group the two. Select the Freehand and Brush Tool. Set the Smoothness slider to around 10% for greater line accuracy. Draw a series of random wavy lines as shown above. Make sure the wavy lines start and end a ways out from the edge of the circle.
Group all the lines. Clone the line group (Ctrl k). Click twice on the clone to enable Roate/Skew mode and drag any of the corner control handles and rotate the lines 90 degrees. The rotated lines are shown in red. (If you changed the Angle Constraint setting in the General tabbed section of the Page Options dialog, back to 15 , you can hold down the Ctrl key to constrain the rotation).
Select the two groups of lines and change the line Width to 4pt. With the lines selected, select the Freehand and Brush Tool. From the second drop down list of stroke shapes on the Infobar, scroll down to the bottom and select the squiggly one called Intestine. This adds a thick and thin quality to the lines. Select both groups of lines and from the Arrange menu, select Convert Line to Shapes. Then with the shapes selected, Arrange > Combine Shapes... Add Shapes. This makes one combined common shape.
Ctrl click on the star to select just the star in the group. Copy the star to the clipboard (Ctrl c) then paste on top (Ctrl Shift v). Change the line Width to 4pt . With the star selected, select the Shape Editor Tool. Shift click on the five outer points to multiple select them, then press the Break at Points icon on the Infobar. Select all five v-shaped line segments with the Freehand and Brush Tool and select the same Intestine stroke shape.
Convert the five new lines to shapes (Arrange > Convert Line to Shapes). Now select all the squiggly lines and Arrange > Combine Shapes... Add Shapes.
Ctrl click on the circle and from the Fill Gallery - Marble Fills folder, apply a Medium Grain 1 fill. Ctrl click the star and apply a Medium Grain 6 fill. Select the lines and the grouped star and circle and Arrange > Combine Shapes... Subtract Shapes. The lines (shown in blue) will disappear)
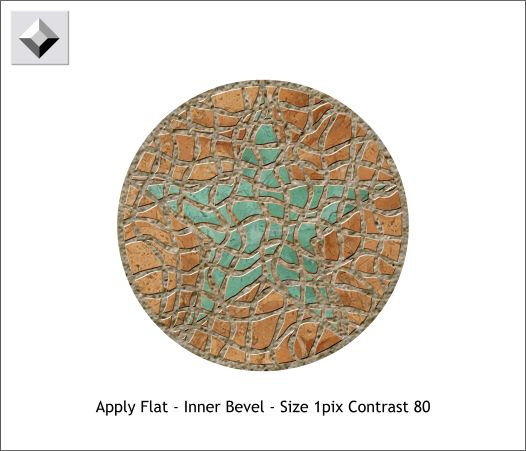
Create a slightly larger circle and from the Fill Gallery > Stone Fills folder, apply a Stone 4 fill. Select the filled circle with the Fill Tool and hold down the Ctrl key and drag one of the fill path arrows towards the center until the grain of the fill is not so coarse looking. This gives the appearance of grout between the tiles. This is also how you resize a bitmap fill.
Finally, select the smaller circle and star objects with the Bevel Tool and drags any of the red arrows towards the center to apply an Inner Bevel. Select Size from the Slider Type drop down list and change the Size to 1pix and press Enter to apply this change. Select Contrast from the drop down list and increase the Contrast setting to 80%. That's my mosaic technique.
|
|
|
|
|
|
|