 |
 |
| H 1 2 3 4 5 6 |
|
|
|
Using Xara's QuickShape Tool, you can create an OK star. But with a small amount of effort, you can create a perfect star. The theme of this month's Workbook, by the way, is Stars.
Select the QuickShape Tool. Change the Number of Sides on the Infobar to 5 and click the Starred Shapes icon. Drag a vertical guideline from the vertical screen ruler (Ctrl L to display rulers) onto the page. Holding down the Shift key, to draw the star from the center outward, click on the guideline and drag and rotate the star until the top point and opposite inverted point are directly on the guideline as shown.
Drag a horizontal guideline from the top screen ruler that aligns with the ends of left and right points as shown. With the QuickShape Tool, drag the control points shown in black until they too are touching the guideline. You should now have a perfect, five-pointed star. But wait, there's more.
Select the star with the QuickShape Tool and you will notice an X-shaped cross hair in the center. Drag another horizontal guideline through this center point. Delete the top guideline by right clicking on the guideline and selecting Delete from the pop up menu.
Enable Snap To Objects by pressing the red magnet icon on the Infobar, or by right clicking on the page and selecting Snap to Objects from the pop up menu. Using the Shape Editor Tool create a triangle like the gray one shown above. Here's How: Click the Shape Editor Tool on the top of the star, then then click the next point down on the left, then the intersection of the two guidelines and then click back at the top of the star. This creates a black filled closed path. Repeat these steps to create the triangle on the right. This is the procedure for creating a closed path in Xara with the Shape Editor Tool.
Select the Ellipse Tool. Hold down the Shift key (to draw from the center) and the Ctrl key (to constrain the ellipse to a circle), click at the intersection of the two guidelines and drag outward to create a circle that just touches the points of the star. Using the Shape Editor Tool, create a line (shown above in red) that aligns to the top left two sides of the star. Extend the ends of the line a little so they extend beyond the edge of the circle. Holding down the Shift key, and using the Selector Tool (the arrow pointer tool), click on the circle and the line to multiple select the two. From the Arrange menu, select Combine Shapes... Slice Shapes . The line will disappear and the circle with be sliced into two parts. Delete the larger part of the circle. Save the star. We will be using it later.
Open the Fill Gallery which is the small pouring paint can icon on the top right area of the Infobar. Select the remaining circle part, then open the Marble Fills folder, select the Coarse Grain 4 fill and press Fill (or you can drag and drop the thumbnail directly onto the shape) to apply the fill to the shape. Apply the other two fills shown to the two triangle shapes. To Add Fills If you are a new user and have not yet installed the fills here is what you need to do. Place your Xara CD in your CD drive. Open the Fill Gallery and press Disc Fills... Xara will attempt to locate the CD drive. If it cannot, Browse to that drive. Locate the Fills folder and double click on the folder icon. Press Add. Xara will add thumbnail images and folders for all the various fills. The actual fills remain on the CD so you will need to have the CD in your drive to actually apply the fills.
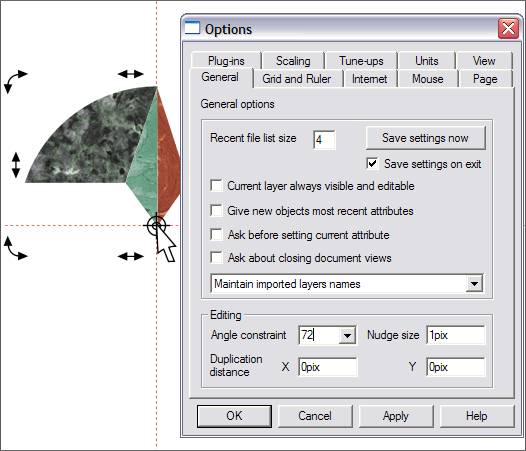
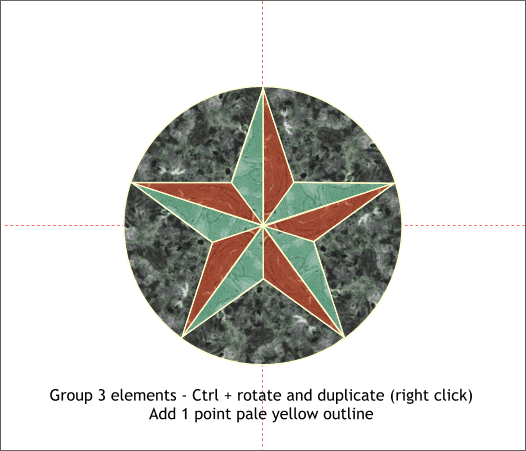
Right click on the page and select Page Options... from the pop up menu. In the General tabbed section, change the Angle Constraint number to 72 (1/5 or 360 degrees). Press Apply to apply the change while keeping the dialog open. Group the circle section and the two triangles (Ctrl g). Click twice on the group to enable Rotate/Skew mode (the black bounding box handles will change to arrows). Drag the center of rotation bulls eye to the intersection of the two guidelines to set this as the new rotation point. Select one of the corner arrows and holding down the Ctrl key, drag in a clockwise direction. The group will rotate 72 degrees. Before you release the left mouse button, click the right mouse button to drop a duplicate. This is known as drag and duplicate or in this case, drag, rotate and duplicate. To give yourself practice, repeat until you have all five sections on the page and the circle is complete. Set the Angle Constraint to 15 (or whatever you had it set to) and press OK to close the dialog.
Add a 1-point pale yellow outline to all the shapes. A perfect star and then some.
|
|
|
|
|
|
|