 |
 |
| H 1 2 3 4 5 6 |
|
|
|
This tutorial explores the Shadow Tool and some of its capabilities.
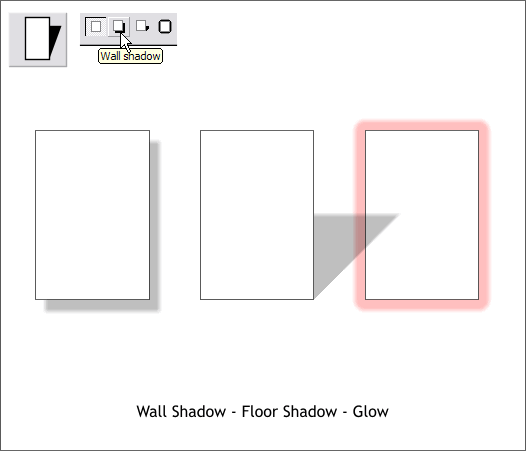
Xara offer three types of shadows as illustrated above, Wall and Floor Shadow and Glow. Wall shadows are the kind of shadow you would expect to see cast from a picture mounted on a wall. Floor shadows are what you would see cast from an object onto the floor or flat surface. Glow adds a colored glow behind the selected object. When you select the Shadow Tool the four shadow options appear on the Infobar (the first option is No shadow and removes a shadow from an object. To add a shadow to a selected object or group of objects, select the object with the Shadow Tool then select the icon for the kind of shadow you wish to add.
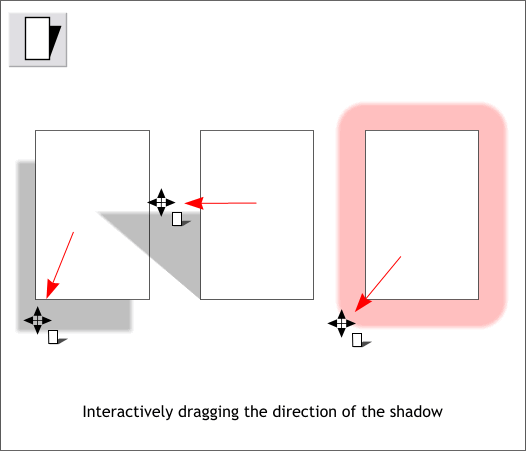
Once a shadow has been applied, you can interactively change the angle or direction of a shadow or the size of the glow by dragging the shadow with the Shadow Tool. You can interactively add a Wall shadow to an object, text object or group of objects by clicking and dragging on the object in the direction the shadow falls.
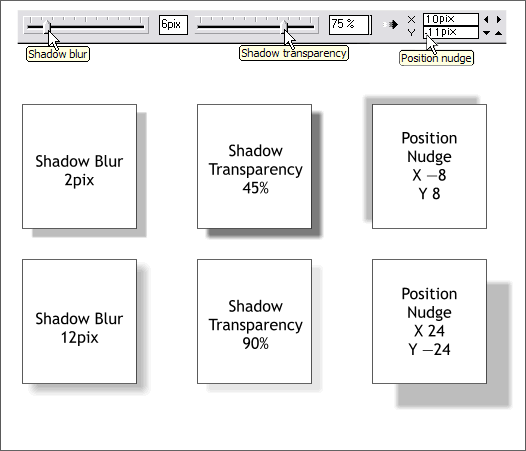
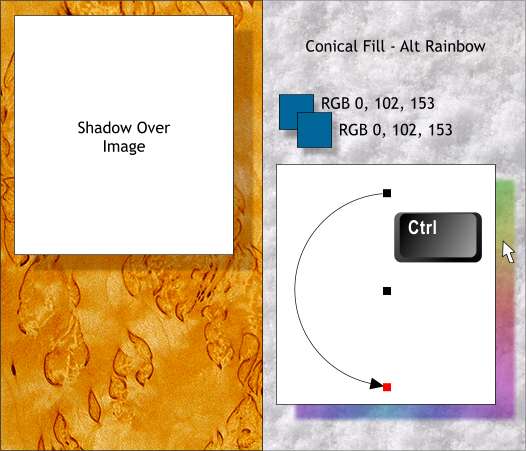
There are additional controls on the Infobar that effect the quality of the shadows and glows: Shadow Blur, which sharpens or softens the edge of the shadow, Shadow Transparency, which makes the shadow lighter or darker, and Position Nudge, which moves the shadow by a specific amount. Positive numbers move the shadow up and to the right. Negative numbers (-8) move the shadow to the left and down.
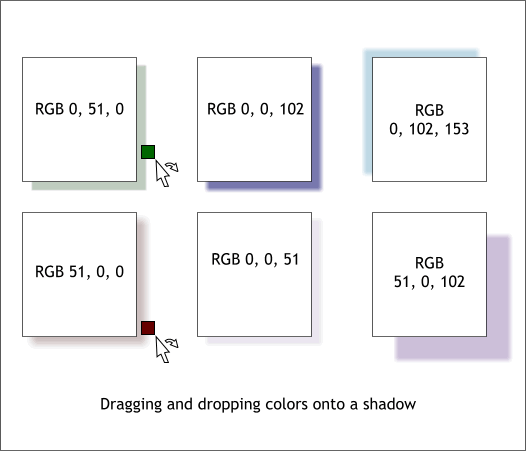
There are several ways to add color to shadows and glows. The easiest way is to drag a color from the screen palette and drop it onto the shadow or glow. You can also Ctrl click on a shadow to select just the shadow and then select a color on the screen palette or mix a color in the Color Editor (Ctrl e).
Shadows are transparent. If you apply a shadow to an object and place the shadowed object over a surface, the shadow makes the surface darker, as would a natural shadow. You can apply any of Xara's various fills to a shadow such as the rainbow filled shadow on the right. Ctrl click to select just the shadow. Select the Fill Tool and select a fill type from the Fill Type drop down list. Apply colors and fill effects as you would with any fill.
Here is a quick way to create glowing text on a white or pale background. Create the text. Change the fill color to white. Apply a glow and change the glow to a Conical fill with the Alt Rainbow option (or a 3 or 4 color fill or any other fill).
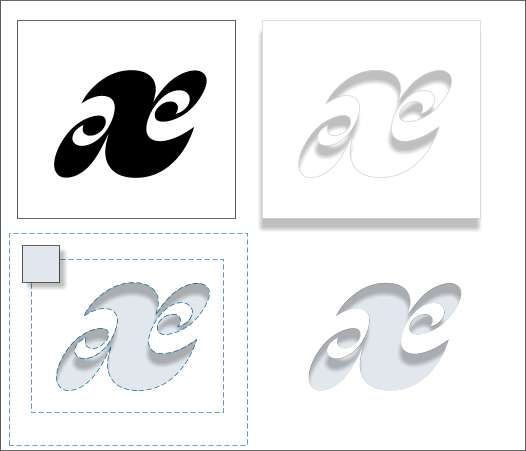
Here is an easy way to create a cut out effect. Place an object on a larger rectangle and join (Arrange > Join Shapes) the two objects. Copy the Joined shape to the clipboard (Ctrl c ). Add a wall shadow. Place a slightly darker rectangle behind the open area of the cut out to create the illusion of depth. Paste the copy on top (Shift Ctrl v). Using the Shape Editor Tool, extend the edges of the pasted shape to cover the shadow.
Objects with outlines cast outline shadows. Objects with transparency cast transparent shadows. These are just a few things you can do with the Shadow Tool. Questions, Comments, or Confirmations that you are really out there and really reading and doing these tutorials is always welcome. Please use the form on the next page to send me your thoughts. Until next month then. Gary W. Priester
|
|
|
|
|
|