 |
 |
| H 1 2 3 4 5 6 |
|
|
|
This tutorial demonstrates two of Xara's envelope shapes: Circular and Perspective. We'll cover an old technique and a few new ones as well.
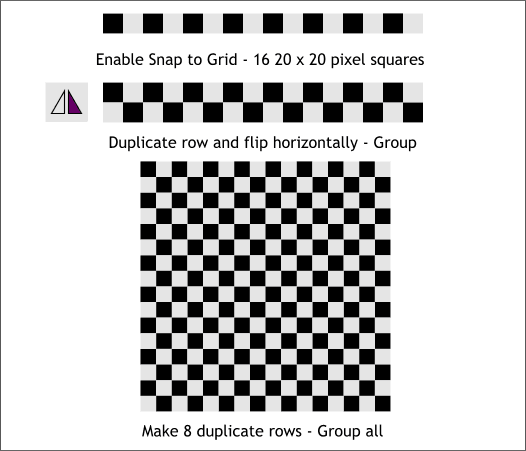
Right click on the page and select Snap to Grid. Create a 20 x 20 pixel square. Drag the square to the right until it is just beyond its outline and press the right mouse button to drop a duplicate (I call this drag-and-duplicate). Continue to drag and duplicate until you have a row of 16 squares. Change the colors to alternating black and 10% gray. Drag the entire row downwards and right click to make a duplicate row. Press the Flip Horizontally icon on the Infobar to flop the row. Select all the squares and group them (Ctrl g ). Drag and duplicate this group until you have a total of 8 groups as shown. Group all the groups.
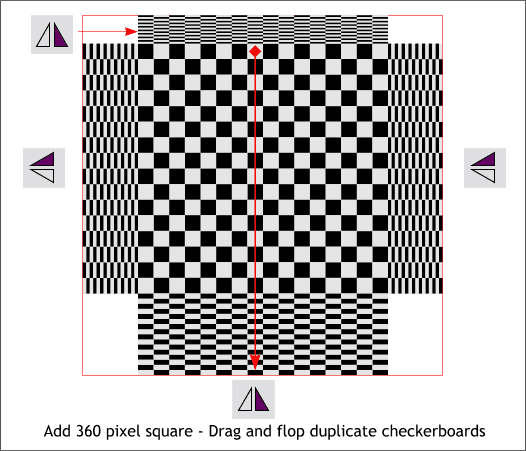
Create a 360 pixel square (shown red outline). Vertically align the checkers inside the square but leave more room on the bottom as shown. Drag-flop a duplicate of the checkerboard to align with the bottom of the large square. Repeat to add flopped checkerboards to the other three sides as shown. Using the Flip icons on the Infobar, flip the top and bottom checkerboards horizontally and the side checkerboards vertically. HOW TO: To drag-and-flop/duplicate the bottom checkerboard, select the checkerboard, select the top center control handle (the small black box in the group of black boxes that indicate a selected object) and drag it all the way to the bottom of the the large square. Before you release the left mouse button, press the right mouse button to drop the duplicate.
Enable Snap to Objects (press the red magnet icon on the Infobar). Select the bottom checkerboard with the Mould Tool. On the Mould Tool Infobar, select the Default Perspective icon. Drag the bottom corners of the checkerboard until they snap to the bottom edges of the big square. Repeat and add Default Perspective envelopes to the other three checkerboards and snap them into place as shown.
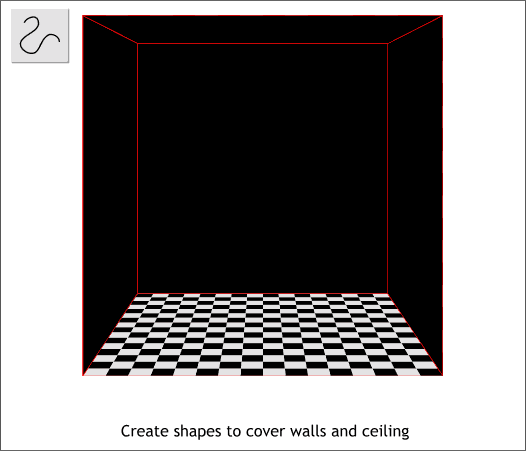
Using the Shape Editor Tool, create the four black shapes as shown above. Click the Shape Editor Tool on each corner and click on top of the first anchor point to create a closed (filled) shape.
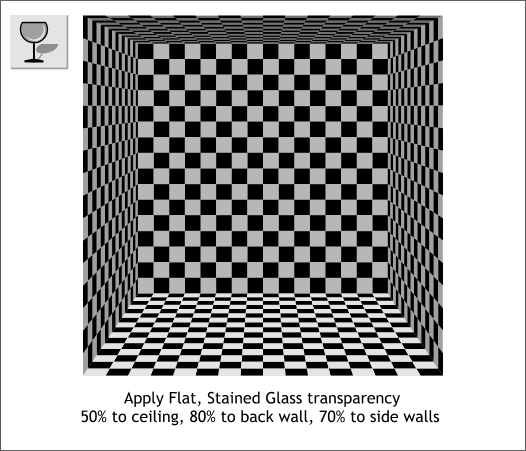
Select the Transparency Tool. Hold down the Shift key and click on the left black panel, and then on the right black panel to select both. On the Infobar, select Flat from the Transparency Shape drop down list, and Stained Glass from the Transparency Type drop down list. Move the Transparency slider to 70%. Repeat and make the back panel 80% and the top panel 50%.
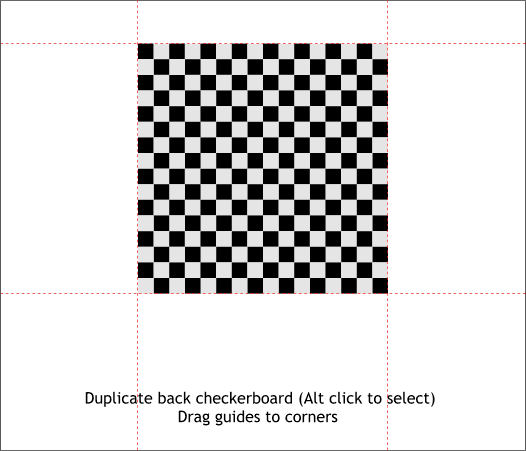
Hold down the Alt key and click twice on the back center checkerboard (clicking while holding down the Alt key selects the next object down). Press Ctrl d to duplicate the checkerboard and move the duplicate off to the side. Drag guidelines from the screen rulers (Ctrl l to display rulers) to align with the four sides of the checkerboard.
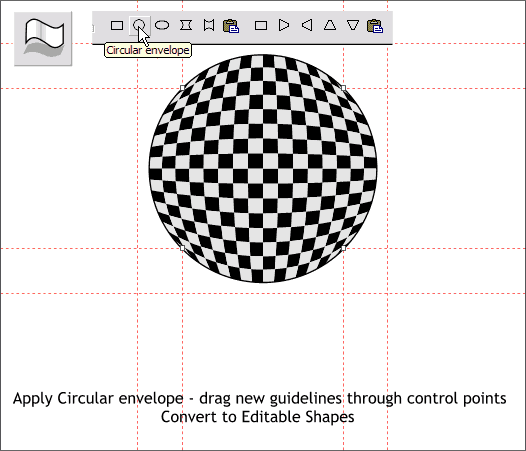
Click the checkerboard with the Mould Tool. On the Infobar, press the Circular Envelope icon. Drag four more guidelines though the tiny control points as shown. If you have done the tutorials like this one before, you know that by applying another circular envelope we can make the sphere look more spherical. Convert the circle to editable shapes (Arrange > Convert to Editable Shapes).
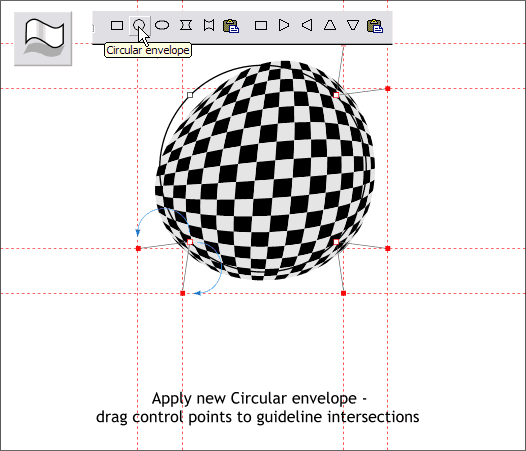
Select the sphere with the Mould Tool and apply another Circular Envelope. Click on the control points with the Mould Tool to display the control handles and drag the handles to the intersection of the guidelines as shown.
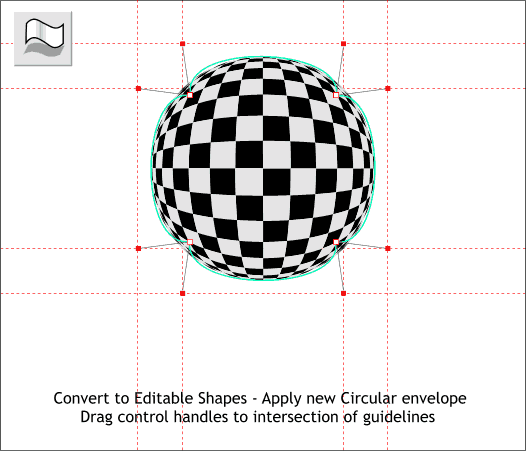
Once again, convert the sphere to editable shapes (Arrange menu) and once again apply another Circular Envelope and adjust it the same way as in the last step. Now that looks more spherical.
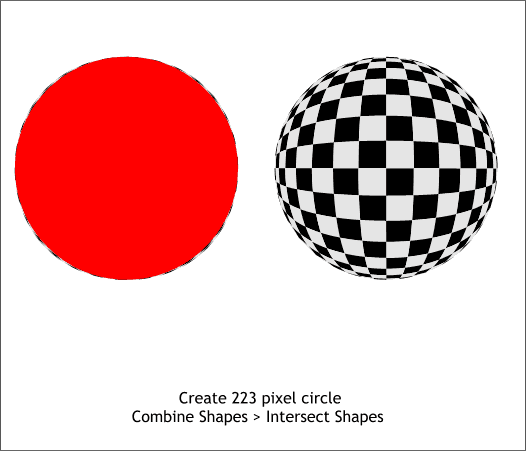
Create a circle that is just a little bit smaller than the sphere. Copy the circle to the clipboard (Ctrl c). Center the circle over the sphere and Arrange > Combine Shapes... Intersect Shapes . This masks the slightly irregular shape into a perfect circle.
Paste the shape from the clipboard (Ctrl v). Apply a black and white Circular fill. Drag the center of the fill upwards as shown and apply a Profile 2 preset. (Click the Profile arrow icon on the Infobar to open the Profile dialog). Place the circle over the checkered sphere and apply a Flat, 20% Stained Glass transparency to add shading to the sphere.
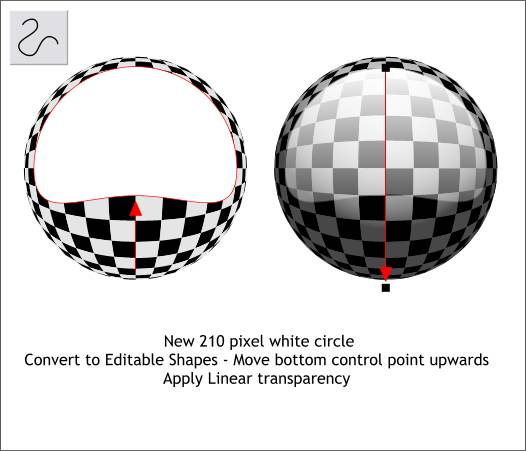
Create and center a smaller white circle over the checkered sphere. Convert the circle to editable shapes (Arrange menu). Using the Shape Editor Tool, drag the bottom control point about to the center of the sphere. Apply a Linear transparency by selecting the white shape with the Transparency Tool and dragging straight down. Apply about 3 pixels of feathering using the Change Size of Feather Region slider on the top right area of the Infobar.
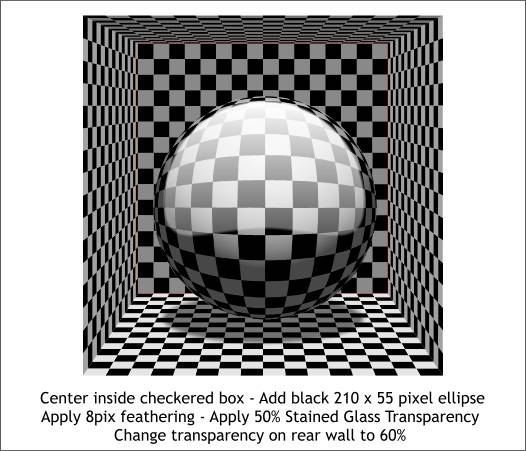
Group all the sphere objects (Ctrl g) and place it inside the checkerboard sides. Add a black ellipse 210 x 55 pixels under the sphere. Add 8 pixels of feathering and apply a 50% Stained Glass transparency. Finally, change the transparency for the back wall to 60% to make it darker.
|
|
|
|
|
|
|