|
|
|
|
|
||
 |
|||
Neon Text EffectOne of the very first effects I created in Xara 1.2 was a neon effect. I have since revisited this effect many times. Xara X's Contour Tool now makes this effect a lot easier.
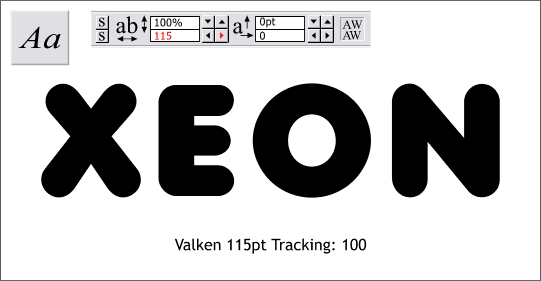
Step 1 Key in Xeon (a type of gas found on the planet Xara). I have used my favorite Xara font Valken (found on the Xara X CD in the Fonts folder). Rounded fonts like Valken work best as they resemble the glass tubing used in making neon signs. Make the text size 115pts (points not pints) which you can change by highlighting the default text Size with the Text Tool cursor, keying in 115 and pressing Enter to apply the changes. Change the Tracking amount (the space between characters) to 115 and pressed Enter once again to apply the changes.
Step 2 Change the fill to RGB 51, 0, 102. (Open the Color Editor (Ctrl e), select RGB Color Model from the drop down list, and enter value in the appropriate RGB text entry window).
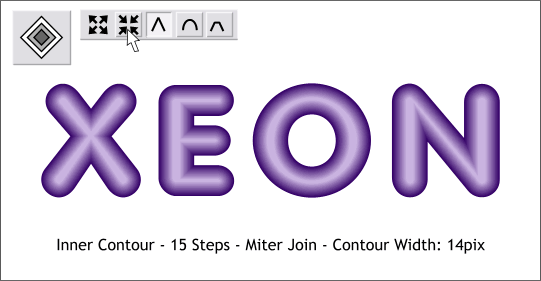
Step 3 Click on the text with the Contour Tool to select it. Drag any of the red arrows (control handles) towards the center a little bit to apply an Inner Contour. Or press the Inner Contour icon on the Infobar as shown above. Select the Miter Join option (^). Change the Contour Width slider setting to 14pix and press Enter. Change the number of Contour Steps to 15 and press Enter to apply the changes.
Step 4 The top contour shape should be a bit brighter. Locate the pale lavender color on the far right area of the on-screen color palette and drag and drop the color onto the top contour shape. (The cursor will change to a small white box as shown). TIP: You can drag and drop colors onto any object whether the object is selected or not.
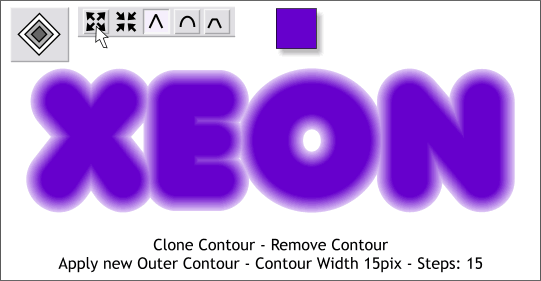
Step 5 Clone (Ctrl k) the contour. Select the cloned contour with the Contour Tool and press Remove to remove the contour. Change the color of the text to RGB 102, 0, 204 (shown above). Apply a new Contour. Click the Outer Contour icon to make the contour build out from the text. Change the Width to 15pix and the Steps to 15. Press Enter to apply the changes.
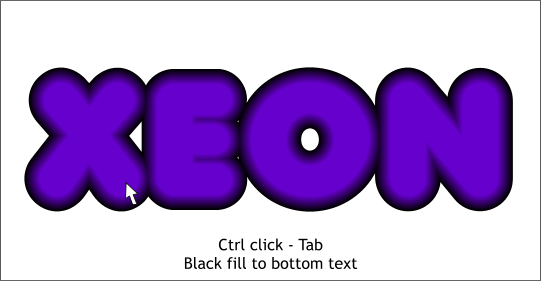
Step 6 Holding down the Ctrl key, click first on the X, then press the Tab key to select the bottom contour shape (the actual text). Change the fill to black.
Step 7 Place the inner contoured text on top (Ctrl f to bring the text to the front) and place a black rectangle behind both contours. This looks pretty good. On the next page we'll add a few additional steps to make the effect even better. Name and save your drawing and take a short eye break. |


|