|
|
|
|
|
||
 |
|||
Better CloudsI was not very happy with the clouds that I used in this month's Xara X tutorial. They did not look very cloud like. So after the fact I started experimenting with different ways to create cloud shapes and this stylized version is what I came up with.
Step 1 Using the Ellipse Tool, and holding down the Ctrl key to constrain the ellipse to a circle, create a series of different sized circles. 5-7 should be fine.
Step 2 Marquee select the circles (drag a rectangle around them with the Selector Tool to make a marquee selection). Select the Freehand and Brush Tool then press Create Brush on the Infobar at the top of the screen. Name your brush Cloud Brush and press OK to create the brush.
Step 3 Using the Ellipse Tool, create a large ellipse and some smaller ones and make an arrangement like the one above. (I have colored the ellipses yellow so you can see the various outlines).
Step 4 Marquee select all the ellipses (or hold down the Shift key and select the ellipses one by one). From the Arrange menu select Combine Shapes... Add Shapes. (You can also right click on the selection and select Combine Shapes... from the pop up menu). This combines all the ellipses into one outline that is a a basic cloud-like shape.
Step 5 Select the new shape. Open the Line Gallery on the Infobar. (The arrow icon). Open the New Brush Strokes folder, select the Cloud Brush you created a few steps back and press Apply.
Step 6 With the brush still selected, select the Freehand and Brush Tool then press Edit Brush on the Infobar. In the Edit Brush dialog, select the Spacing tabbed section and move the Spacing slider to the left until the circles overlap as shown above. There should be no space between any of the circles. Press Save Brush to save your new settings and press Close to exit the dialog.
Step 7 With the brushed outline selected, select Convert Line to Shape from the Arrange menu. Then also from the Arrange menu, select Combine Shapes... Add Shapes. (I added the red outline and a white fill to show the effect of Add Shapes).
Step 8 With the shape still selected, from the Arrange menu, select Break Shapes. Select the inside portion(s) and delete.
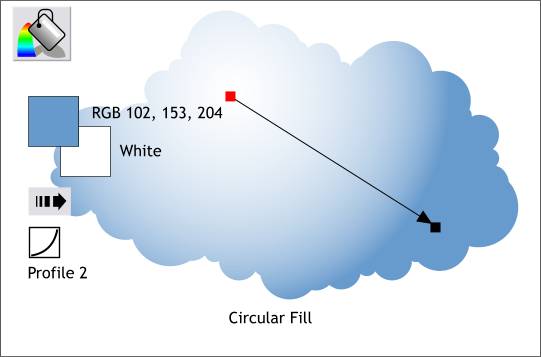
Step 9 Select the cloud shape with the Fill Tool then select Circular from the Fill Type drop down list on the Infobar. Drag the center of the fill up and to the left. Drag the outside control handle (the small box at the end of the arrow) as shown above. Click the Profile arrow on the Infobar and select the down curving line icon ( Profile 2) from the drop down list of Profile presets. Click the outside control handle (the tiny box) then open the Color Editor (Ctrl e). Select RGB Color Model from the drop down list of Color Models. Enter the RGB values shown above (the first number 102 goes in the R box, the second number 153 goes in the G box and enter the third number 204 in the B box. NOTE: Your Color Units (Utilities > Options > Units) need to be set to 0-255.
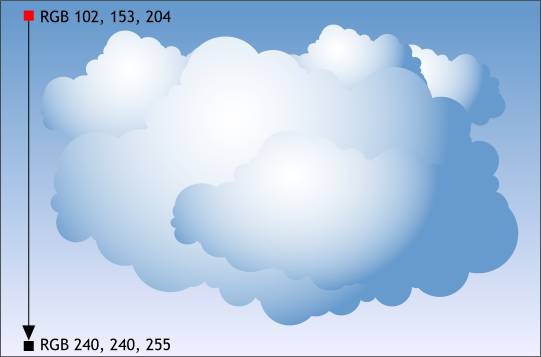
Step 10 Add a rectangle behind the cloud and apply a Linear Fill using the two RGB colors shown. Make several duplicates of the cloud shape (Ctrl d) and stretch to different sizes and heights and widths. For more varied and interesting clouds, make several different cloud shapes in different sizes and with different cloud brush edges (You can also modify the Line Width of the custom brush to make the circular portions larger and smaller. And that is my way to make better clouds. Paul Söderholm pointed out to me that you can also use the Splodge brush from the Select an Existing Brush drop down list but I don't think that would be as rewarding as creating your own editable Cloud brush, do you? |
|