


 STEP 7
We need to change the color of these shapes. For this exercise use the
colors I selected. You can easily change them later if you wish.
STEP 7
We need to change the color of these shapes. For this exercise use the
colors I selected. You can easily change them later if you wish.
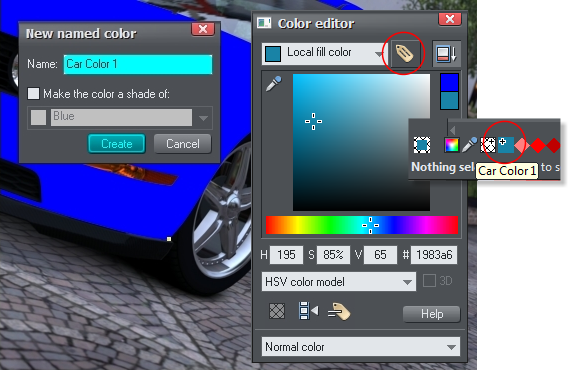
 Select the car shape on the Car Paint 1 layer. Open the Color Editor
(Ctrl + e) and click on the yellow tag “named color” icon (see above).
Name this color Car Color 1 and click Create. Select the HSV Color
Model in the Color Editor and change the HSV values as shown above.
With the shape on the Car Paint 1 layer selected, click the named color
Car Color 1 color swatch on the screen palette.
Note: Creating this named color will allow you to change the color
of the car on the fly without having to turn on or off any layers.
Simply drag and drop the color swatch for Car Color 1 into the
color editor and edit the color as desired, Xara will immediately
re-color the image with your new color selection.
Select the car shape on the Car Paint 1 layer. Open the Color Editor
(Ctrl + e) and click on the yellow tag “named color” icon (see above).
Name this color Car Color 1 and click Create. Select the HSV Color
Model in the Color Editor and change the HSV values as shown above.
With the shape on the Car Paint 1 layer selected, click the named color
Car Color 1 color swatch on the screen palette.
Note: Creating this named color will allow you to change the color
of the car on the fly without having to turn on or off any layers.
Simply drag and drop the color swatch for Car Color 1 into the
color editor and edit the color as desired, Xara will immediately
re-color the image with your new color selection.
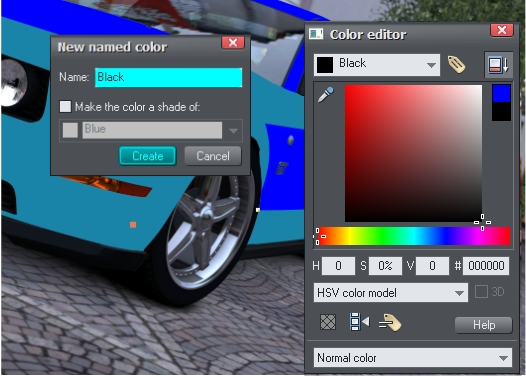
 We’ll repeat this step for the Car Paint 2 layer but we need to create 2
more colors for the 3 shapes. Create a new named color for the hood
shape and name it Black (H: 0 S: 0 V: 0). (Make sure the shape is in
fact using the named color).
Apply Black 2 to the shapes for the Roof and Side of the car to
compensate for the lighting difference in the photo on these surfaces.
We’ll repeat this step for the Car Paint 2 layer but we need to create 2
more colors for the 3 shapes. Create a new named color for the hood
shape and name it Black (H: 0 S: 0 V: 0). (Make sure the shape is in
fact using the named color).
Apply Black 2 to the shapes for the Roof and Side of the car to
compensate for the lighting difference in the photo on these surfaces.
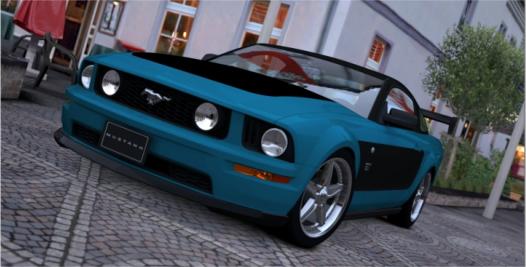
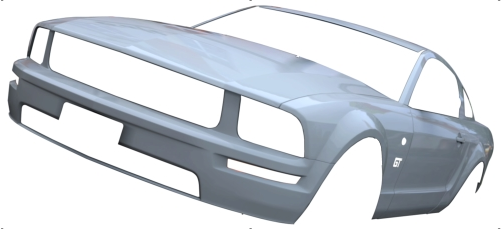
 If you have completed these last steps correctly, your car should look
like the photo above. (All transparency has been removed).
If you have completed these last steps correctly, your car should look
like the photo above. (All transparency has been removed).
 STEP 8a
Now that we have the paint colors done, we need to add reflections,
shadows, highlights, and depth to the color so it looks like it's on the
car, rather than just drawn over the top of the photo. It’s really easy!
Open the Page and Layer Gallery and Duplicate the Original Photo
layer and then Duplicate the Car Cut-Out — TEMPLATE layer.
Select both the photo copy & the shape copy and from the Arrange
menu, select Combine Shapes > Intersect Shapes (or press Ctrl + 3).
You should have the entire car body cut free from the photo and it
should look like the white photographic shell image above.
Cut the white photographic shell image to the clipboard (Edit > Cut or
press Ctrl + x).
STEP 8b
Now that we have our clean white car body tucked away in the
clipboard, we can delete the layers: Car Cut-Out — TEMPLATE - Copy
Original Photo - Copy layers.
Create a new layer and call it Car Paint Reflection - (Stained glass).
From the Edit menu, select Paste in Place to paint the white photo
shell on top.
Select the pasted white cut out shape then select the Transparency
Tool (F6) and apply a Flat, Stained Glass, 0% transparency. This makes
the colored shapes we made earlier look more natural and the
highlights of the original paint job are showing up and making the
image come alive
Your car should now look like the example above.
STEP 8a
Now that we have the paint colors done, we need to add reflections,
shadows, highlights, and depth to the color so it looks like it's on the
car, rather than just drawn over the top of the photo. It’s really easy!
Open the Page and Layer Gallery and Duplicate the Original Photo
layer and then Duplicate the Car Cut-Out — TEMPLATE layer.
Select both the photo copy & the shape copy and from the Arrange
menu, select Combine Shapes > Intersect Shapes (or press Ctrl + 3).
You should have the entire car body cut free from the photo and it
should look like the white photographic shell image above.
Cut the white photographic shell image to the clipboard (Edit > Cut or
press Ctrl + x).
STEP 8b
Now that we have our clean white car body tucked away in the
clipboard, we can delete the layers: Car Cut-Out — TEMPLATE - Copy
Original Photo - Copy layers.
Create a new layer and call it Car Paint Reflection - (Stained glass).
From the Edit menu, select Paste in Place to paint the white photo
shell on top.
Select the pasted white cut out shape then select the Transparency
Tool (F6) and apply a Flat, Stained Glass, 0% transparency. This makes
the colored shapes we made earlier look more natural and the
highlights of the original paint job are showing up and making the
image come alive
Your car should now look like the example above.
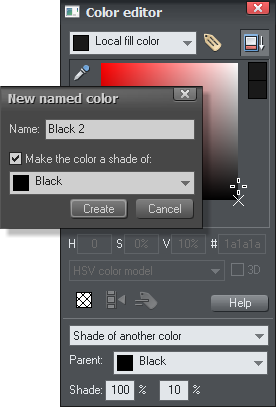
 Create a new named color,
check Make Color a Shade
of: and select Black from
the drop down list.
Set the Shade: to 100% and
10%. This creates a slightly
lighter black that we’ll use
for the roof and the side
panel.
Create a new named color,
check Make Color a Shade
of: and select Black from
the drop down list.
Set the Shade: to 100% and
10%. This creates a slightly
lighter black that we’ll use
for the roof and the side
panel.
 This slight color
change in Black 2 is a
tone correction - Black
is Black and it's easy to
spot a change in tone
(shading value) in
Black, If all 3 pieces are
the same color, the
hood will not look like
it's the same color due
to the high level of
reflections in the paint.
It's a correction in
color (tone) before it
shows up in steps 9-12
This slight color
change in Black 2 is a
tone correction - Black
is Black and it's easy to
spot a change in tone
(shading value) in
Black, If all 3 pieces are
the same color, the
hood will not look like
it's the same color due
to the high level of
reflections in the paint.
It's a correction in
color (tone) before it
shows up in steps 9-12


