


 Before we start, we’ll make a few adjustments to the settings and
options of our document.
From the Utilities menu, select Options… to open the Page Options
menu.
Under the General tab, Change the Nudge size: to 1px, Change the
Duplication distance: to X: 0, Y: 0. Click Apply.
Under the Units tab, change Page Units: to Pixels, and click Apply.
Under the Page Size tab, change Paper Size: to fit the size of the
photo we’ll be using for this tutorial. Chose Custom and set page size
to 3240px (W) x 2160px (H), and click Apply. OK, let’s get started.
STEP 1
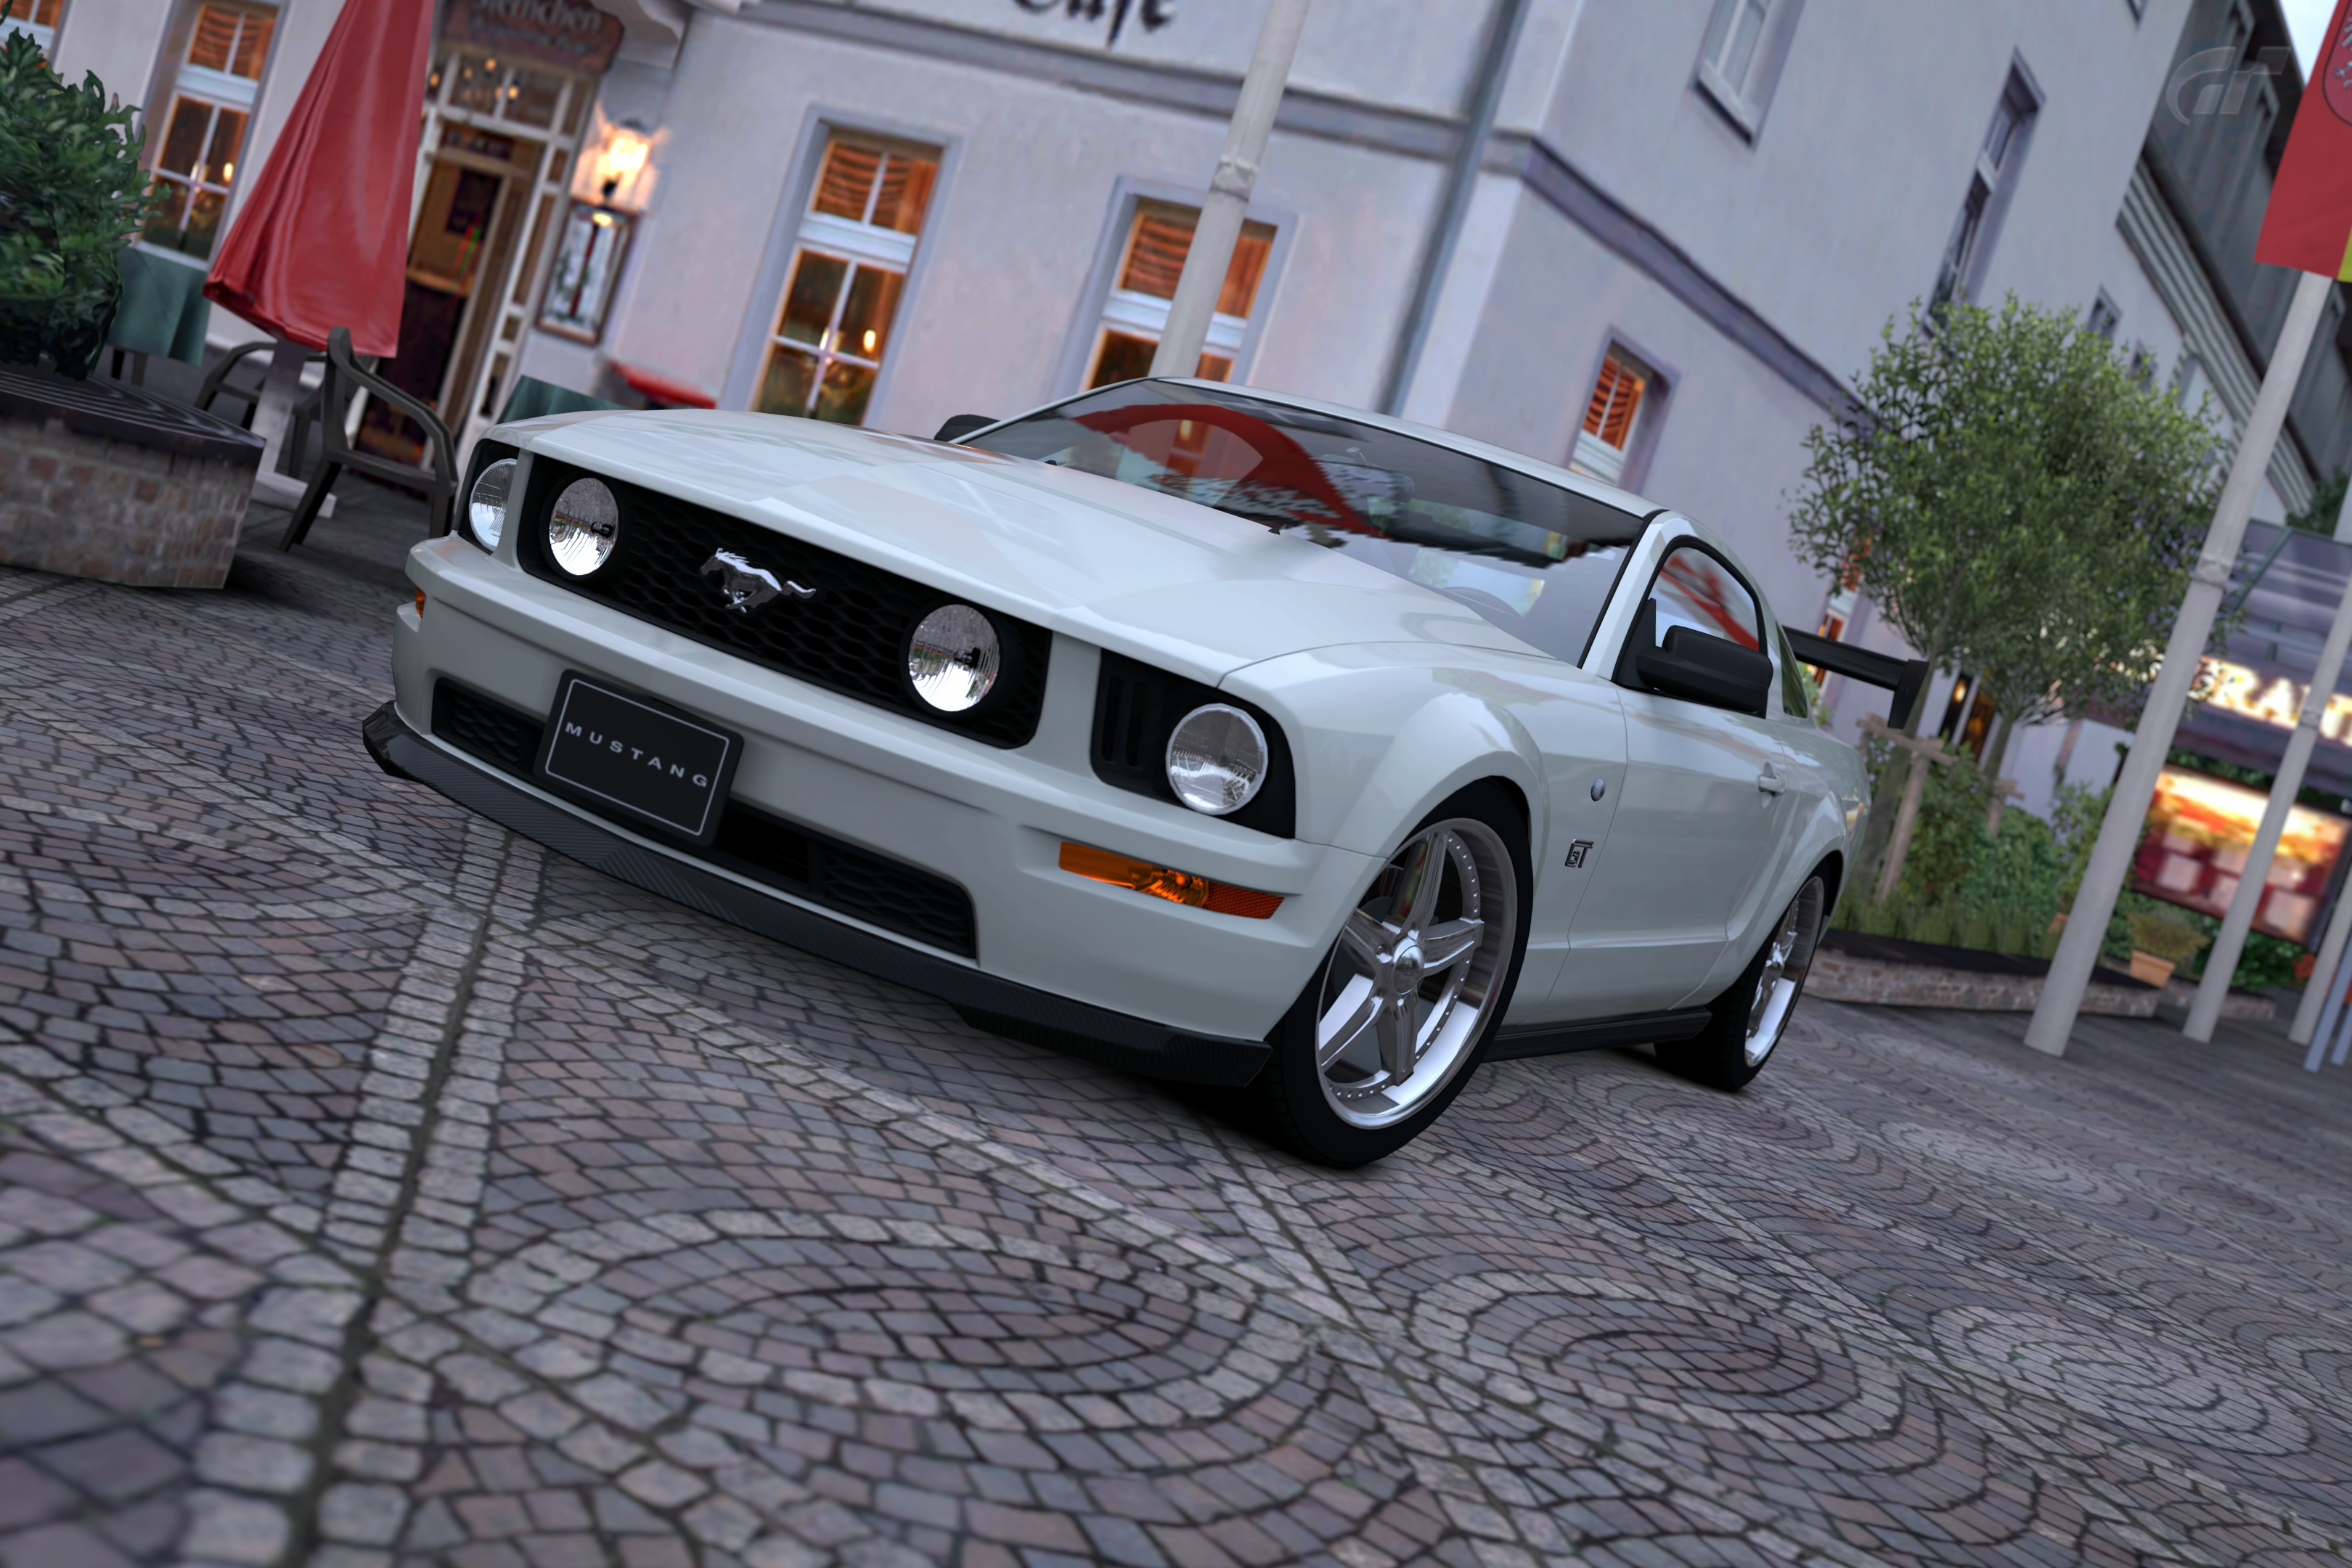
Import the car image that we will use for this tutorial. The image file
photo-white-mustang.jpg will be located in the same directory as the
tutorial files. Or you can click here to download the image.
Xara will ask you to make a decision: Import Reduced or Import
Original. Select Import Original because we need the highest
resolution to ensure accuracy in the drawings we are about to make.
Use the Selector Tool (v) and select the white-mustang.jpg photo and
center it on the page. You can do this visually or select the photo and
use the Alignment menu to center the photo on the Page.
Open the Page & Layer Gallery (F10) and highlight Layer 1. Click the
Properties button, rename this layer Original Photo, and click OK.
Lock this layer so it does not move when we draw over the photo.
While the Page & Layer Gallery is still open, create a new layer by
clicking the New button and re-name this new layer Car Cut-Out —
TEMPLATE.
Before we start, we’ll make a few adjustments to the settings and
options of our document.
From the Utilities menu, select Options… to open the Page Options
menu.
Under the General tab, Change the Nudge size: to 1px, Change the
Duplication distance: to X: 0, Y: 0. Click Apply.
Under the Units tab, change Page Units: to Pixels, and click Apply.
Under the Page Size tab, change Paper Size: to fit the size of the
photo we’ll be using for this tutorial. Chose Custom and set page size
to 3240px (W) x 2160px (H), and click Apply. OK, let’s get started.
STEP 1
Import the car image that we will use for this tutorial. The image file
photo-white-mustang.jpg will be located in the same directory as the
tutorial files. Or you can click here to download the image.
Xara will ask you to make a decision: Import Reduced or Import
Original. Select Import Original because we need the highest
resolution to ensure accuracy in the drawings we are about to make.
Use the Selector Tool (v) and select the white-mustang.jpg photo and
center it on the page. You can do this visually or select the photo and
use the Alignment menu to center the photo on the Page.
Open the Page & Layer Gallery (F10) and highlight Layer 1. Click the
Properties button, rename this layer Original Photo, and click OK.
Lock this layer so it does not move when we draw over the photo.
While the Page & Layer Gallery is still open, create a new layer by
clicking the New button and re-name this new layer Car Cut-Out —
TEMPLATE.
 STEP 2
In this step, we’ll create a very accurate vector image of the Mustang’s
body. I like to use the Shape Editor Tool (F4) to create this detailed car
body object. This vector shape is going to be the most important
shape because it's going to be used as a template (many times) for this
project. The more time you spend on this step, the better your final
image is going to look. So spend as much time as you feel it needs.
Select the Car Cut-Out — TEMPLATE layer. We’ll do our drawing on this
layer, using the white photo as our template. Be patient as this step is
going to take some time. We are going for accuracy, not speed.
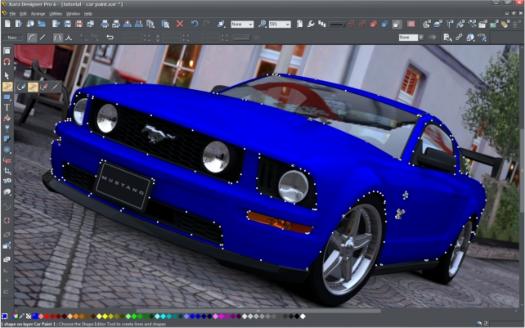
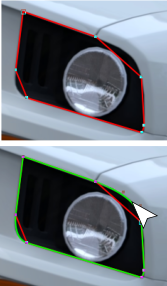
Note: Once the filled shape is created, I like to add a
Transparency (F6) (Flat -Stained glass @ 40% - 90%. In this case, I
picked 50% with the blue color) You'll need to be able to see the
car under the shape you are working on.
Note: The image above shows the blue shape with a Flat,
Transparency at 0% to show the solid shape.
The image below is in Outline view to show the outline shape and
my control points.
STEP 2
In this step, we’ll create a very accurate vector image of the Mustang’s
body. I like to use the Shape Editor Tool (F4) to create this detailed car
body object. This vector shape is going to be the most important
shape because it's going to be used as a template (many times) for this
project. The more time you spend on this step, the better your final
image is going to look. So spend as much time as you feel it needs.
Select the Car Cut-Out — TEMPLATE layer. We’ll do our drawing on this
layer, using the white photo as our template. Be patient as this step is
going to take some time. We are going for accuracy, not speed.
Note: Once the filled shape is created, I like to add a
Transparency (F6) (Flat -Stained glass @ 40% - 90%. In this case, I
picked 50% with the blue color) You'll need to be able to see the
car under the shape you are working on.
Note: The image above shows the blue shape with a Flat,
Transparency at 0% to show the solid shape.
The image below is in Outline view to show the outline shape and
my control points.
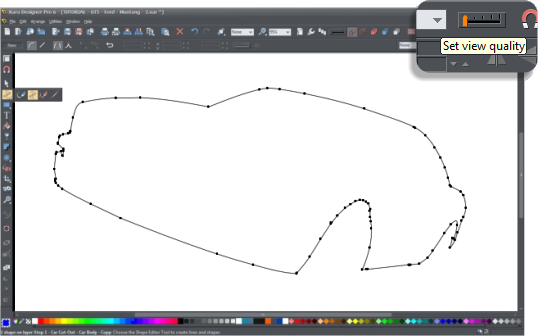 I draw with a series
of connected
straight lines from
point to point. I go
through and curve
the the line segments
to fit the shape by
dragging the lines
into curves with the
Shape Editor Tool.
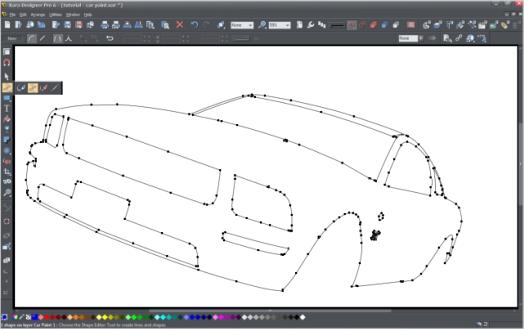
In the example above I made a single large shape. The solid shape now
needs relief cuts taken out of this shape for anything that isn't going to
be 'painted', like; the windows, plastic, rubber, carbon fiber, grill,
lights, license plates & emblems which you can see in the photos below.
Here’s the shape so far. All of the inside shapes (lights, grill opening,
etc.) have been removed from the solid shape using Arrange >
Combine Shapes > Subtract Shapes. Don’t be in a hurry. Make sure
your shape is as perfect as you can make it.
Here’s How First create the inside shape, the headlight for example,
then select the headlight shape and the car shape and with both shapes
selected, from the Arrange menu, select Combine Shapes > Subtract
Shapes. Repeat this step to remove the other openings as shown.
STEP 3
Now that you have the car cut-out shape as you like it, open the Page &
Layer Gallery and select the Car Cut-Out — TEMPLATE layer and lock
it by clicking the padlock icon. This layer will be used again later in the
project but for now we don’t want to disturb it.
Select the Car Cut-Out — TEMPLATE layer and press the Duplicate
button. Re-name the new layer Car Paint 1 and unlock this new layer.
The work we just did on Car Cut-Out — TEMPLATE is exactly what we
need for the layer Car Paint 1 layer and no other work needs to be
done to this layer at this time.
Create a Duplicate layer of Car Paint 1 and re-name this layer Car
Paint 2.
I draw with a series
of connected
straight lines from
point to point. I go
through and curve
the the line segments
to fit the shape by
dragging the lines
into curves with the
Shape Editor Tool.
In the example above I made a single large shape. The solid shape now
needs relief cuts taken out of this shape for anything that isn't going to
be 'painted', like; the windows, plastic, rubber, carbon fiber, grill,
lights, license plates & emblems which you can see in the photos below.
Here’s the shape so far. All of the inside shapes (lights, grill opening,
etc.) have been removed from the solid shape using Arrange >
Combine Shapes > Subtract Shapes. Don’t be in a hurry. Make sure
your shape is as perfect as you can make it.
Here’s How First create the inside shape, the headlight for example,
then select the headlight shape and the car shape and with both shapes
selected, from the Arrange menu, select Combine Shapes > Subtract
Shapes. Repeat this step to remove the other openings as shown.
STEP 3
Now that you have the car cut-out shape as you like it, open the Page &
Layer Gallery and select the Car Cut-Out — TEMPLATE layer and lock
it by clicking the padlock icon. This layer will be used again later in the
project but for now we don’t want to disturb it.
Select the Car Cut-Out — TEMPLATE layer and press the Duplicate
button. Re-name the new layer Car Paint 1 and unlock this new layer.
The work we just did on Car Cut-Out — TEMPLATE is exactly what we
need for the layer Car Paint 1 layer and no other work needs to be
done to this layer at this time.
Create a Duplicate layer of Car Paint 1 and re-name this layer Car
Paint 2.
 On the Car Paint 2 layer, use the Shape Editor Tool (F4) to make a
shape that will allow you cut just the roof from the shape. Don't be
afraid to go outside the shape to make the lines smooth. It should very
similar to the photos shown above.
Note: The critical areas are where the roof and the body meet.
These need to fit precisely.
TIP: When hand
tracing a bitmap
image disable
Snap to Objects
(the orange
magnet icon will
be in the up
position). This
gives you more
control when
hand tracing.
On the Car Paint 2 layer, use the Shape Editor Tool (F4) to make a
shape that will allow you cut just the roof from the shape. Don't be
afraid to go outside the shape to make the lines smooth. It should very
similar to the photos shown above.
Note: The critical areas are where the roof and the body meet.
These need to fit precisely.
TIP: When hand
tracing a bitmap
image disable
Snap to Objects
(the orange
magnet icon will
be in the up
position). This
gives you more
control when
hand tracing.
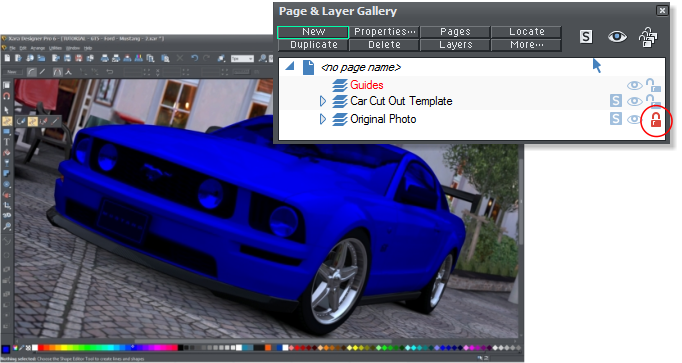 Click the
padlock
icon to lock
the layer
Click the
padlock
icon to lock
the layer
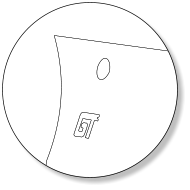
 Create new shapes
for the ellipse and the
GT and remove them
from the side panel
(Subtract Shapes)
Create new shapes
for the ellipse and the
GT and remove them
from the side panel
(Subtract Shapes)


